Hints and Tips on using the Walkabouts and the Walkabout Generator

If you leave the generator inactive of over 15 minutes you will lose any information you have entered. It can be refreshed without losing data by pressing the F5 key every now and then.
Generator entry fields
- Image details
- The directory structure (where to put your files)
- File path of the medium images
- File path of the small images
- File path of the large images
- File path of the icons
- File extension
- Starting image name
- Blank thumbnail name
- Name of file
- Title of walkabout
- Descriptive text
Walkabout
Image Details
In the top left box, under image name, enter the name of your first image. Do not include the file extension. All images names must start with a letter (not a number) and must not include spaces or punctuation.
Fill in the remaining 5 boxes on that row as appropriate with the names of the images that can be moved to from this point. Where there is no available image for a specified movement, simply leave the box blank.
Record any notes relating to the image in the image caption box. These will be displayed in the caption box when that image is displayed during the walkabout.
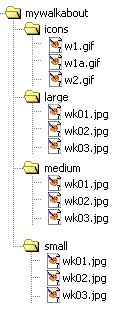
The directory structure (where to put your files)
|
This is an example of where you should put your files if you leave the default entries in the generator.
If you make your directory structure match this one (the images don't have to be wk... but should start with a letter) then you can leave the default entries for the file paths in the generator |
File path of the small, medium and large images
See the diagram above for an example of the structure of the image files. As you will notice all the different sizes of image have the same name but are located in the appropriate folder.
There are different ways of writing your image paths:
Relative or absolute paths.
A relative path is one which identifies a file or folder in relation to the position of the original file.
i.e. your walkabout is in the 'mywalkabout' folder and it references an image in the
'large' folder called wk01.jpg.
The relative path would be 'large\'
The advantage of this is that is simpler to work out. and it allows you to move the whole walkabout (including its subfolders).
The disadvantage would be that if you moved the images but not the walkabout you would also have to change the image path.
An absolute path comes from the root of the directory tree.
i.e. your walkabout is in a folder called 'mywalkabout' on the 'C' drive of your computer.
There is an image called 'wk01.jpg' in the 'large' folder. The 'large' folder is in the
'mywalkabout' folder.
The absolute path would be 'C:\mywalkabout\large\'
The advantage of this is that even if you move your walkabout to another folder it will always find the images.
The disadvantage is that it is more complicated to work out and if you move the whole mywalkabout folder
(including its subfolders) the walkabout would no longer find the images.
For a PC and for a web server.
Different computers use different notation to specify directory paths. As a general rule windows (PC's and Windows web servers) uses the back slash to delimit folder names and Unix (most other web servers) uses the forward slash
C:\mywalkabout\large\ for windows
or
/mywalkabout/large/ for unix
You need to include the trailing slash ('\' for your own PC and '/' for a web server)
File path of the icons
See the section on file paths above.
The icons can be downloaded on to your machine. Please see the Zipped Icons section for instructions on how to do this
File extension
This should be either GIF or JPG. Generally if your images are photographs they should be saved as JPGs. If they are line drawings then GIF would be more appropriate
Starting image name
This is the name of the first image in your walkabout. Do not include the file extension. All images names must start with a letter (not a number).
Blank thumbnail name
This should be a blank white image of the same proportions and size as your thumbnail images. Do not include the file extension. All images names must start with a letter (not a number).
Name of file
This will be the name of the file which contains your walkabout. Please do not include spaces or special characters
Title of walkabout
You could use the site or monument name as your title - this will appear at the top of the page on your walkabout.
Descriptive text
This will appear under the title and should be used to describe the location and any special characteristics of the walkabout.
Zipped Icons
All the icons that are needed for the navigation through the walkabout are included in one zip file.
If you do not have zip software or would just prefer to download the navigation images one by one, they are shown below.
To download the images right-click on the image and select 'Save picture as...' (Internet Explorer) or 'Save image as...' (Netscape) or 'Save image...' (Opera) and save the image into your icons directory. You will need to download both the bold and the 'greyed out' versions of each image. The borders will not appear in the walkabout.
![]()
![]()
![]()
![]()
![]()
![]()
![]()
![]()
![]()
![]()
![]()
![]()
![]()
The back button
The back button works by retracing your steps through the walkabout. However if you cross your path it will remove the loop from your steps (see images for further explanation).
|
The image on the left shows a path through a walkabout for this one the back button
would retrace your steps all the way from 7 back to 1, each image is representated by a circle.
Back button path: 6,5,4,3,2,1 |
| |
|
The image to the right shows the walkabout further on, a loop has been completed,
images 1 - 11 and then back to 4. As image 4 is reached again the loop is removed from the back sequence.
Back button path: 3,2,1 |