Corpus of Anglo-Saxon Stone Sculpture
Durham University, 2019. (updated 2020)
Data copyright © Durham University unless otherwise stated
This work is licensed under the ADS Terms of Use and Access.
Primary contact
Durham University
South Road
Durham
DH1 3LE
England
Resource identifiers
- ADS Collection: 351
Halton (St Wilfrid) 01, Lancashire
| Overview | ||
|---|---|---|
|
Object Type | Part of shaft [1] | Measurements | H. 115 cm (41 in); W. 39 cm (15.5 in); D. 38 cm (15 in) | Stone Type | Gritstone | Plate Numbers In Printed Volume | 464,465,466,467,468,469,470 | Corpus Volume Reference | 177-83 |
| See table below for more views or larger images available for this item. Click on the thumbnail images to preview larger images. | ||
| Images | |||
|---|---|---|---|
: see Fig. 20 for numbered key <br \> as a JPG image")
|
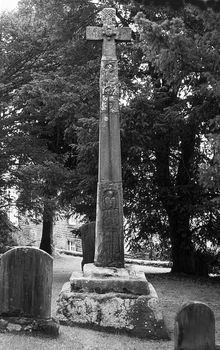
Halton St Wilfrid 1, 2, 8, 9 and 10, as presently reconstructed (W. face, nts): see Fig. 20 for numbered key (Plate no. 464) |
JPG | 347 Kb |

|
Halton St Wilfrid 1A (Plate no. 465) |
JPG | 1 Mb |

|
Halton St Wilfrid 1B (Plate no. 466) |
JPG | 1 Mb |

|
Halton St Wilfrid 1C (Plate no. 467) |
JPG | 1 Mb |

|
Halton St Wilfrid 1D (Plate no. 468) |
JPG | 1 Mb |
 <br \> as a JPG image")
|
Halton St Wilfrid 1A (nts) (Plate no. 469) |
JPG | 218 Kb |
 <br \> as a JPG image")
|
Halton St Wilfrid 1C (nts) (Plate no. 470) |
JPG | 231 Kb |
| National Grid Reference of Place of Discovery | ||
|---|---|---|
| SD499647 | ||
| Latitude | ||
| 54.075786 | ||
| Longitude | ||
| -2.767173 | ||
| Diocese | ||
| Blackburn | ||
| Present Location | ||
| In the churchyard to the south of the church, now lower part of a composite monument constructed in 1890/91 ((——) 1891a, 311; Calverley 1899a, 183). See Fig. 20 and Ill. 464. | ||
| Evidence for Discovery | ||
| ‘In the year 1635 the Rev. Richard Jackson, who was rector at that time, removed the upper part of the cross, so as to convert the remaining portion into a pedestal for a sundial, which purpose it still serves. The inscription on the sundial is, “For St. Wilfrid’s Church, Halton, 1635’” (Allen 1886, 330). The earliest surviving illustrations are those in Clark (c. 1811, fig. facing 124) and Whitaker (1823, II, fig. on 241) and in vol. VI, p. 40 of the Hibbert Ware MS dated December 1840. | ||
| Church Dedication | ||
| St Wilfrid | ||
| Present Condition | ||
| Worn in places, particularly on north face | ||
| Date | ||
| Tenth century | ||
| Earliest Date | ||
| 900 | ||
| Latest Date | ||
| 1000 | ||
| Geological Period | ||
| Carboniferous, Upper | ||
| Geological Group | ||
| Millstone Grit | ||
| Geological Formation | ||
| Pendleton Formation | ||
| Description | ||
| All faces have a bold cable moulding forming the lower border and are flanked vertically by a similar moulding. The junction between the west and north faces has not been dressed square; the 'bite' out of this corner is clearly original since it is respected by the decoration. A (broad, west): The surviving shaft carries a single panel, whose top is marked by a horizontal border consisting of pellets set within narrow horizontal mouldings. Below there are two scenes. In the upper section is an arched frame, with slab capitals, which is elaborately decorated by a row of pellets set within moulded borders. This frame encloses a large full-length, forward-facing, seated figure with a pellet set by his left ear. Running horizontally from below the hollowed ears is a moulding which turns at right angles to run alongside the frame down to the figure's elbows, terminating in a roundel. The facial features are well marked: a triangular head, short 'classical' hairstyle, large hollowed ears, eyes, nose and mouth. His arms are bent upwards above his knees and he is carrying a book in his left hand; there is a trace of a round brooch at the neckline. Flanking his legs are two squatting, possibly naked, figures seen in profile and facing inwards. The one visible arm of each of these subsidiary figures touches the hem of the main character's dress. Below is another arch, similarly with slab capitals and pellet decoration, whose curve acts as the lower boundary of the scene containing the seated figure. Within this lower arch is a tall-stemmed cross, with stepped base, flanked by two figures, heads turned inwards and with hair falling down the back of the head to the shoulders; they are clothed and stand, with inward-facing feet, on what appear to be either long-stemmed cups (chalices) or columns with cup-shaped capitals. With the one visible hand each figure reaches towards the cross-shaft, the man to the left grasping it. B (narrow, south): As on A, this face carries a single panel whose upper limit is marked by a horizontal border consisting of pellets set within framing narrow mouldings. The panel is divided into two areas of ornament, each defined by a flat arched frame (the upper with slab capitals), pellet decoration and separate bases. The upper arch contains a double column of knotwork, linked at the top, of half pattern A with a bar terminal to the left, and half pattern D to the right, whilst the lower contains a double scroll, whose stems emerge from the bottom corners of the panel to cross twice and thus form two medallions. At the bottom, between the stems and springing from the flat bar which links them, is a trefoil foliate form whilst to right and left is a vertical side-shoot ending in a pointed leaf. In the upper medallion the two curving stems fall inwards, crossing and re-crossing the side-shoots before producing a series of pendant scooped pellets. The lower medallion contains crossing shoots, one pair emerging from within the medallion, the other springing from below the lowest crossing of the main stems. There is a trefoil foliate motif at the top of the medallion and another leaf form to the right. To the left, between the arris edge and the upper stem crossing, is a veined pointed drop leaf with pellets at its base and a loose pellet above. To the right in similar position is a similar veined pointed leaf, pointing upwards, with scooped pellets below. C (broad, east): Like B, this face of the shaft is divided into two arched scenes, the lower arch carrying slab capitals and both panels having their own base; above is a horizontal border whose decorative details (if any) are unclear. The upper arched frame is further subdivided by a horizontal border whilst the lower arch is elaborately decorated by pellets set within narrow border mouldings. The uppermost scene shows five curving and intersecting boughs on which perch two birds; at the centre of the curves at the base is a vertical floriate stem. To the left of the scene below is a full-length profile figure, dressed in a short kirtle and stepping forward, whose right hand is raised so that his thumb is in his mouth. With his other hand he reaches towards a structure formed by three vertical stems, their lower parts plaited together, which support a flat surface on which are set ?three triangular forms. Below, in the lower arch, there is a seated profile figure in front of a two-legged table; he leans forward and raises a hammer. Below his high backed chair is a rectangular shape whilst there are two bellows, seen from above, set beneath the table; a hammer-like object is placed between them. On the table are pincers with a plane, seen in profile, above; its flat base curls at the ends. A further hammer is set above this. In the upper part of this scene are, reading from left to right: a sword with blade pointing upwards; pincers; and a headless clothed figure with a simple ring-encircled twist above him. D (narrow, north): Six panels survive on this face, though the division is not conventional. At the top are two complete and one partially surviving panel, framed laterally by a narrow inner border set within the bold cable-moulding border. These three scenes are divided from each other by horizontal mouldings. Partially surviving at the top, in the bottom left corner of panel (i), is the lower part of a zoomorphic ornament with an eared gaping-jawed beast biting the end of a strand; to the right is a terminal curl. Panel (ii) contains two inverted serpentine forms, their bodies locked around each other and with their heads in the lower corners; these heads have ears, round eyes, gaping jaws and curling nostrils. At the top of the panel the single rear legs and tails meet. Panel (iii) contains a prancing quadruped, facing left, with ears and tail; the neck and chest have contoured outlines. Below this, the ornamental organisation changes. (iv) To the left is a small blank square panel contained within its own narrow moulded border. (v) To the right is another smaller but very narrow panel, bordered to its right by the rope arris; its lower border is unclear. This contains a ring-encircled twist. Below the narrow panel the stone has been badly damaged. (vi) The remaining decoration respects this damage — thus showing that the loss of a working surface occurred before carving — and consists of a vertical run of half pattern A with a bar terminal to the left and a horizontal run of similar knotwork at the bottom; this latter stretches across the entire width of the cross. | ||
| Discussion | ||
| This much-discussed sculpture raises several important issues about chronology (see Chapter V, p. 39). As Collingwood (1927a, 159) recognised long ago, there was a strong element of copying of earlier Halton carvings present on this shaft, existing stones at the site being plundered for a range of motifs. Thus, like many Halton sculptures, the shaft is given cable-moulding borders and much of its ornament is set beneath arcades with slab capitals, or is separated by ornamental bands which are decorated with pellets (see Chapter IV, p. 21). The figural art also links to other Halton monuments: the seated figure on face A has a moulding outline which seems to represent an angular version of the wings attached to the haloed figures on Halton St Wilfrid 3, 5 and 9 — and the haloed winged zoomorphic symbols of no. 2 (Ills. 476–9, 483, 489, 499). (For discussion of this 'Halton outline moulding' see no. 2 below, p. 184.) The row of half pattern A knotwork on faces B and D is found again on Halton St Wilfrid 5 and 6 (Ills. 490, 493). The scrolls tell the same story of imitation. The type seen on face C is matched by Halton St Wilfrid 2 (Ills. 477, 479). Similarly the scroll on face B carries leaf and fruit forms which are familiar at Halton and in the Lune valley: the veined leaf with buds at the stem is found on Halton St Wilfrid 6, Gressingham 2 and Heysham 1 (Ills. 462, 492, 514–15), whilst the single fruit pellet, with hollowed centre, recurs on Heysham 1, Lancaster St Mary 3 and 8, and Lowther 1 (Ills. 514–15, 579–80, 596; Bailey and Cramp 1988, ill. 439 — see Fig. 11). The scroll-form itself on this face clearly derives from the double scrolls of Lancaster and Kendal, though the manner in which the main stem dominates the composition recalls the trellis types of Collingham 3 and Kirkby Wharfe 2 in Yorkshire (Coatsworth 2008, ills. 153, 436). The playful trefoil leaf has been discussed under Anderton 1 (pp. 162–3). Fortunately, given this strong Anglian tradition, there are some Viking-age markers. The four-legged animal within its own frame finds a parallel at Whalley 1 where the discussion notes the popularity of this beast type elsewhere in the Viking period (p. 244, Ill. 666). With its contoured outline it has a particularly close parallel at Kirby Hill in Yorkshire where, significantly, it again occurs in association with Sigurd iconography (Lang 2001, 133, ill. 359). The ring-encircled twist in the lower scene of face C is a typical ornamental motif of this period, and the panel with serpentine zoomorphic ornament on face D points to the same chronological conclusion: the eared heads and curled lips are familiar in Viking (and indeed earlier) art, and the general composition recalls the bird-headed serpents on the tenth-century cross from Aycliffe, Co. Durham (Cramp 1984, 42, pls. 7.25, 230.1302). The presence of scenes from the Sigurd legend further confirms this dating. The iconography of face A is puzzling (Ills. 465, 469). Figures by an empty cross can be cited on Viking-age carvings from Lancaster St Mary 5, Burton in Kendal in Westmorland, Kirkby Wharfe in Yorkshire, Lindisfarne in Northumberland and Hope in Derbyshire (Ill. 586; Bailey and Cramp 1988, ill. 180; Coatsworth 2008, ill. 440; Cramp 1984, pl. 191.1061; Routh 1937, pl. XVB), but none of them stand on columns or indeed any other form of pediment. No satisfactory explanation can be suggested for this feature: the closest analogy is provided by the Majestas page on fol. 1v of the Trier Gospels where an eagle appears to stand on two cup-like pedestals which are, however, equally inexplicable in their manuscript context (Alexander 1978, ill. 114; Netzer 1994, 107, 240). Even without the columns, there are problems in explaining the significance of the scene. Is it some form of symbolic crucifixion, as claimed for an analogous panel at Burton in Kendal 1 (Bailey and Cramp 1988, 82, ill. 180)? Or should it be seen as a version of the figure grasping a cross at the beginning of Psalm XVII, 1, in the Corbie Psalter (fol. 14r) which illustrates the text of the psalm: 'I will love you, O Lord, my strength' (Meehan 2000, 16)? Perhaps, as Rosemary Cramp has suggested to me, the entire composition is based upon a combination of metallic cross and flanking pedimented figures which were in the church. The scene above is equally problematic. The central figure seems, to judge by the manner in which the legs are handled, to be seated. It is therefore possible that the angular moulding over his shoulders, despite its resemblance to the 'outline moulding' wings of Halton St Wilfrid nos. 2, 3, 5 and 9, was intended to represent the chair or throne on which he is ensconced (compare the enthroned Gregory in the Metz Sacramentary — Mütherich and Gaehde 1977, pl. 32). If the figure was not winged, then there are seeming analogies to this Halton scene on shafts at Nunburnholme and York Minster 2 (Lang 1991, 55, 192, ills. 6, 727). These have a large central figure, flanked by smaller personages with bent legs, and appear, respectively, to have been intended as crucifixion and blessing scenes. In these examples however, as with the ivory relief from St Geroen in Cologne cited by Pattison (1973, 228, pl. LIa), the central figure — presumably Christ — has hands extended, not folded across his chest as at Halton. More relevant perhaps is a scene on the Durrow cross which shows a seated Christ with two smaller figures seated alongside him; he holds an open book on his knees which is touched by the flanking figures (Harbison 1992, iii, fig. 922). In a detailed analysis, Harbison has argued that this is a portrait of the raised Christ with Peter and Paul (ibid., i, 291–4). If, however, the same explanation is applicable to the Halton scene, then we must recognise that the usual attendant angels and apostolic attributes of keys and books seem to have been omitted (see Harbison 1992, iii, figs. 923–4). Given, however, the fact that a (less angular) outline moulding is present on other Halton crosses (nos. 2, 3, 5, 9), where it was clearly intended to represent wings, it is more likely that the central figure here is an angel rather than Christ (see discussion of the 'Halton outline moulding' under no. 2, p. 184). In that case it would be difficult to see this image without being reminded of Psalm XC, 3–4: 'He will overshadow you with his shoulders: and under his wings you shall trust', an iconography which is present in the initial letter to the Corbie Psalter's Magnificat (Hubert et al. 1969, pl. 209 — see also Psalm XLVI, 2). A similar image is known from Iona (Fisher 2001, 19, 134, fig. 27M). The two scenes on face C (Ills. 467, 470) have been much discussed since they were first recognised in 1891 by the Rev. W. S. Calverley as carrying Sigurd iconography. Subsequent discussion has further strengthened this initial identification, whilst also exploring the significance of its presence on this monument and the implications for dating (for general Sigurd discussions see March 1891; Kermode 1904; id. 1907, 55–9; Ellis 1942a; id. 1942b; Davidson, H. 1950; Ploss 1966; Blindheim 1973; Lang 1976; Bailey 1980, 116–22; Margeson 1980; id. 1983; Düwel 1986). The literary sources on which we depend for our knowledge of the events seemingly depicted at Halton survive in manuscripts written down no earlier than the thirteenth century, though it is clear that these texts embody much older traditions (for summary see Bailey 1980, 116; for mythological elements in poetry composed in England see Jesch 2001; id. 2004). The Insular distribution of Sigurd scenes embraces Halton and (possibly) Heysham in Lancashire, the Yorkshire sites of York Minster, Ripon and Kirby Hill, and the Isle of Man, together with a further possible, but essentially unrelated, example from Winchester (Lang 1976, fig. 4; id. 1991, ill. 145; id. 2001, ills. 356–9; Coatsworth 2008, ill. 662; Kermode 1907; Margeson 1983, 100–4; Tweddle et al. 1995, 314–22, ills. 642–9). What clearly emerges from this listing is the fact that, in many ways, this Halton scene is the least allusive of the Insular depictions. As on so many of the Scandinavian representations, the story is not set out in any logical sequential order. In this respect it presumably reflects the narrative art of the likely sources of such iconography, in the metalwork, fabrics, shield paintings or wood carvings of Scandinavia (for information on such sources, see Bailey 1980, 106; Margeson 1996, 50–1; Leahy and Patterson 2001, 192; North 2007). The Halton shaft follows the general Insular pattern in selecting a very narrow band of events from the Sigurd narrative, focusing on the heart-roasting, the subsequent ability to understand the language of birds and the consequent decapitation of Reginn. Unlike other depictions from the British Isles, however, here the forging of the magic sword also takes precedence whilst the actual killing of Fáfnir does not seem to make an appearance at all, unless it figured on part of the shaft which has now been lost. The specific elements in the scenes at Halton are best examined separately: (a) The birds in the tree. The bird element in the story makes its first literary appearance to the eleventh-century Fáfnismál (Margeson 1983, 104). In sculpture it is found again clearly only once in Insular art at Kirk Andreas on Man, though Lang has claimed a possible fragmentary appearance at York (Kermode 1907, pl. XLV; Lang 1976, 84). It is common in the Scandinavian depictions on examples like the Rasmus rock at Jäder or the Hylestad portals (Wilson and Klindt-Jensen 1966, pl. LXI (a); Blindheim 1965, pls. 197–9). (b) The thumb-sucking is common to almost all representations, occurring in Yorkshire at York Minster 34, Kirby Hill 2 and Ripon 4, on Man and in Scandinavia (Lang 1976, fig. 4; id. 1991, ill. 145; id. 2001, ill. 356; Coatsworth 2008, ill. 662; Margeson 1983, figs. 4, 5, ?6; Blindheim 1965, pls. 197–9; id. 1973, passim; for general discussion of the 'seer's thumb' see Davidson, H. 1989). The three slices of heart on a rod (if such the triangles are meant to be) seem to be a west Norse trait, according to Margeson's analysis (Margeson 1983, 104). This slicing is not apparent on the other English examples but is there at Andreas on Man (Margeson 1983, fig. 5). The complex interlace fire is not easily paralleled, though triangular flames occur elsewhere in representations of the scene. (c) The scene at the bottom of the shaft can, given the Sigurd iconography above, be reasonably interpreted as showing Reginn the smith preparing the sword with which his foster-son Sigurd would kill the dragon Fáfnir, guardian of a cursed treasure. The smith's plan was to kill Sigurd when he had completed his task but, warned by the birds whose language he miraculously understood thanks to the ingestion of the dragon's juices, Sigurd was able to kill Reginn first. The scene thus shows Reginn twice, once at work and once decapitated, alongside the completed sword (also shown in course of preparation). Other features include bellows, smith's tools of hammers, tongs and a plane; the ring-encircled figure-of-eight above could represent Fáfnir. Analogous complete smithy scenes are known from Scandinavia: the smith with his bellows, hammer and tongs appears on the eleventh-century rock carvings at Jäder and Gök and on twelfth-century Norwegian church portals (Blindheim 1965, pls. 197–9; id. 1973, passim; Margeson 1980, 196–207; Wilson and Klindt-Jensen 1966, pl. LXI). But, apart from Halton, they are not well evidenced in Insular contexts. It is, admittedly, just possible that a scene on a carving from Iona may have Sigurd links (Fisher 2001, 135, fig. on 134) but otherwise this weapon-preparation part of the narrative is only depicted allusively in the British Isles. Thus Ramsey has a scattering of bellows, tongs and hammer whilst Kirby Hill 2 carries a crudely-cut anvil (Margeson 1983, fig. 6; Lang 2001, 130, ill. 356). The headless Reginn, a decapitation tradition which is recorded in the Edda poem Fáfnismál, appears again in Insular art at both Kirby Hill and York Minster, and on the Swedish rock carvings but, apparently, not in that form on the twelfth-century Norwegian portals (Lang 1991, ill. 145; id. 2001, ill. 356). The stress on the sword at Halton finds its Insular echo in the ownerless weapon thrust through the dragon's body at Kirby Hill 9 — a theme also portrayed in Scandinavia (Lang 2001, fig. 9, ill. 358; Margeson 1980, fig. 14) (d) It is possible that decorative elements on face D are part of the same story. Lang (2001, 133) suggested that the horse is Grani, the animal on which Sigurd packed the treasure and which appears fully integrated into Insular Sigurd scenes at Kirk Andreas, Ramsey and York Minster 34 (Margeson 1983, 100–1, figs. 5, 6; Lang 1991, 71, ill. 145). This proposal has some justification for there are similar beasts, set separately from the rest of the Sigurd scenes, on the Malew cross and, as we have seen, at Kirby Hill in association with clear Sigurd iconography (Margeson 1983, fig. 4; Lang 2001, ill. 359). If this were accepted then the serpentine ornament on that same northern face at Halton might be a depiction of Fáfnir; the dual form would not necessarily be an argument against this identification because there are two such monsters in the seeming Sigurd scenes at both York Minster and on the Rasmus rock, Jäder (Lang 1991, ill. 147; Wilson and Klindt-Jensen 1966, pl. LXI). The potential significance of these Sigurd scenes on a Christian cross has been summarised by Bailey (1980, 122–5). It is important, first, to stress that there was clearly nothing inherently 'heathen' about this story: the eleventh-century rock carving from Jäder carries an inscription recording the building of a bridge for the salvation of a man's soul, whilst the Sigurd narrative on the contemporary Härad rock is woven around a cross — and the scene is popular on twelfth-century Norwegian church portals. Collingwood originally suggested that the selection of this iconography might relate to the eleventh-century Earl Tostig and his ancestry claims in England (Calverley 1899a, 195–7). Given what we now know about the English distribution of these scenes this appears unlikely. More plausible would be some reference to the dynasty of the Hiberno-Norse kings of York whose dynastic names frequently include the Volsung names of Sigurd or Sigfryth (Smyth 1975, 26–7); such a dynastic reference found favour with Biddle in his interpretation of the Winchester frieze (Tweddle et al. 1995, 317–21). Yet another explanation draws attention to potential parallels between the Sigurd story and Christian narrative in their common themes of a mystic meal which confers perception — and the parallels with the notions of Christ and the Christian struggling with evil in a serpent-like form (Lang 1976, 89, 94; Bailey 1980, 124–5; see also Bugge 1953, 36). Whilst these all provide possible explanations, I remain convinced by the case I proposed many years ago: that the reference to Sigurd is an assertion of the prestige of the man commemorated by this stone (Bailey 1980, 122–5). That assertion is expressed in Scandinavian-based imagery which might be compared to the 'cultural paganism' which can be traced in the skaldic verse emerging from the court of King Cnut at a later date (Frank 1994; Townend 2001; Jesch 2004). The Anglo-Saxon poet of Beowulf uses the figure of Sigemund (Sigurd's father to whom the dragon-killing may originally have been attributed) to emphasise the nobility and bravery of Beowulf by setting him alongside a famous hero of old (lines 867–900). The same type of 'tribute by association' can be found in the fragmentary poem Eríksmál where Erik Bloodaxe is paid an extraordinary compliment by Odin when he sends Sigmundr and Sinfjøtli, two members of the Volsung family, as emissaries to welcome him into Valhalla. In a similar vein a story about the eleventh-century saint Olaf describes a poet composing verses in his honour which all use a refrain based upon the Sigurd narrative. Invoking the story of Sigurd clearly honoured the dead, and in Olaf's case, the living also. Seen in this light, two faces of the cross-shaft are concerned with allusive statements of the heroic stature of the deceased, whilst the other two (with their vine-scroll, cross and angelic protection) are centred on the assurance of the Christian faith. The date of the carving was placed in the early eleventh century by both Collingwood and Margeson, in part because of the proposed association with Tostig (Collingwood 1927a, 162; Margeson 1983, 101). I see no need to set it in such a late context. The degree of copying of immediately local monuments, which would be possible at any period, clearly confuses the issue, but the formal resemblances to late Anglian work at the site would argue for a tenth-century date — and probably early within that century. | ||
| References | ||
| Clark 1811, 124, fig. facing 124; Whitaker 1823, II, 214, 241, fig. on 241; Baines 1831–6, IV, 585; Baines 1868–70, II, 607–8; Allen and Browne 1885, 355; Allen 1886, 330–5, fig. facing 334; Browne 1887a, 8–10, pl. IV, figs. 1–3, 7; Jackson 1889, 33; (——) 1891a, 311; March 1891, 62–4, pls. IV–VII; Allen 1894, 22–3, pl. X; Allen 1895, 135, 157, 162, fig. on 158; Calverley 1895, 119, 122, 123; Harrison 1896, 4; Calverley 1899a, 183–97, fig. facing 186; Howarth 1899, 21; Roper 1900, 66; Collingwood 1903a, 388; Taylor, H. 1903, 78–87, pls. facing 78, 87; Garstang 1906, 266–7, pl. facing 266; Taylor, H. 1906, 180, 370–9, pls. facing 370 and 379; Collingwood 1906–7, 139–41, fig. 31; Collingwood 1907a, 294; Kermode 1907, 173, fig. 55; Collingwood 1909, 152; Ditchfield 1909, 118, pl. facing 116; Collingwood 1912b, 32; Farrer and Brownbill 1914, 119; Collingwood 1915, 137, 214–5; Collingwood 1916–18, 50, fig. 35; Parker and Collingwood 1917, 105, 106, fig. facing 106; (——) 1923, 287; Collingwood 1927a, 73, 159–62, fig. 191; Collingwood 1932, 53; Shetelig 1933, 228; Brown, G. 1937, 232–3, pls. LXXVII, LXXVIII; Routh 1937, 22; Kendrick 1941b, 5–7, pl. II; Ellis 1942a, 220–1, 224, 227–8, 234, fig. 4; Ellis 1942b, 88, fig. on 88; Wainwright 1945–6, 103; Tupling 1948, 9; Kendrick 1949, 58–9, pl. XLII; Davidson, H. 1950, 125, 126, 128, 134; Ploss 1966, 90, 96, pl. 4; Davidson, H. 1967, 126, 127, 200–1, pl. 56; Pevsner 1969b, 16, 136; Bagley 1970, 12, pl. facing 16; Meaney 1970, 119; Taylor, H. M. 1970d, 287–8; Becker 1973, 222, fig. VX (b); Blindheim 1973, 16, 29, fig. 14; Pattison 1973, 226, 228, 230–1; Lang 1974b, 13, 15, 21, 23; Lang 1976, 86–7, 90; Lang 1977, 88–9; Cramp 1978a, 11; Edwards, B. 1978a, 60; Henderson, I. 1978, 57; Coatsworth 1979, I, 33–4, 36, 40, II, 24, pl. 3; Smyth 1979, 271; Bailey 1980, 102, 120, 122, 240, fig. 15; Margeson 1980, 189–90, fig. 6; Bailey 1981, 86; Cramp 1982, 17; Margeson 1983, 101; Wilson, D. M. 1983, 181, 185; Bailey 1984, 15; Wilson, D. M. 1984, 149; Düwel 1986, 240, 243, 244, 249, 250, 263, fig. 13; Bailey and Cramp 1988, 82; Ohlgren 1988, 173; Lang 1990a, 14; Kenyon 1991, 121; Lang 1991, 37, 71, 72; Richards, J. 1991, 82; Edwards, B. 1992, 58; Higham, N. 1993a, 198; Bailey 1994, 117; Wilson, D. M. 1995, 45; Bailey 1996a, 92, fig. 47; Bailey 1996b, 28–9; Newman, R. M. 1996, 98, pls. on 96, 97; Hadley 1997, 213; Edwards, B. 1998, 74–6, fig. 36; Noble 1999, 16, fig. 20; Bailey 2000b, 17; Lang 2001, 130, 133; McKinnell 2001, 328, 344; Potts and Shirras 2002b, 9; Bailey 2003, 221; Higham, N. 2004a, 27, pl. 4; Blair 2005, 322, fig. 36; Salter 2005, 41, pl. on 41; Newman, R. M. 2006, 104; Fuglesang 2007, 212; Newman and Brennand 2007, fig. 4.8; Coatsworth 2008, 61, 95, 186, ill. 869 | ||
| Endnotes | ||
| [1] The following are general references to the Halton stones: Allen 1894, 4, 8; Taylor, H. 1898, 42; Ditchfield 1909, 118–19; Curwen 1925, 30; Fellows-Jensen 1985, 402, 405; Noble 1999, 16; Blair 2005, 216, 309, 310, 463; Newman, R. M. 2006, 102. The following are unpublished manuscript references: BL Add. MS 37550, items 602–13, 735; BL Add. MS 37551, items 66–71; Manchester Public Library, Hibbert Ware S. MSS: Msf 091 H21, vol. 5, 38; ibid., vol. 6, 40. | ||
| Subjects | ||
|---|---|---|
| Monument Form: Standing Monument | ||
| Monument Type: Cross | ||
| Monument Feature: Animal, Human Figure, Plant, Shaft | ||
| Monument Period (MIDAS term): Early Medieval | ||
| Horizon: Post 920, Pre 920 | ||