The Evolution of Dere Street from Routeway to Motorway: Evidence from the Dishforth to Barton A1 Motorway Improvements Digital Monograph, 2021
Northern Archaeological Associates, 2021. https://doi.org/10.5284/1090391. How to cite using this DOI
Data copyright © Northern Archaeological Associates unless otherwise stated
This work is licensed under a Creative Commons Attribution 4.0 International License.

Primary contact
Northern Archaeological Associates
Marwood House
Harmire Enterprise Park
Barnard Castle
Co. Durham
DL12 8BN
Tel: 01833 690 800
Resource identifiers
- ADS Collection: 4155
- DOI:https://doi.org/10.5284/1090391
- How to cite using this DOI
Downloads
Monograph | Figures
|
Title: Figures metadata Filename: A1L2B_DS_Figures_metadata.csv (38 kB) |
CSV |
Info
Download |
|
Files

|
Title: Front cover Filename: DS_cover_front.jpg (1 MB) |
JPG |
Info
Download |

|
Title: Figure 1: location of the A1 scheme route through the Vales of York and Mowbray. Filename: DS_Fig-001.jpg (1 MB) |
JPG |
Info
Download |

|
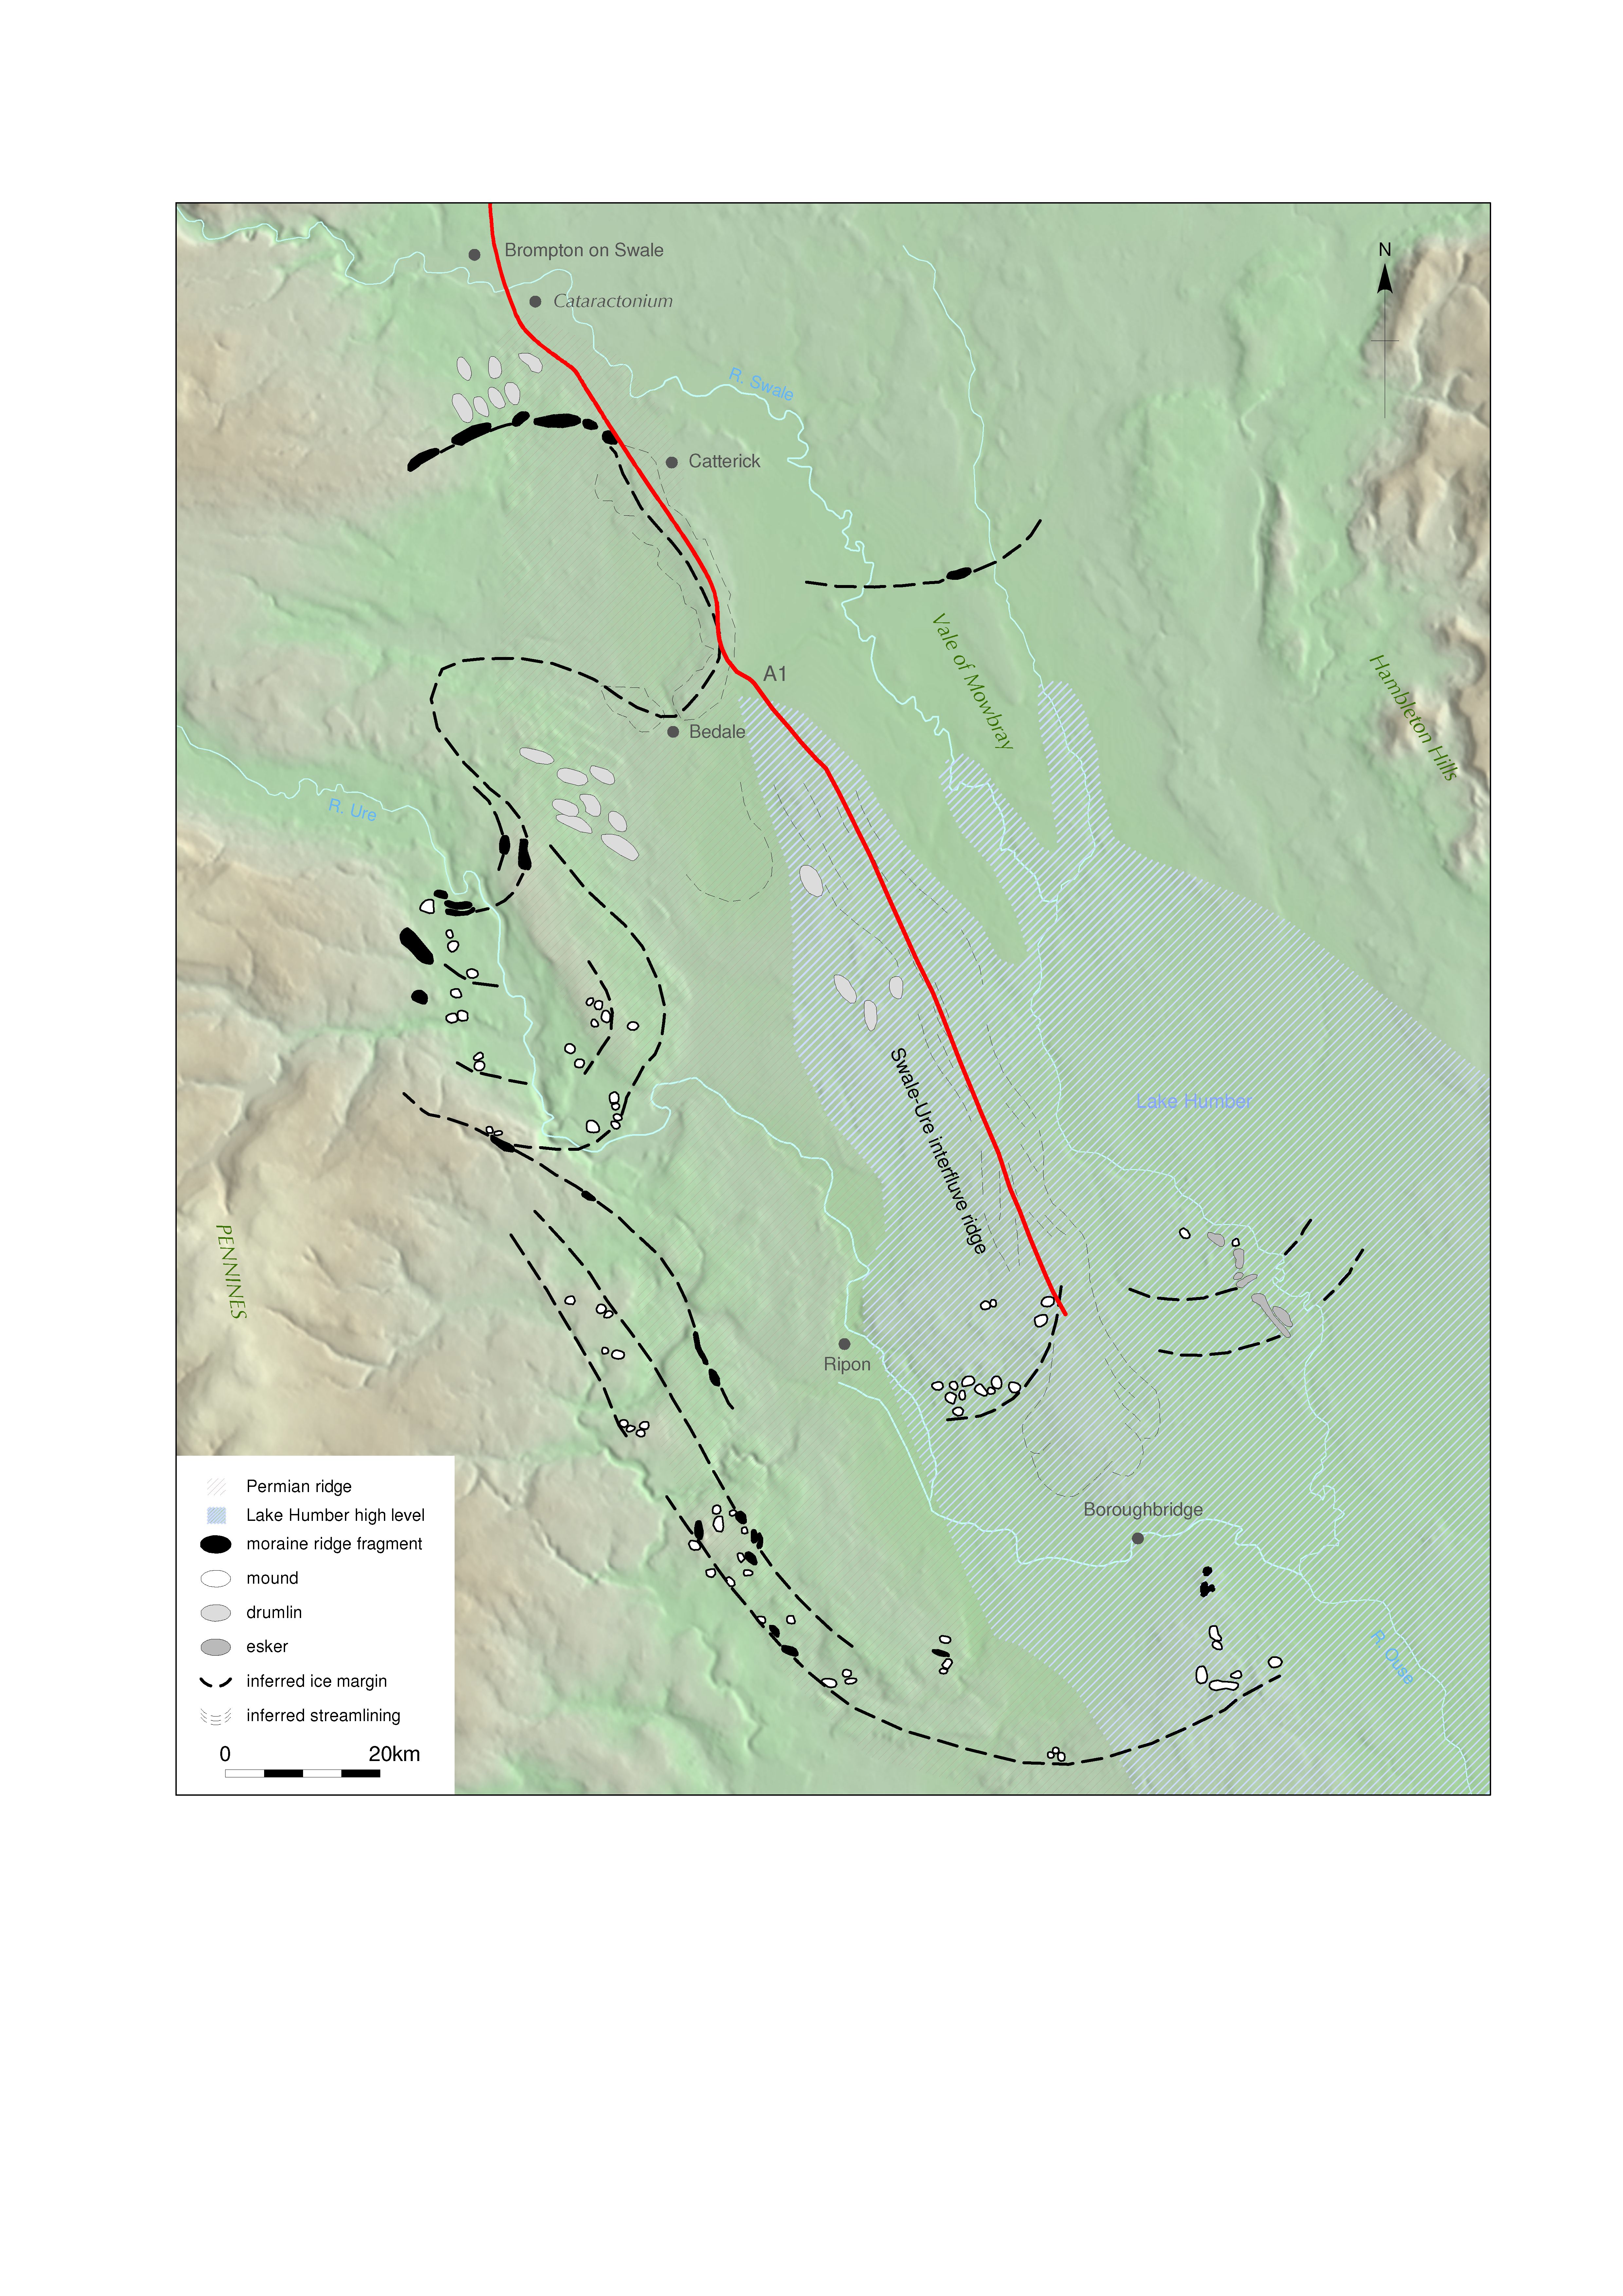
Title: Figure 2: large scale view of primary topographic features in the Vales of York and Mowbray. Filename: DS_Fig-002.jpg (1 MB) |
JPG |
Info
Download |

|
Title: Figure 3: detailed view of primary topographic features in the Vales of York and Mowbray. Filename: DS_Fig-003.jpg (2 MB) |
JPG |
Info
Download |
 and across the Vale of Mowbray towards the North York Moors. as a JPG image")
|
Title: Figure 4: eastwards view from the Swale-Ure interfluve ridge down to the A1(M) and across the Vale of Mowbray towards the North York Moors. Filename: DS_Fig-004.jpg (1 MB) |
JPG |
Info
Download |

|
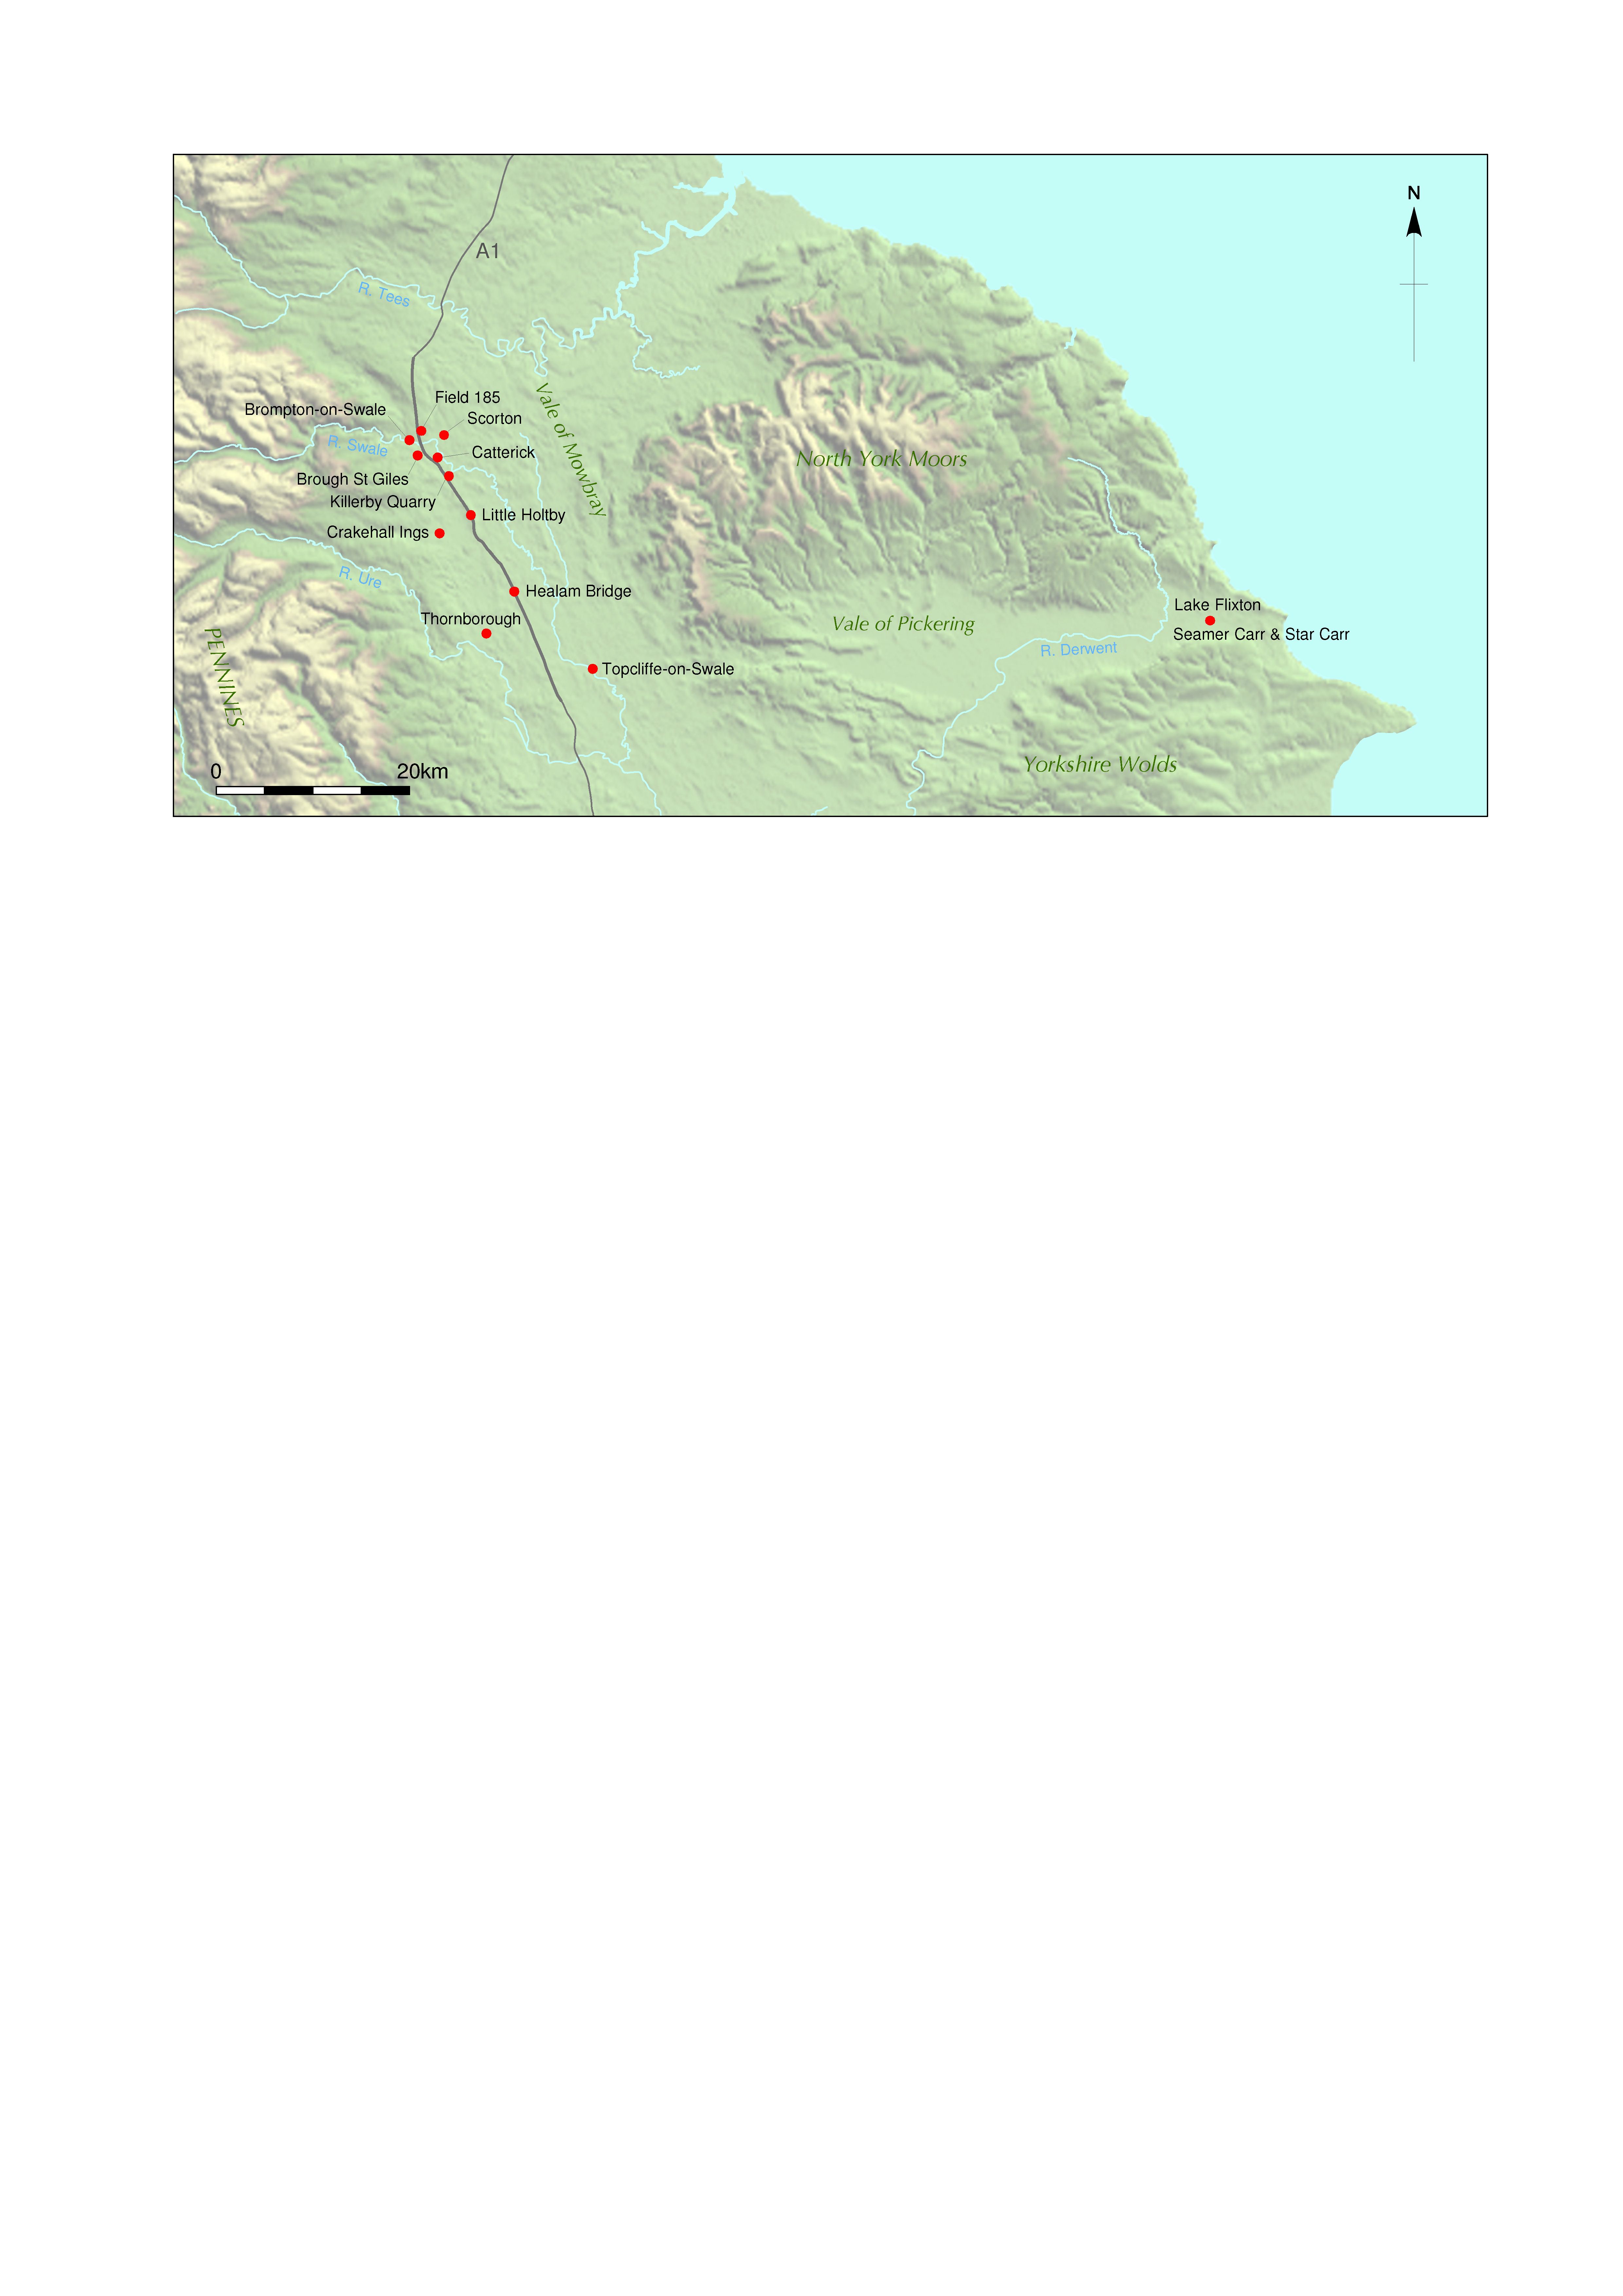
Title: Figure 5: locations of sites mentioned in the Late Upper Palaeolithic section. Filename: DS_Fig-005.jpg (990 kB) |
JPG |
Info
Download |

|
Title: Figure 6: locations of sites mentioned in the earlier Mesolithic section. Filename: DS_Fig-006.jpg (1 MB) |
JPG |
Info
Download |

|
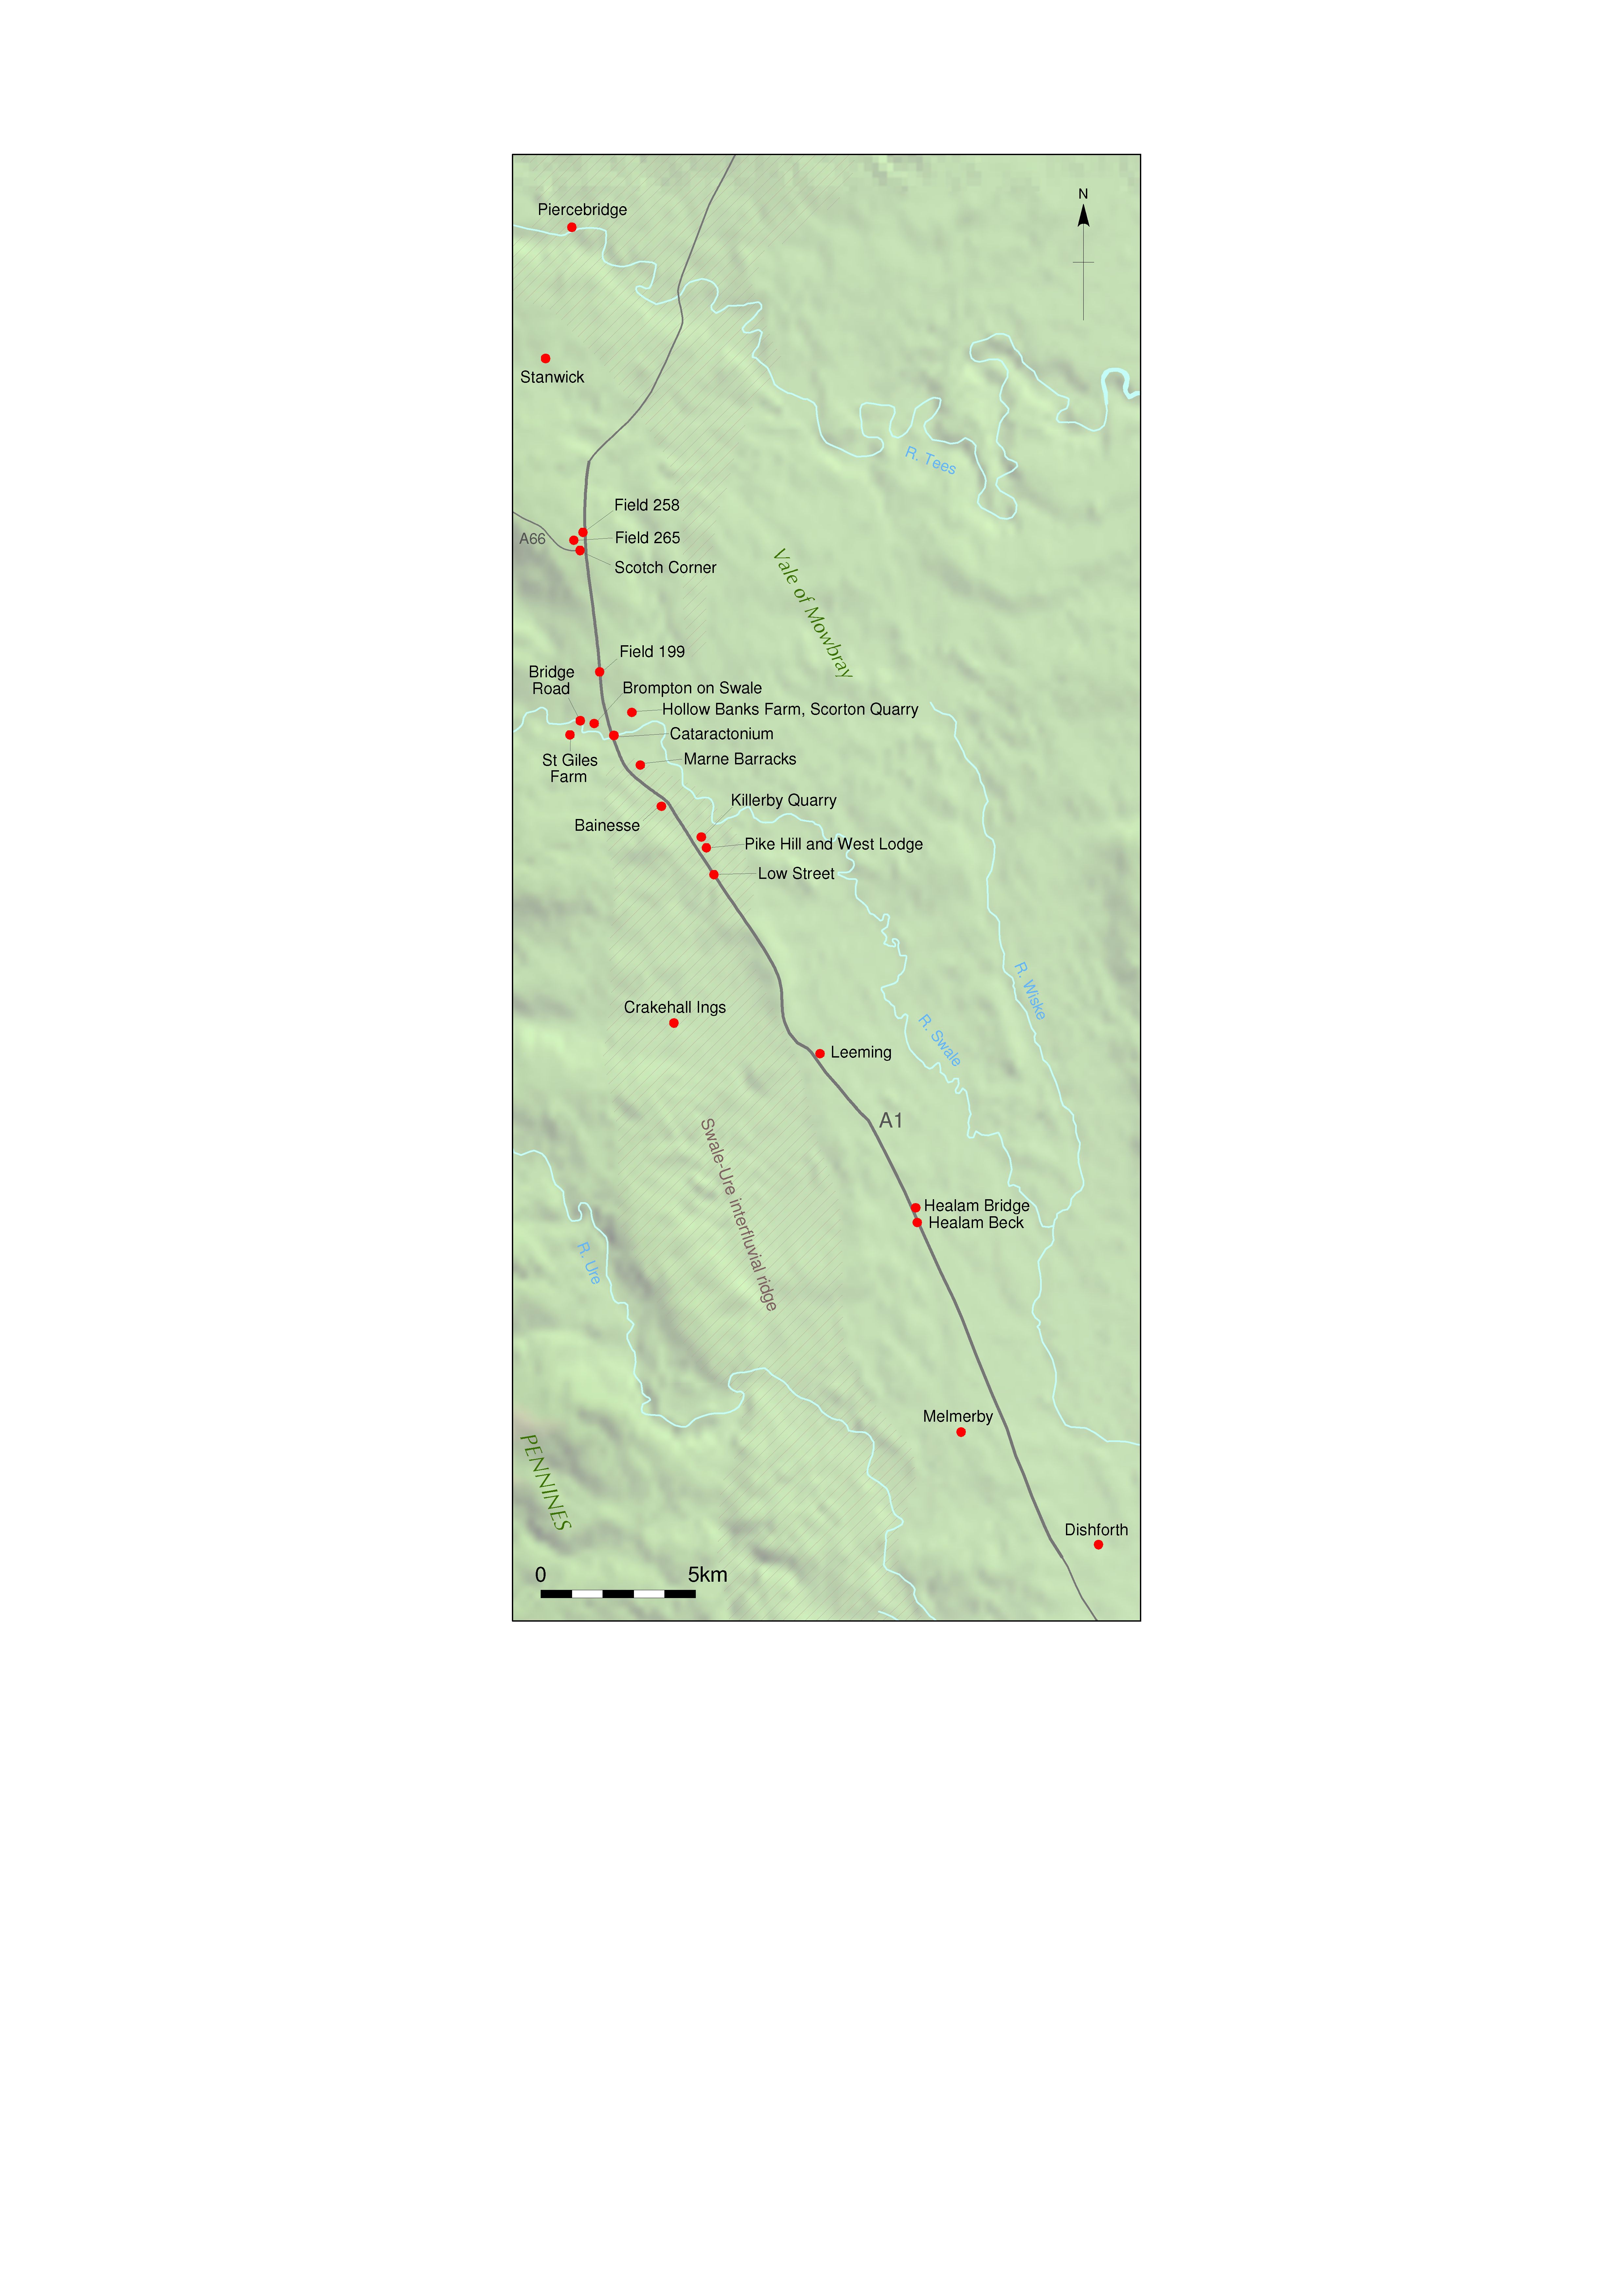
Title: Figure 7: locations of sites mentioned in the later Mesolithic section. Filename: DS_Fig-007.jpg (1 MB) |
JPG |
Info
Download |

|
Title: Figure 8: locations of sites mentioned in the earlier and Middle Neolithic section. Filename: DS_Fig-008.jpg (907 kB) |
JPG |
Info
Download |

|
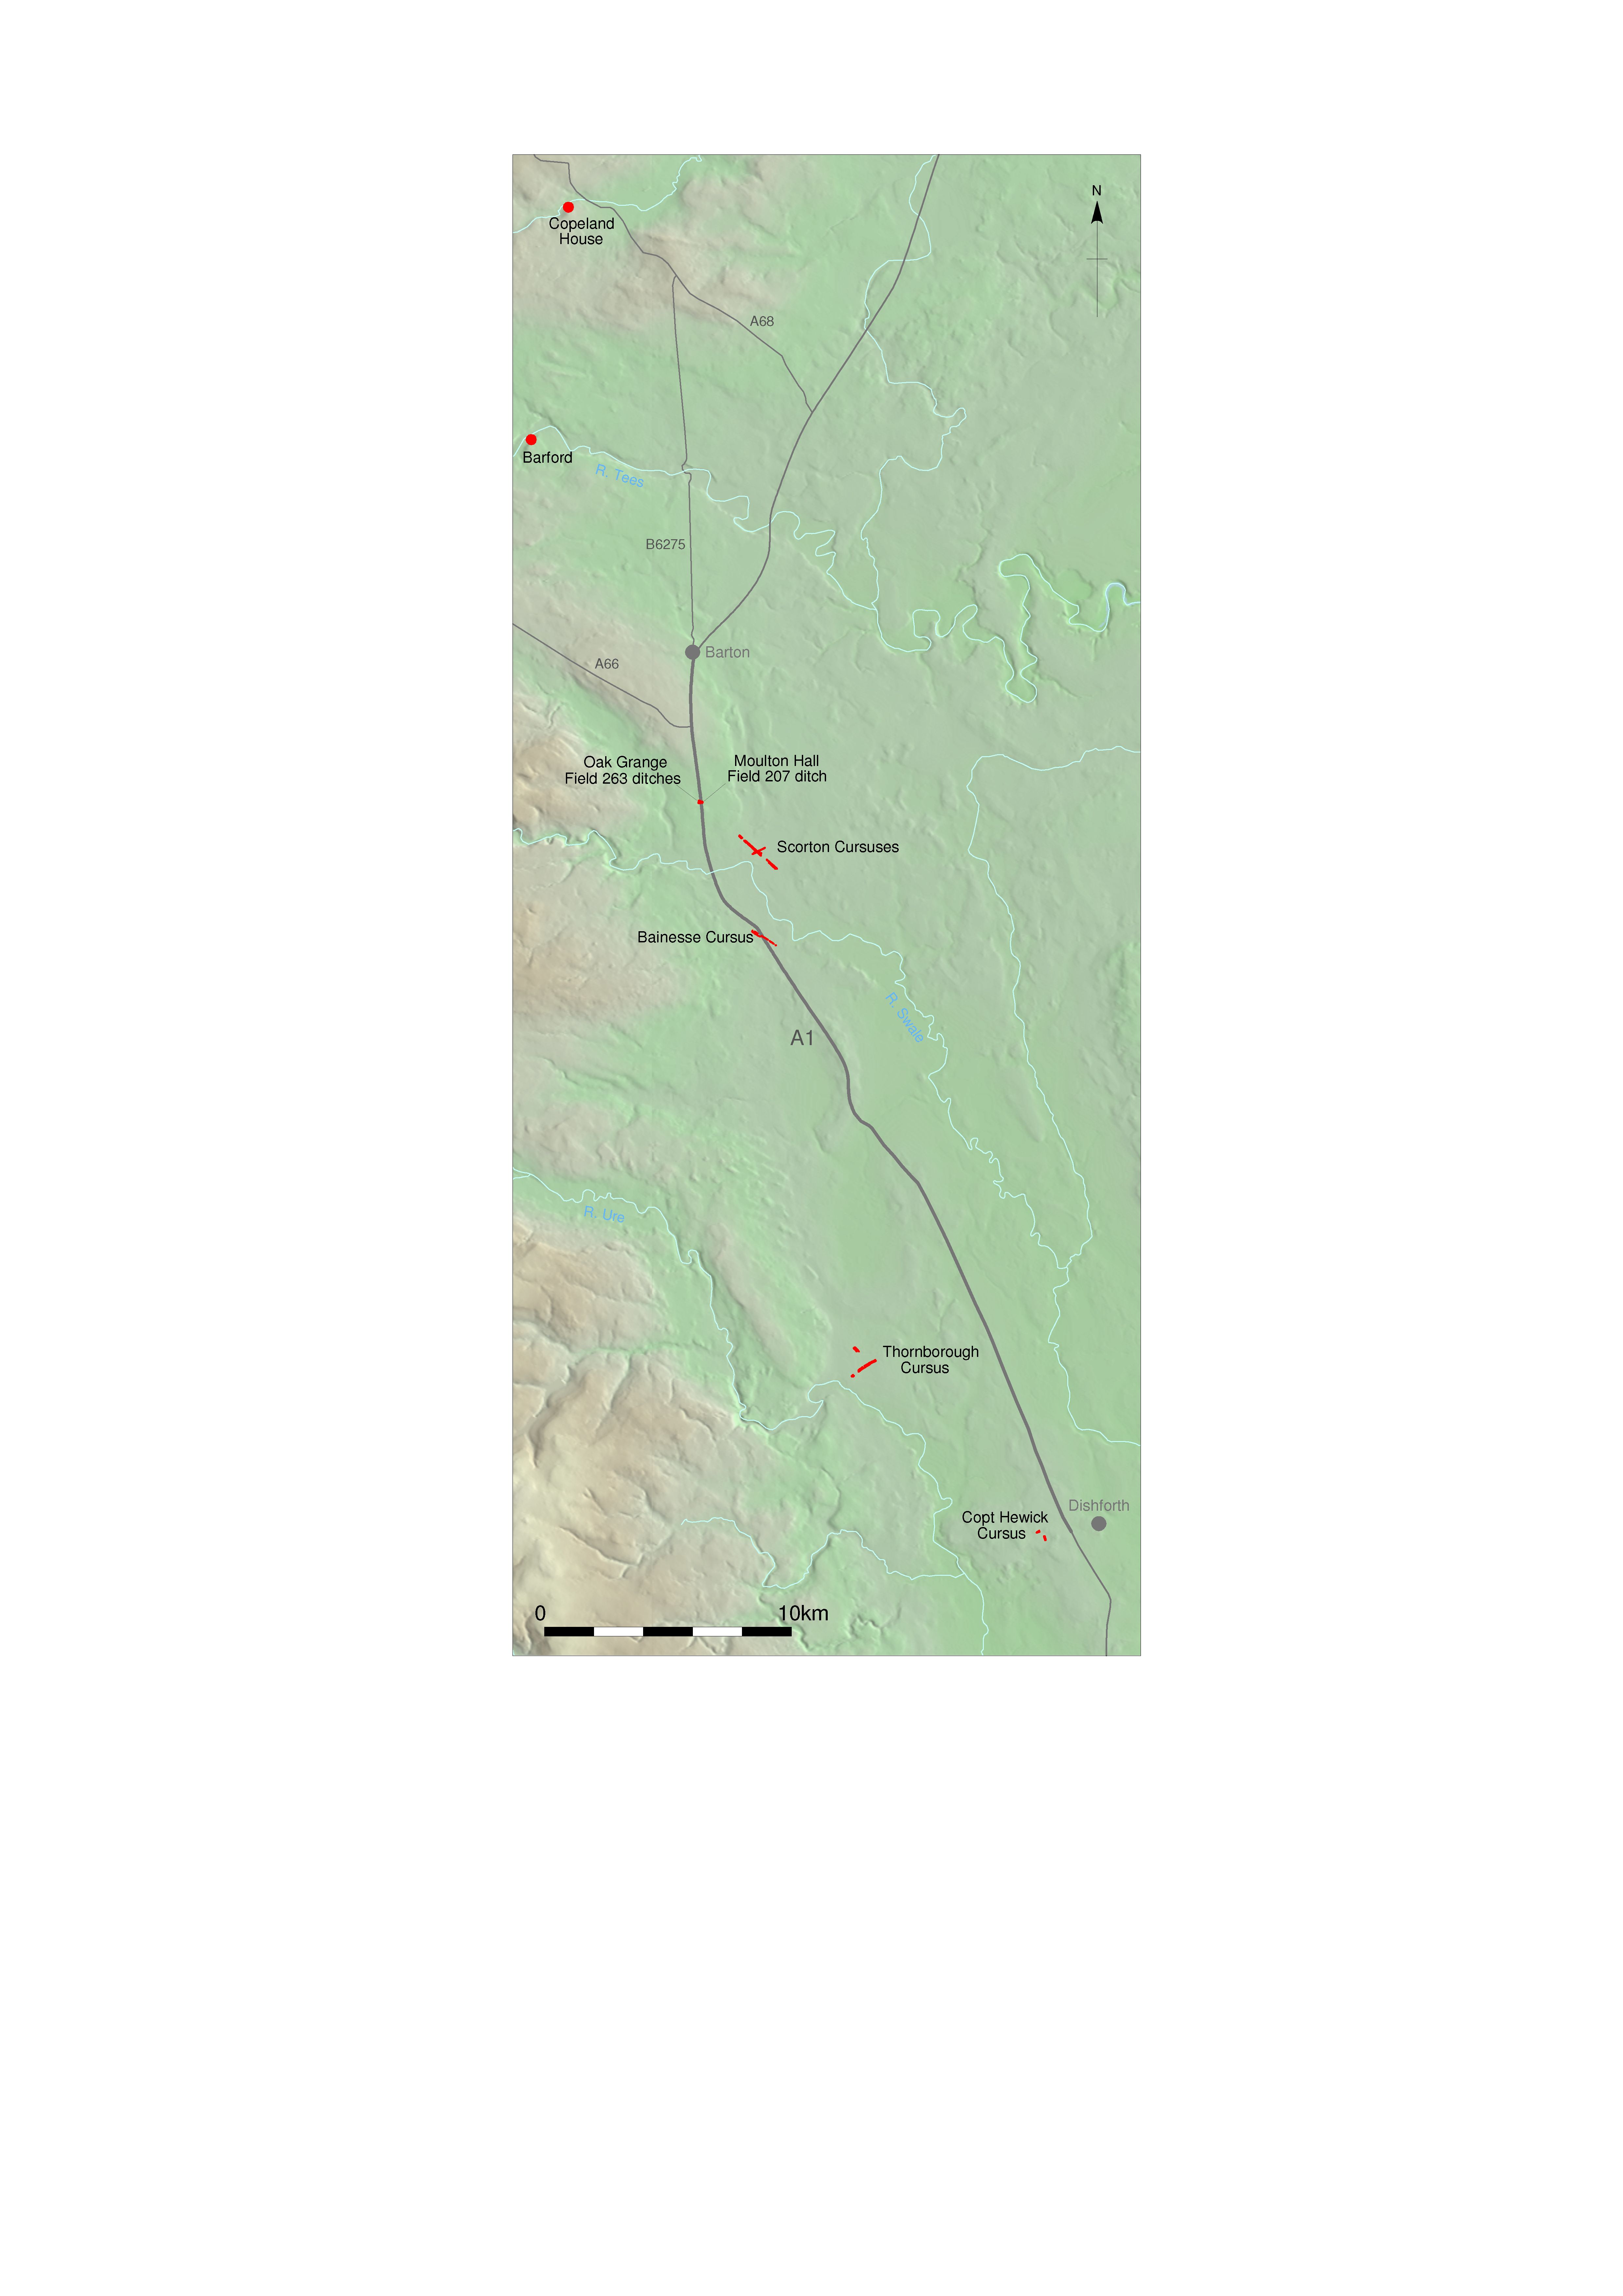
Title: Figure 9: known and possible cursuses along and near the A1 scheme route. Filename: DS_Fig-009.jpg (976 kB) |
JPG |
Info
Download |

|
Title: Figure 10: locations of sites mentioned in the later Neolithic and earlier Bronze Age section. Filename: DS_Fig-010.jpg (1 MB) |
JPG |
Info
Download |

|
Title: Figure 11: Neolithic Class II henge locations showing axial alignments of their paired entrances and alignment of the Devil’s Arrows. Filename: DS_Fig-011.jpg (1 MB) |
JPG |
Info
Download |
 (Google Earth 2002). as a JPG image")
|
Title: Figure 12: opposing entrances at Cana Barn and Hutton Moor Class II henges sharing approximate alignments with Dere Street and the A1(M) (Google Earth 2002). Filename: DS_Fig-012.jpg (198 kB) |
JPG |
Info
Download |
 as a JPG image")
|
Title: Figure 13: aligned entrances through the central and southern Class II henges at Thornborough (courtesy of www.swiftdrones.co.uk.) Filename: DS_Fig-013.jpg (1 MB) |
JPG |
Info
Download |

|
Title: Figure 14: two of the remaining Devil’s Arrows leading to a crossing point of the River Ure. Filename: DS_Fig-014.jpg (1 MB) |
JPG |
Info
Download |
 and parallel local access road. as a JPG image")
|
Title: Figure 15: a round barrow at Sand Hill on the Leeming moraine beside the A1(M) and parallel local access road. Filename: DS_Fig-015.jpg (538 kB) |
JPG |
Info
Download |

|
Title: Figure 16: locations of sites mentioned in the later Bronze Age to Late Iron Age section. Filename: DS_Fig-016.jpg (829 kB) |
JPG |
Info
Download |
 from Low Street flyover showing the undulating character of the Leeming moraine as it descends towards Killerby and the River Swale. as a JPG image")
|
Title: Figure 17: northward view along the A1(M) from Low Street flyover showing the undulating character of the Leeming moraine as it descends towards Killerby and the River Swale. Filename: DS_Fig-017.jpg (1 MB) |
JPG |
Info
Download |
 between Brompton-on-Swale and Scotch Corner, and others radiating from Scotch Corner and Stanwick. as a JPG image")
|
Title: Figure 18: Middle and Late Iron Age routeway (RW1) between Brompton-on-Swale and Scotch Corner, and others radiating from Scotch Corner and Stanwick. Filename: DS_Fig-018.jpg (1 MB) |
JPG |
Info
Download |

|
Title: Figure 19: locations of sites mentioned in the Late Pre-Roman Iron Age section. Filename: DS_Fig-019.jpg (829 kB) |
JPG |
Info
Download |
 in A1 scheme Field 265 beneath the Roman road junction at Scotch Corner. as a JPG image")
|
Title: Figure 20: conjoining hollow-ways (RW2 and RW3) in A1 scheme Field 265 beneath the Roman road junction at Scotch Corner. Filename: DS_Fig-020.jpg (1 MB) |
JPG |
Info
Download |
 at Selgarth Farm, representing the precursor of Dere Street. as a JPG image")
|
Title: Figure 21: pre-Roman aggregate hollow-way (RW1) at Selgarth Farm, representing the precursor of Dere Street. Filename: DS_Fig-021.jpg (1 MB) |
JPG |
Info
Download |

|
Title: Figure 22: major cropmarks and geophysical anomalies between Dishforth and Leeming Bar. Filename: DS_Fig-022.jpg (1 MB) |
JPG |
Info
Download |
 showing the Roman road network and relevant Roman settlements (Margary numbers and Iters I, II and V). as a JPG image")
|
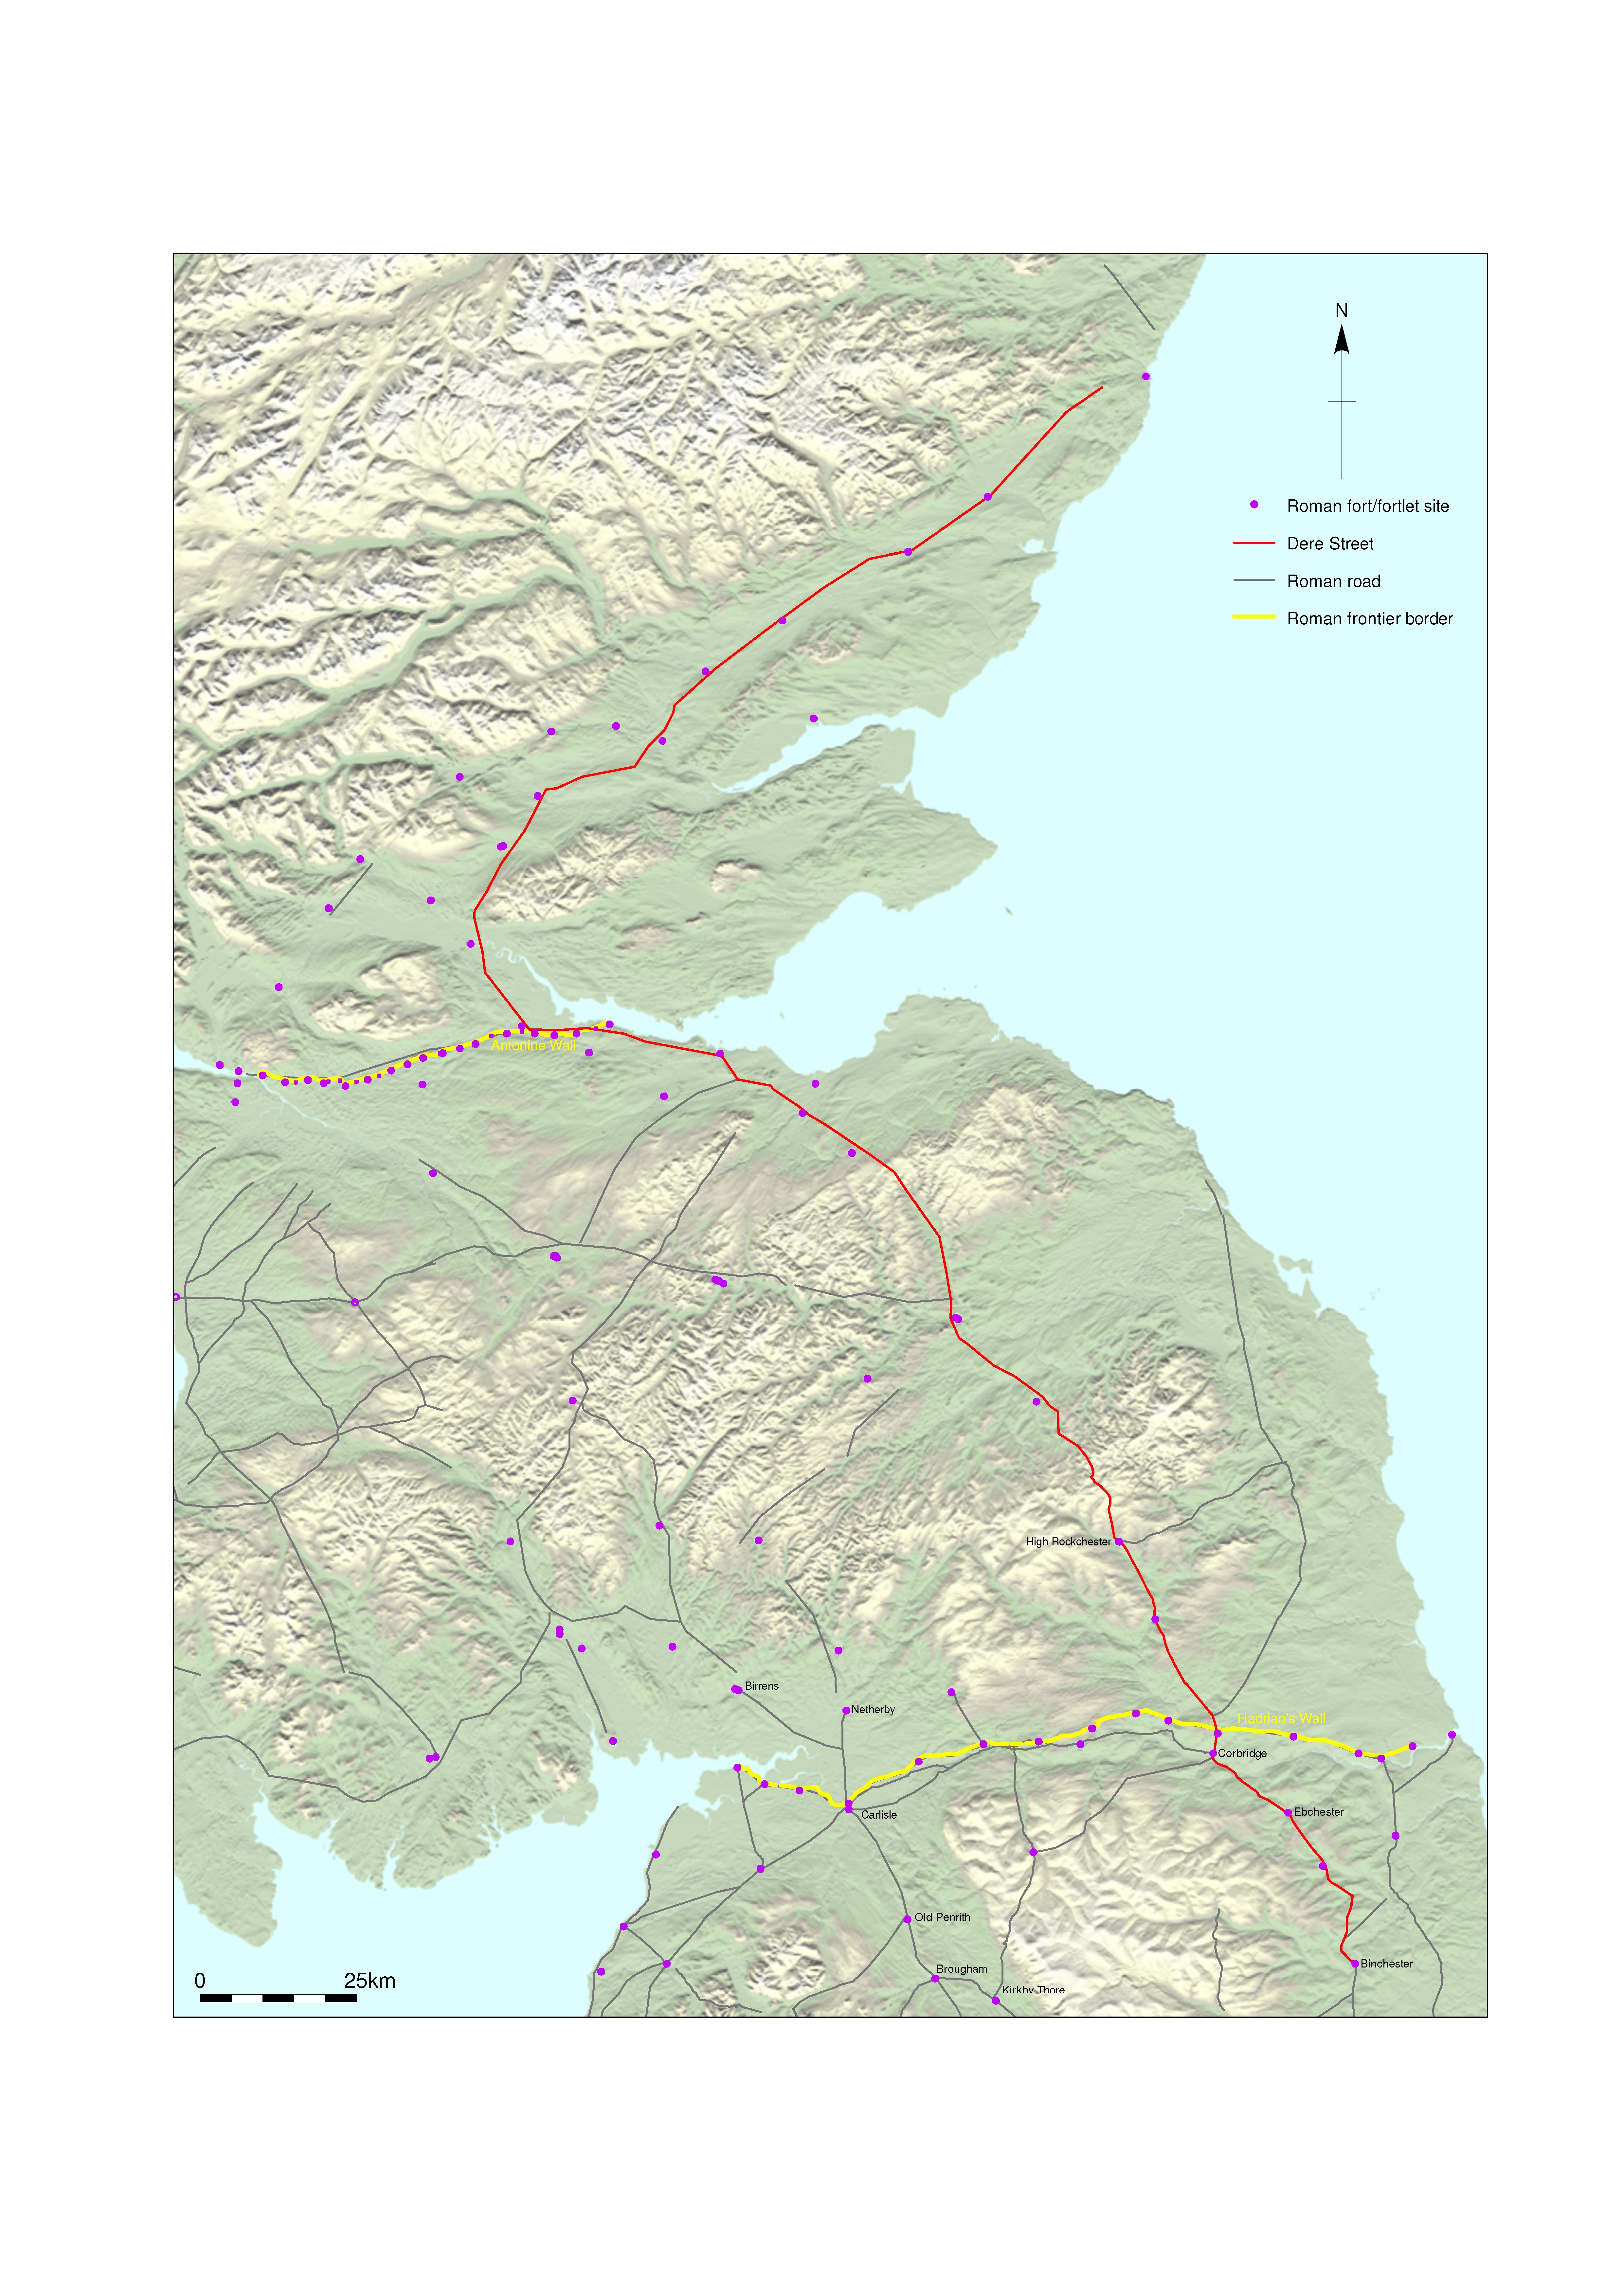
Title: Figure 23: the route of Dere Street (Margary roads 8a–d) showing the Roman road network and relevant Roman settlements (Margary numbers and Iters I, II and V). Filename: DS_Fig-023.jpg (3 MB) |
JPG |
Info
Download |
. as a JPG image")
|
Title: Figure 24: the B6265 looking north-west towards Aldborough along the line of Dere Street (Margary road 8a). Filename: DS_Fig-024.jpg (1 MB) |
JPG |
Info
Download |

|
Title: Figure 25: overview of evidence for Dere Street along the A1 scheme route. Filename: DS_Fig-025.jpg (1 MB) |
JPG |
Info
Download |
 beside the River Nidd crossing between York and Aldborough. as a JPG image")
|
Title: Figure 26: Pool Lane settlement flanking Dere Street (Margary road 8a) beside the River Nidd crossing between York and Aldborough. Filename: DS_Fig-026.jpg (1 MB) |
JPG |
Info
Download |
 at Pool Lane (after Ambrey and Cooper forthcoming). as a JPG image")
|
Title: Figure 27: view south-east along Dere Street (Margary road 8a) at Pool Lane (after Ambrey and Cooper forthcoming). Filename: DS_Fig-027.jpg (357 kB) |
JPG |
Info
Download |
 was exposed between York and Green Hammerton. as a JPG image")
|
Title: Figure 28: locations where Dere Street (Margary road 8a) was exposed between York and Green Hammerton. Filename: DS_Fig-028.jpg (860 kB) |
JPG |
Info
Download |
 at Moor Monkton Moor. as a JPG image")
|
Title: Figure 29: Dere Street (Margary road 8a) at Moor Monkton Moor. Filename: DS_Fig-029.jpg (776 kB) |
JPG |
Info
Download |
 at Moor Monkton Moor. as a JPG image")
|
Title: Figure 30: remains of Dere Street (Margary road 8a) at Moor Monkton Moor. Filename: DS_Fig-030.jpg (1 MB) |
JPG |
Info
Download |
 at Healam Bridge. as a JPG image")
|
Title: Figure 31: location and simplified plan of the settlement and Dere Street (Margary road 8b) at Healam Bridge. Filename: DS_Fig-031.jpg (1005 kB) |
JPG |
Info
Download |
 at Healam Bridge. as a JPG image")
|
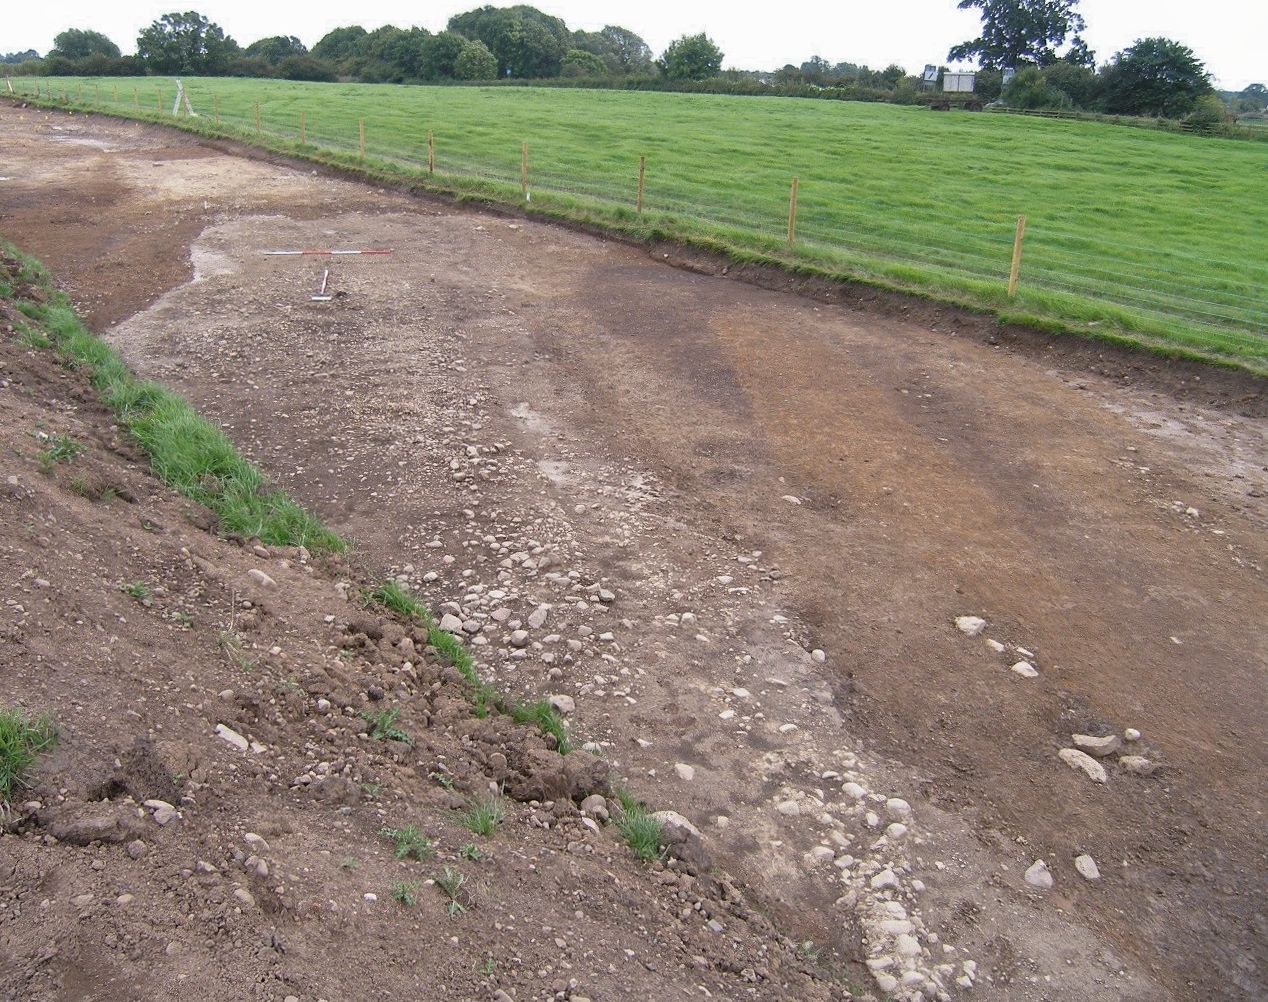
Title: Figure 32: southwards view along Dere Street (Margary road 8b) at Healam Bridge. Filename: DS_Fig-032.jpg (1 MB) |
JPG |
Info
Download |
 at Healam Bridge. as a JPG image")
|
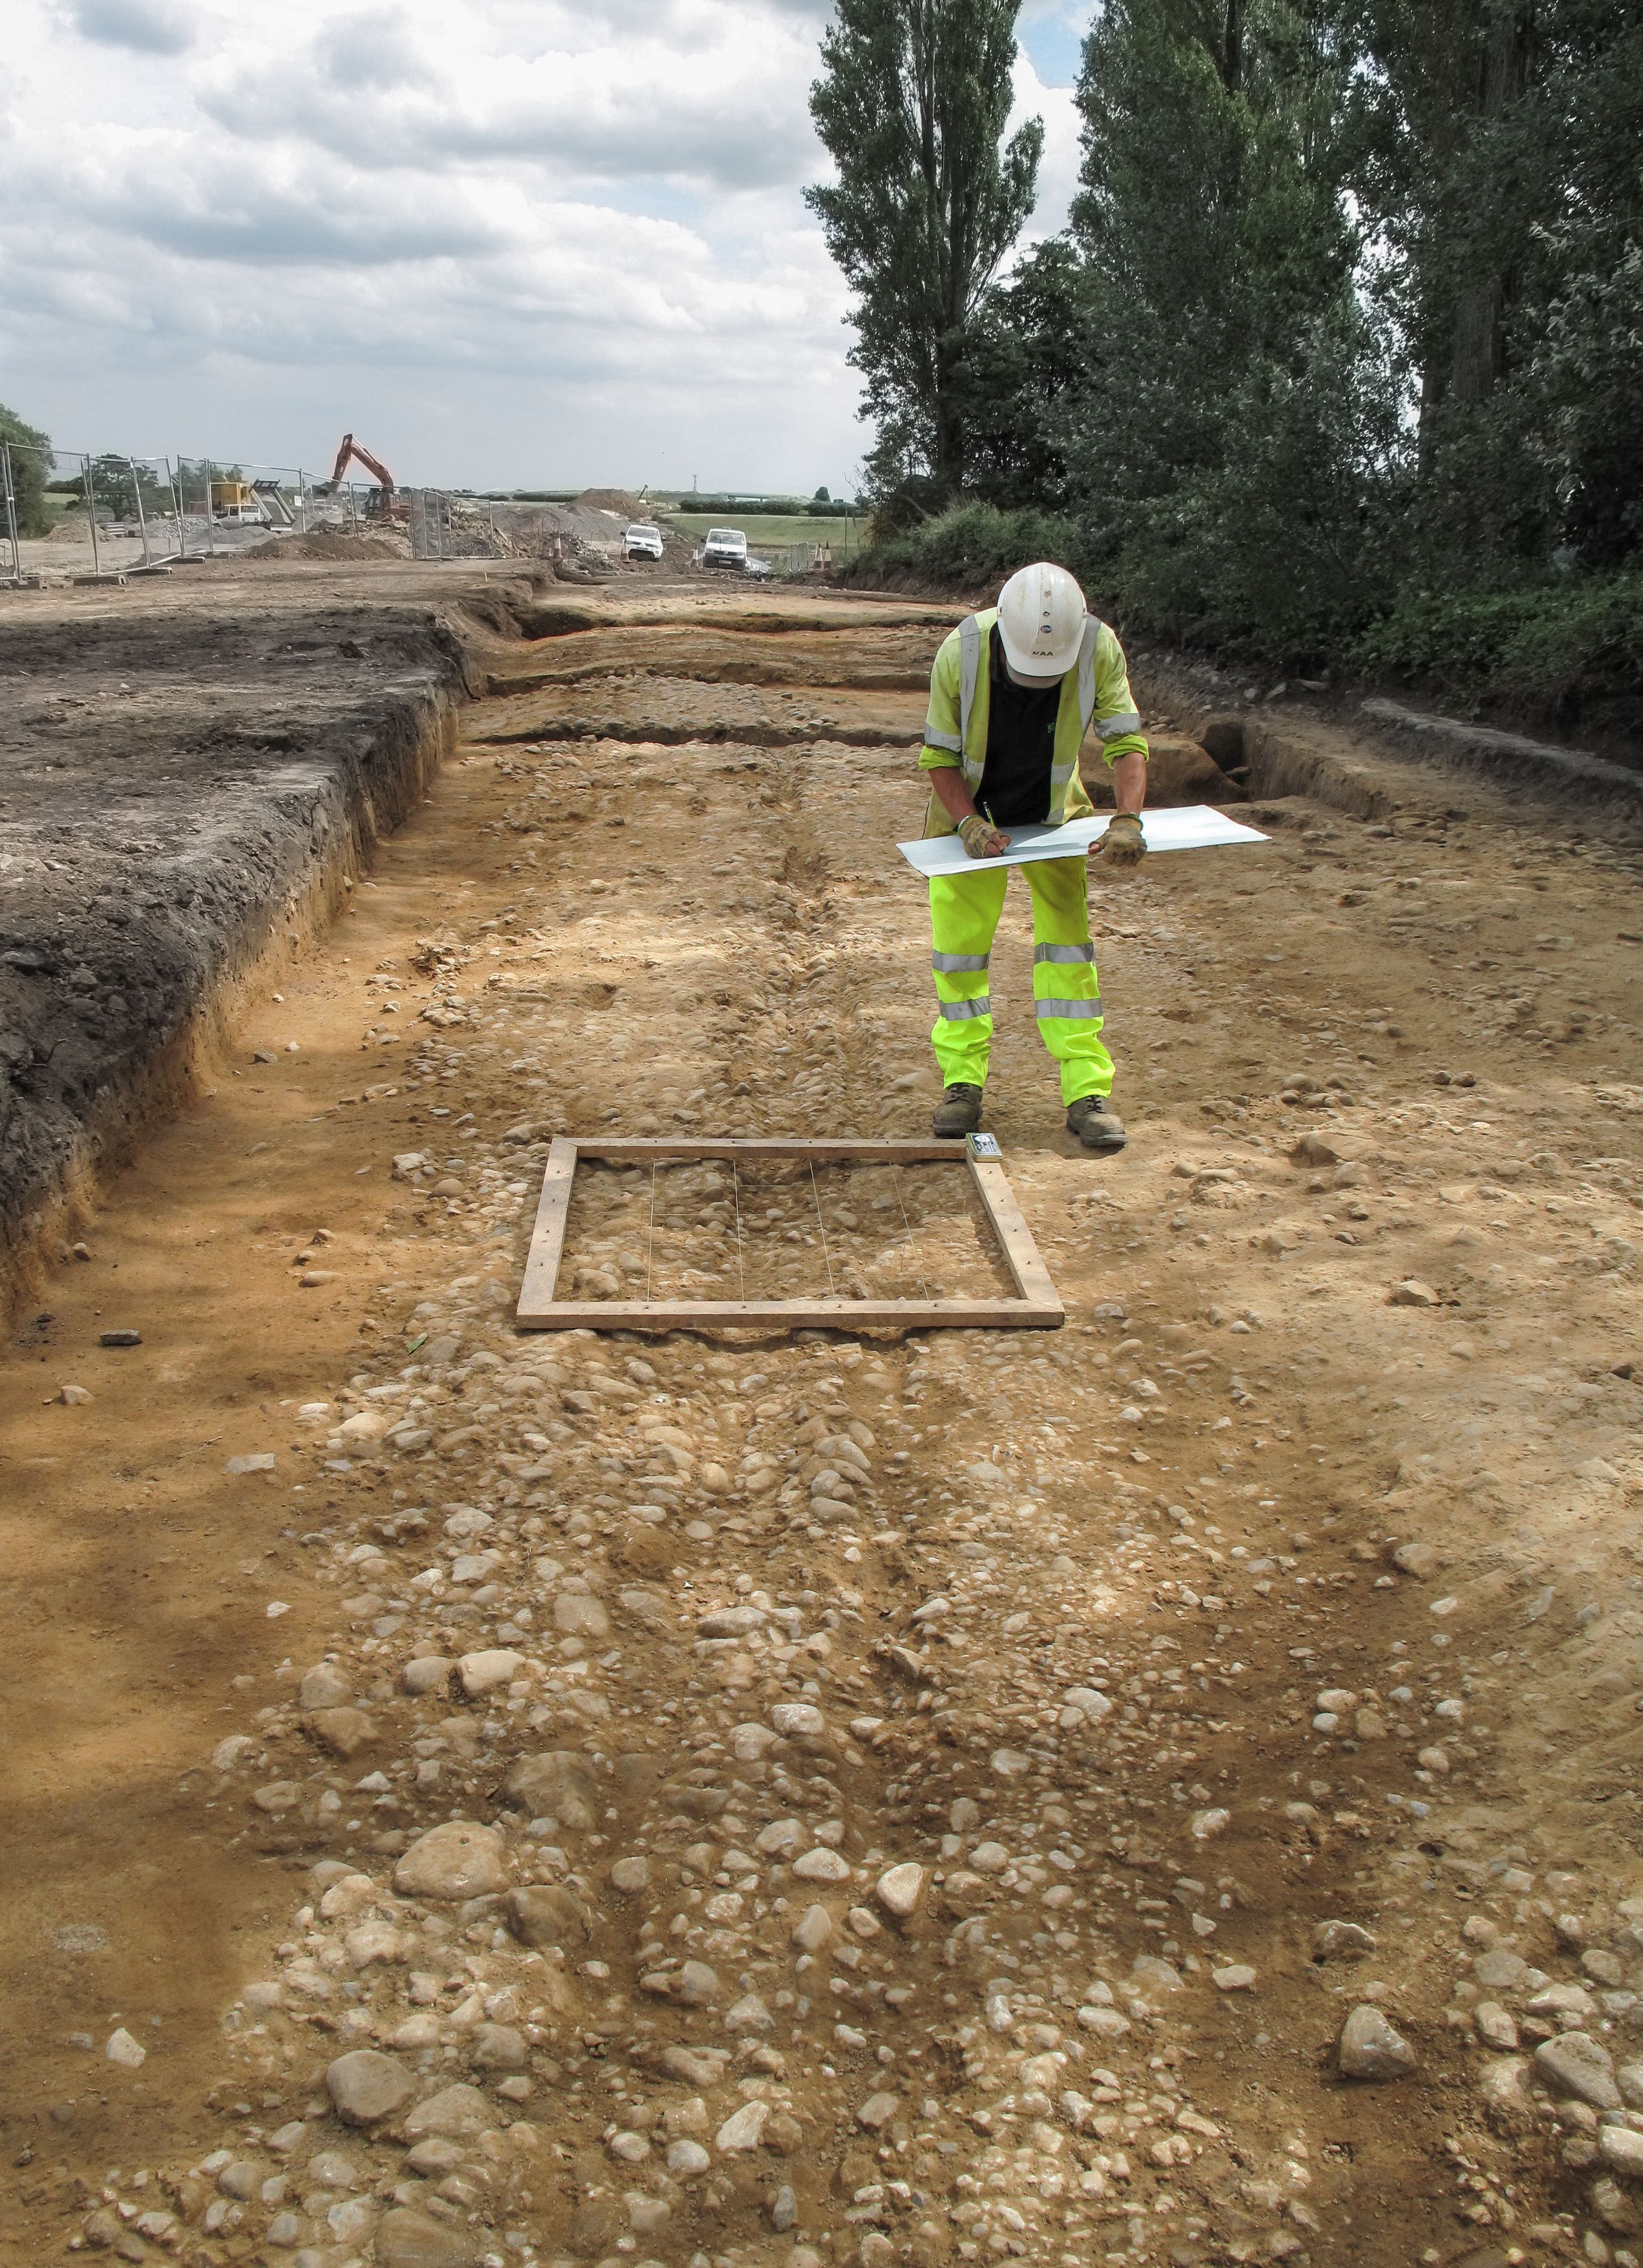
Title: Figure 33: recording wheel ruts along Dere Street (Margary road 8b) at Healam Bridge. Filename: DS_Fig-033.jpg (2 MB) |
JPG |
Info
Download |
 at Healam Bridge. as a JPG image")
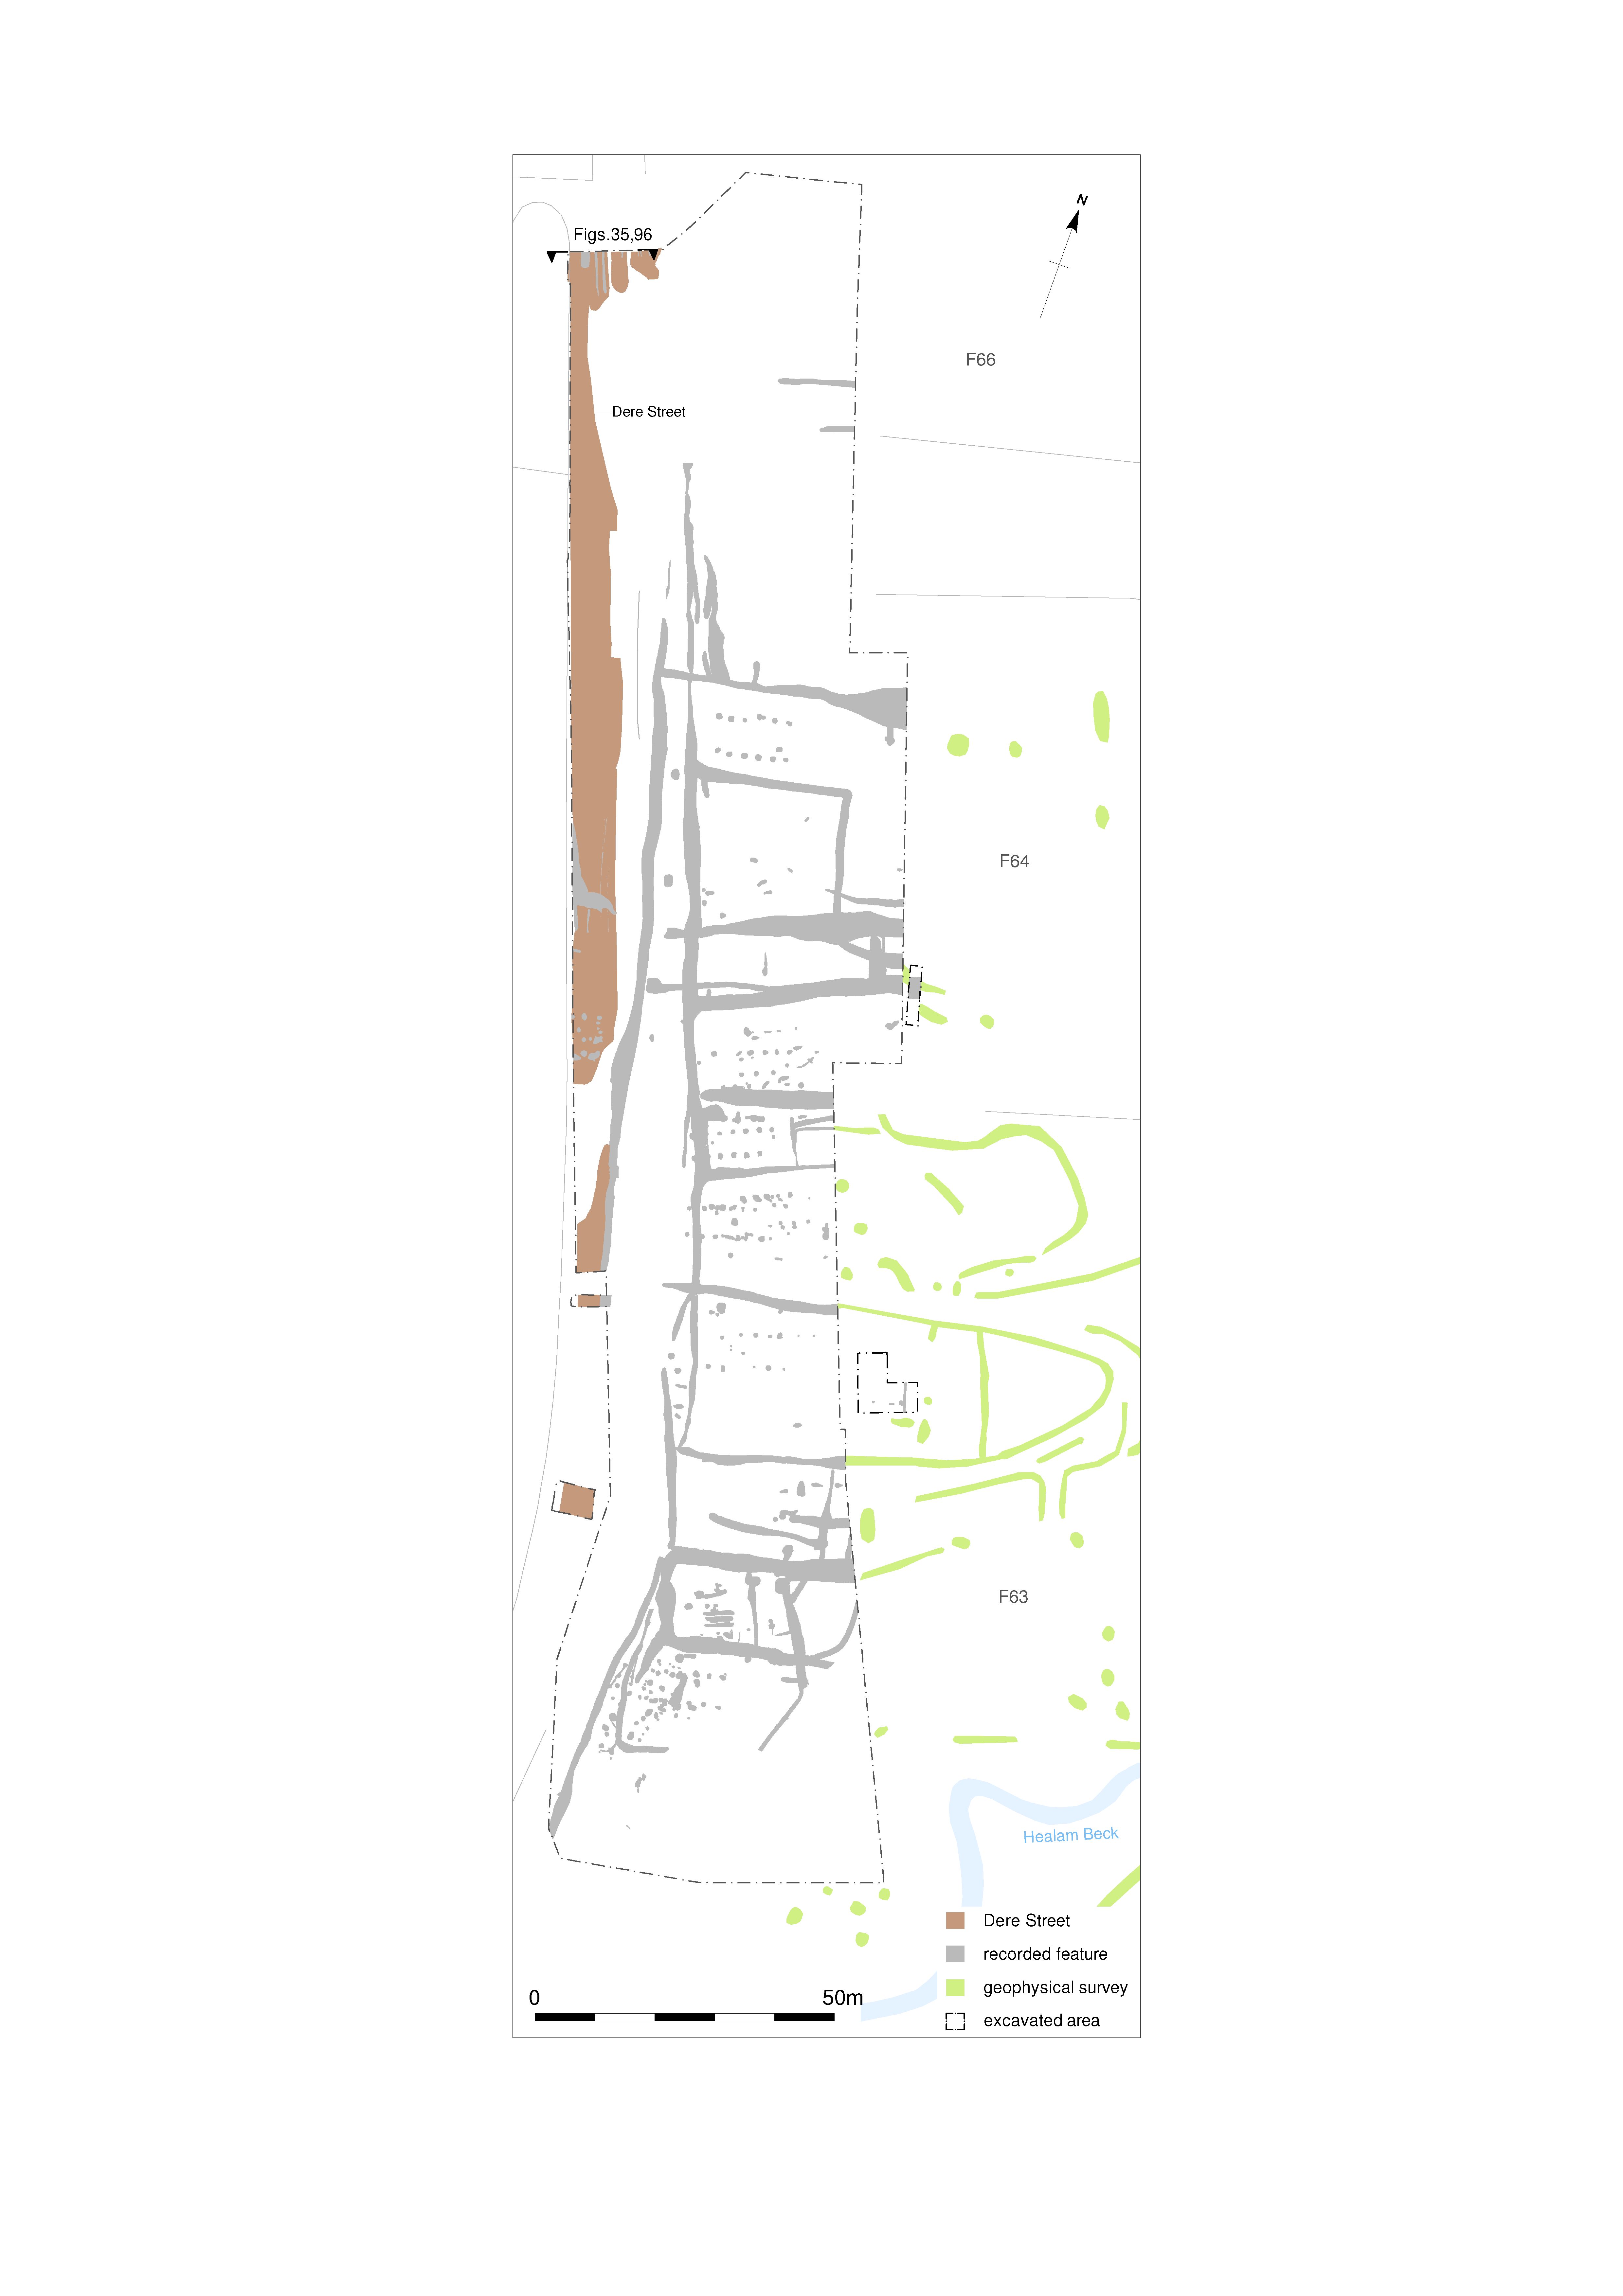
|
Title: Figure 34: iterations of Dere Street (Margary road 8b) at Healam Bridge. Filename: DS_Fig-034.jpg (847 kB) |
JPG |
Info
Download |
 at the north end of Healam Bridge. as a JPG image")
|
Title: Figure 35: deep wheel ruts cutting Dere Street (Margary road 8b) at the north end of Healam Bridge. Filename: DS_Fig-035.jpg (1 MB) |
JPG |
Info
Download |
 and later roads at the north end of Healam Bridge. as a JPG image")
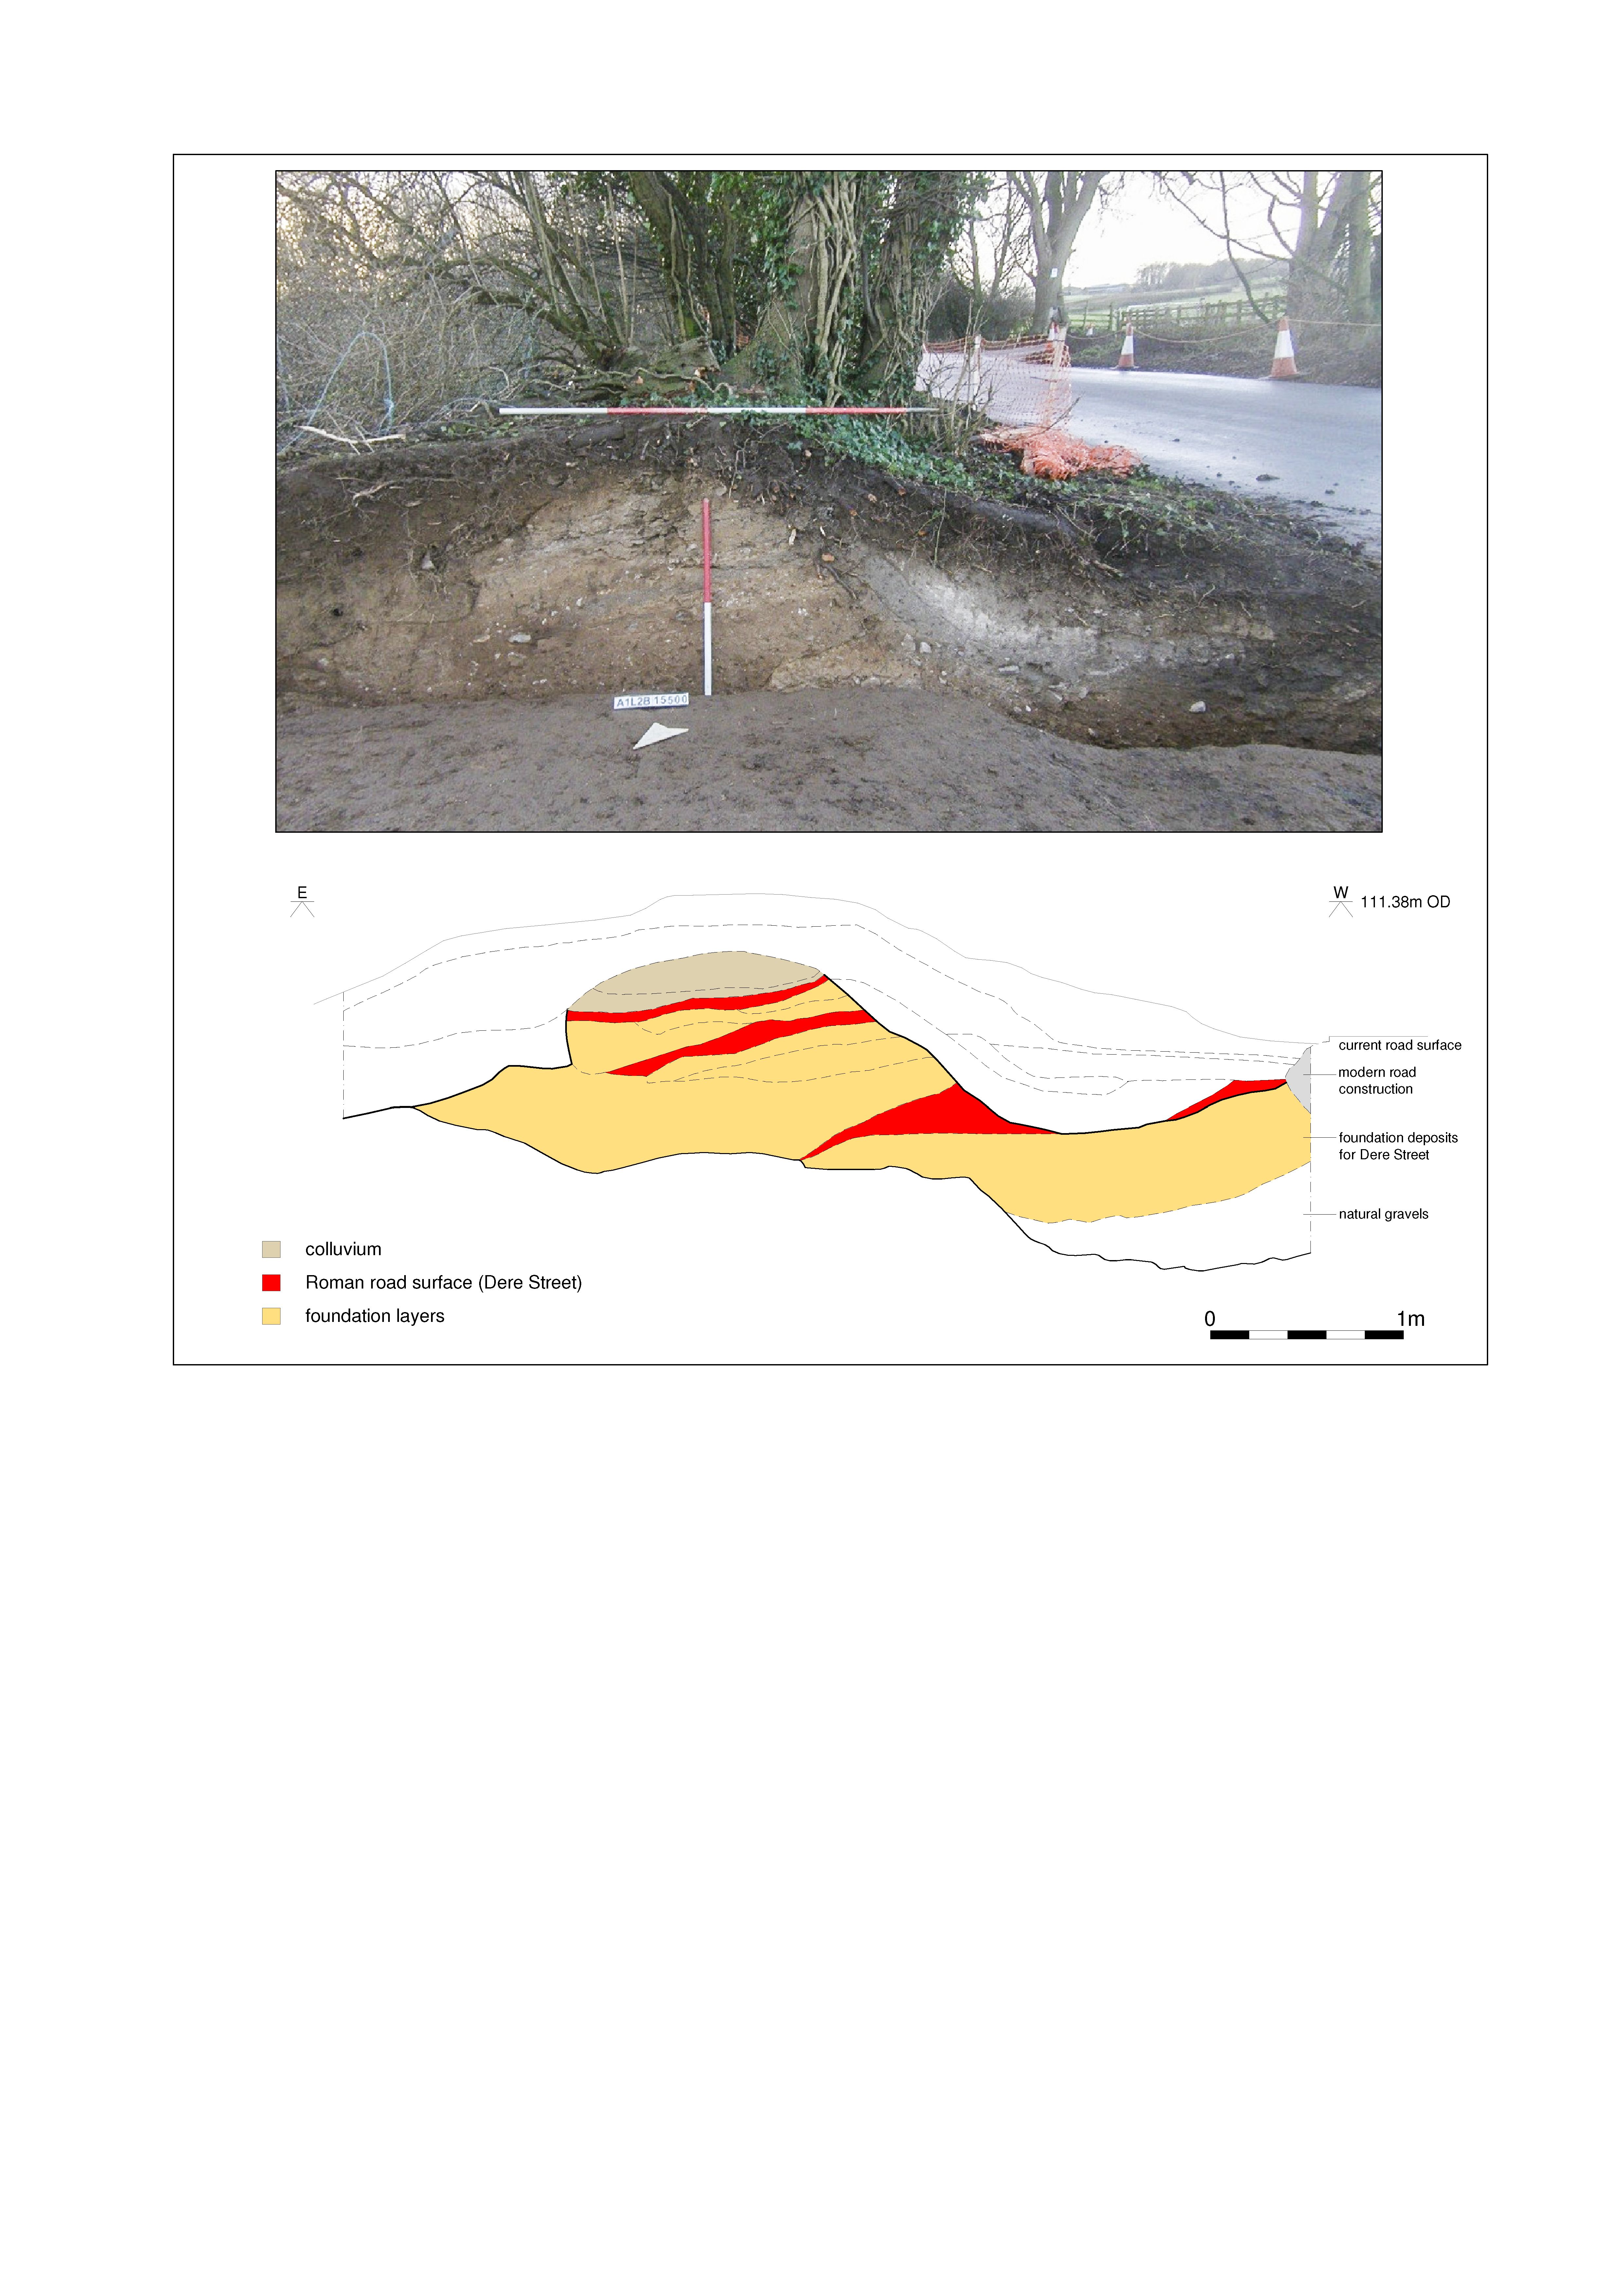
|
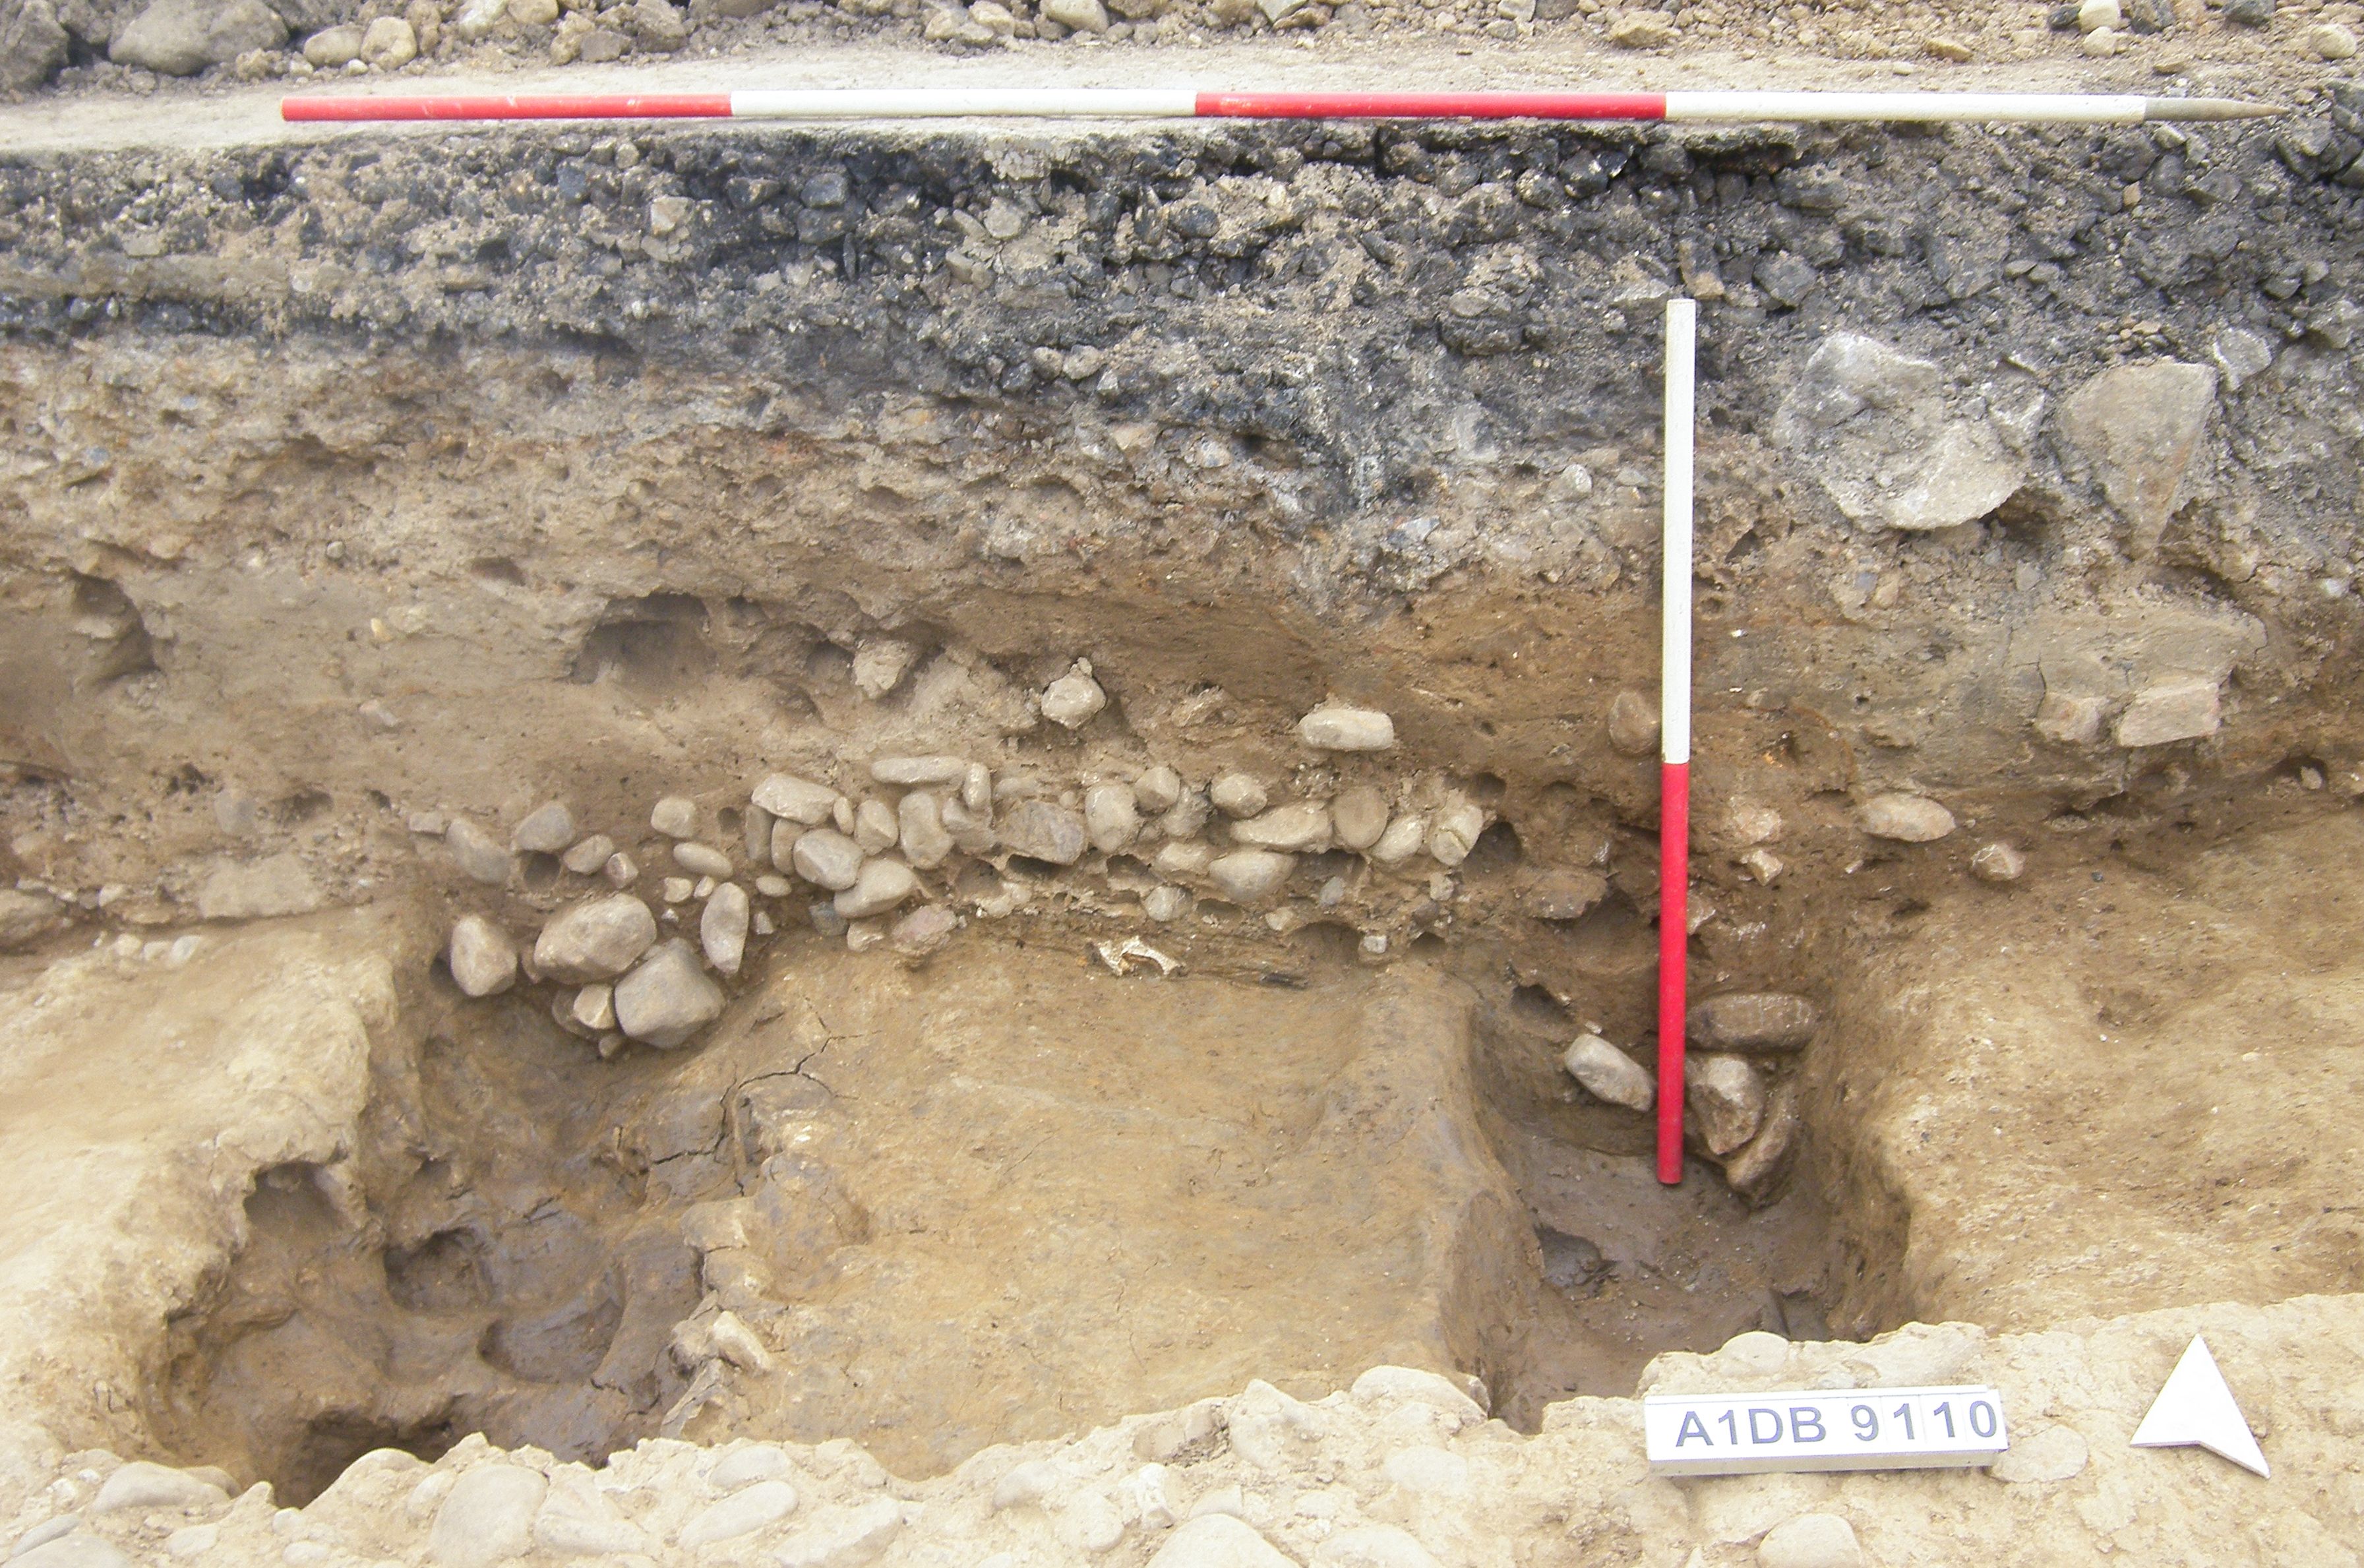
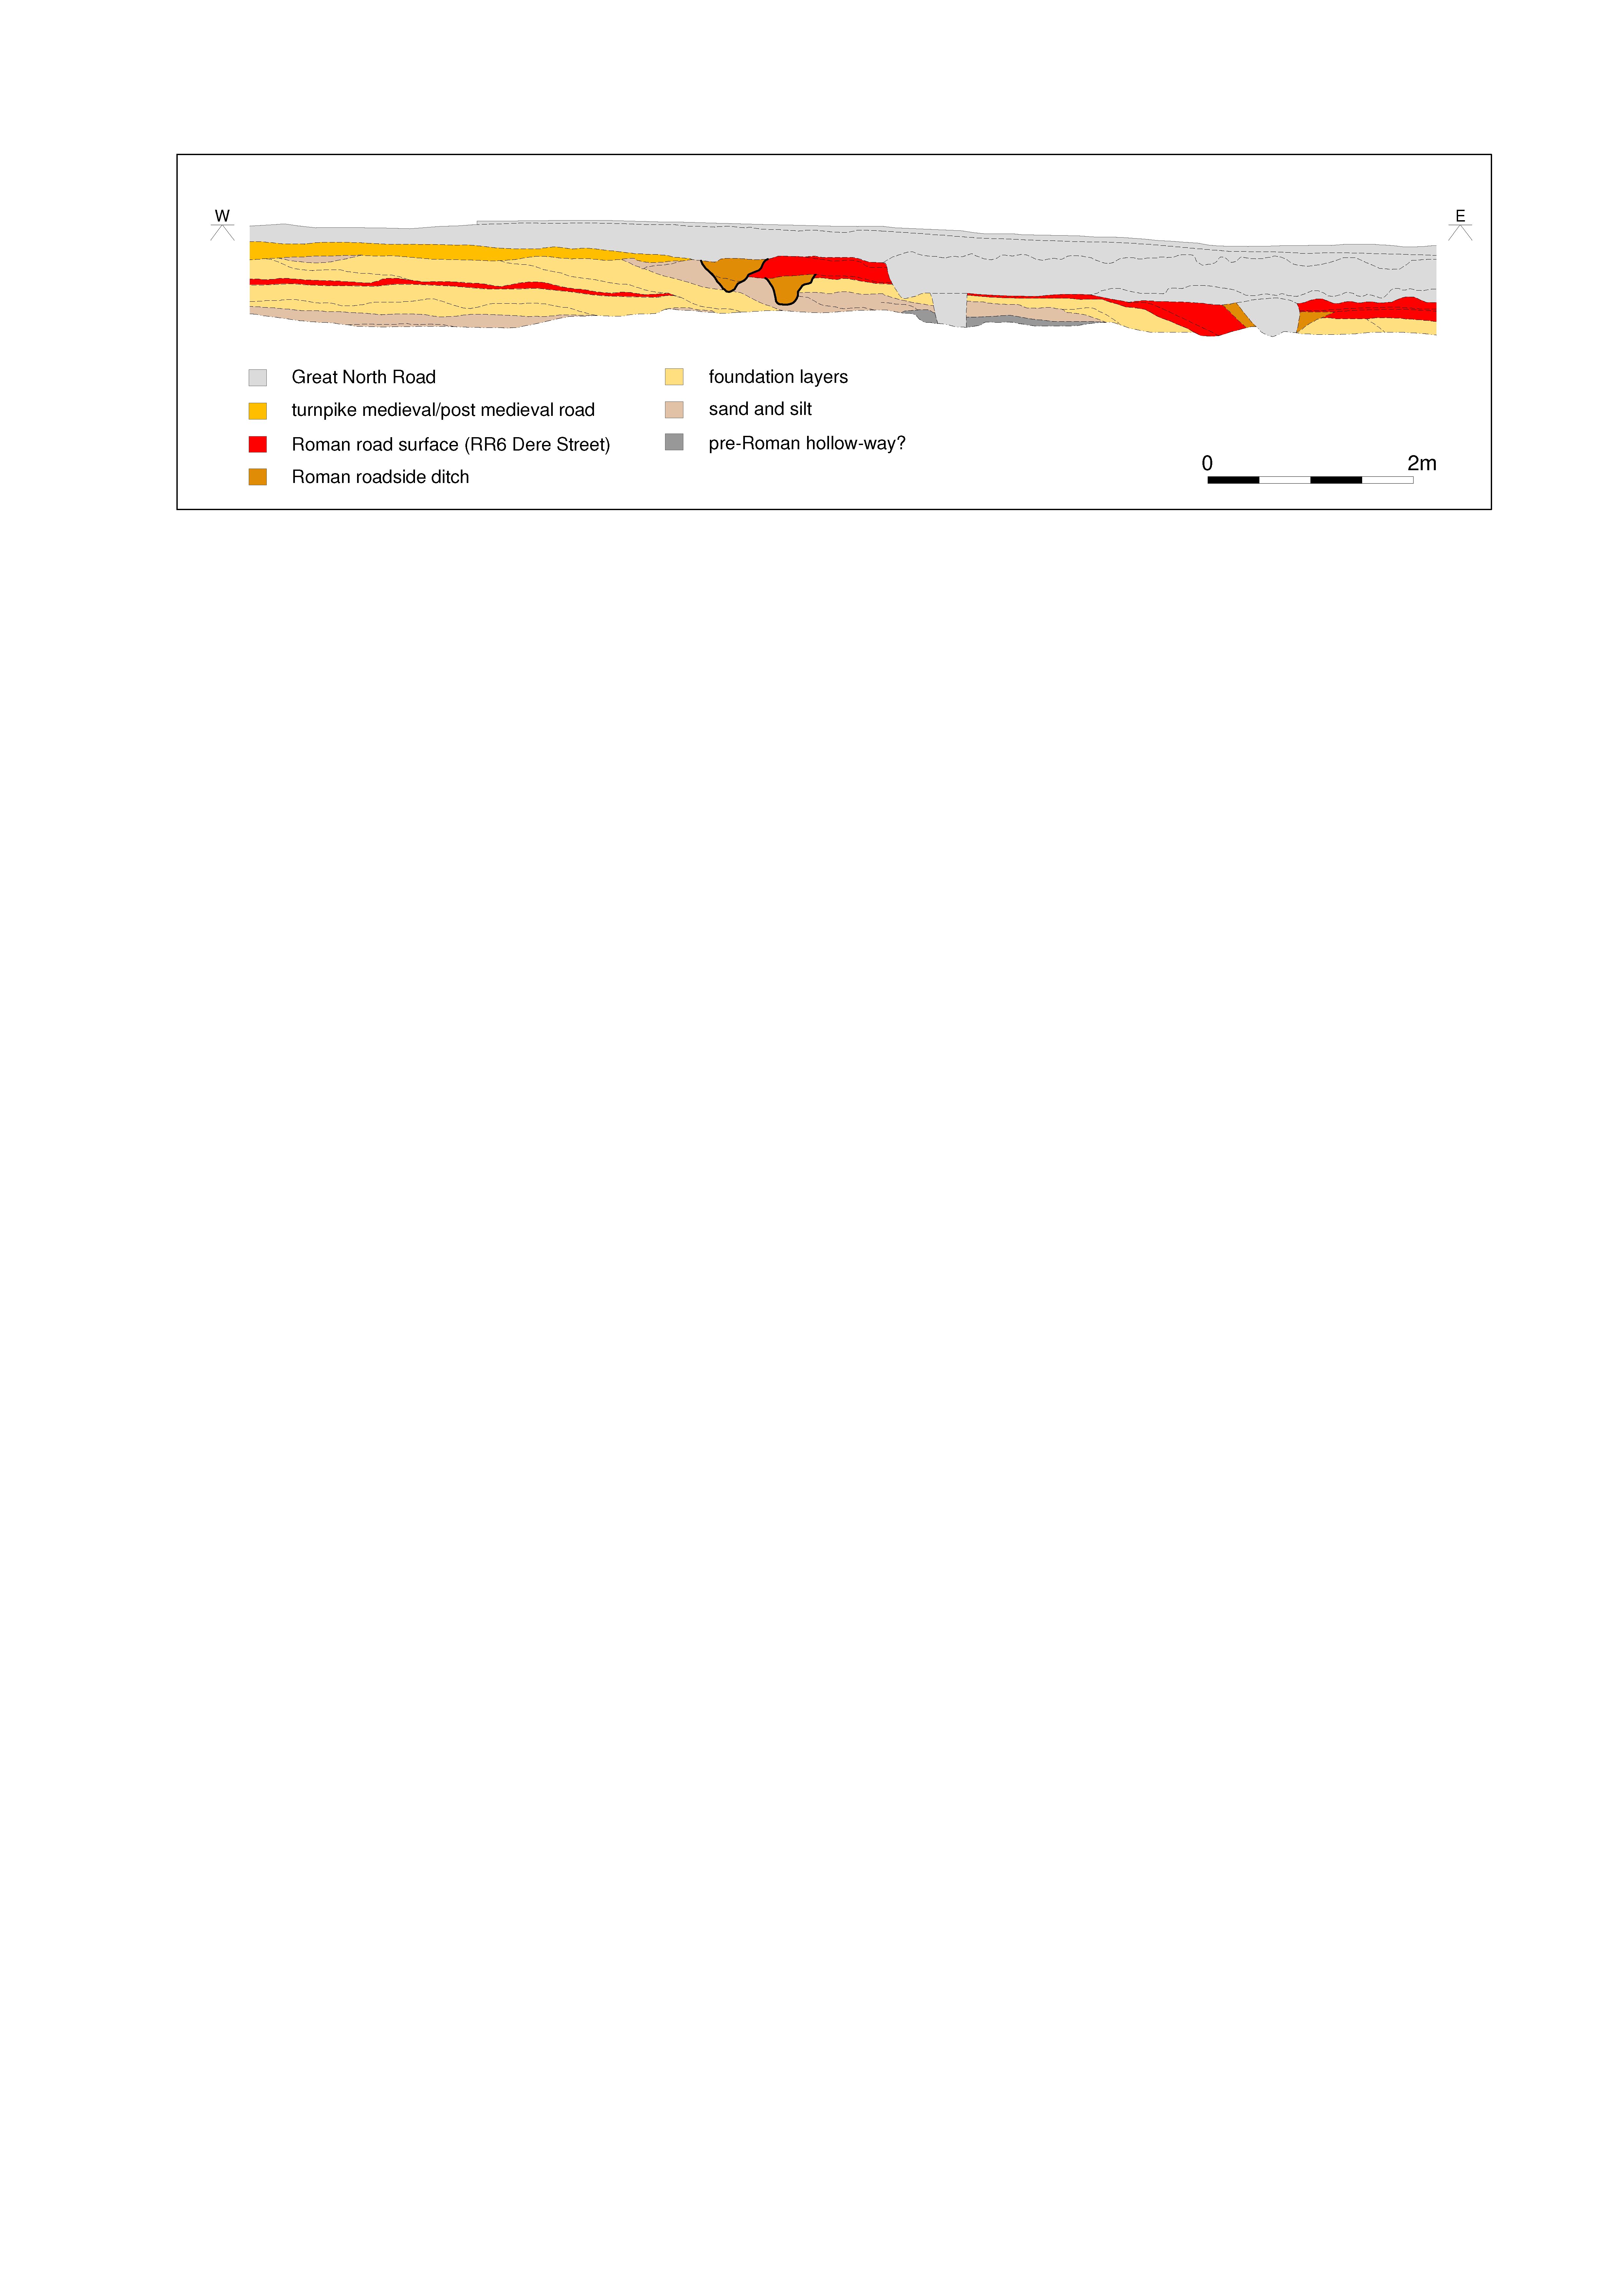
Title: Figure 36: section through Dere Street (Margary road 8b) and later roads at the north end of Healam Bridge. Filename: DS_Fig-036.jpg (702 kB) |
JPG |
Info
Download |
 at Leases Road, Leeming Bar. as a JPG image")
|
Title: Figure 37: the route of Dere Street (Margary road 8b) at Leases Road, Leeming Bar. Filename: DS_Fig-037.jpg (842 kB) |
JPG |
Info
Download |
 at Leases Road, Leeming Bar. as a JPG image")
|
Title: Figure 38: section through Dere Street (Margary road 8b) at Leases Road, Leeming Bar. Filename: DS_Fig-038.jpg (1 MB) |
JPG |
Info
Download |
 at Low Street. as a JPG image")
|
Title: Figure 39: side ditches of Dere Street (Margary road 8b) at Low Street. Filename: DS_Fig-039.jpg (826 kB) |
JPG |
Info
Download |
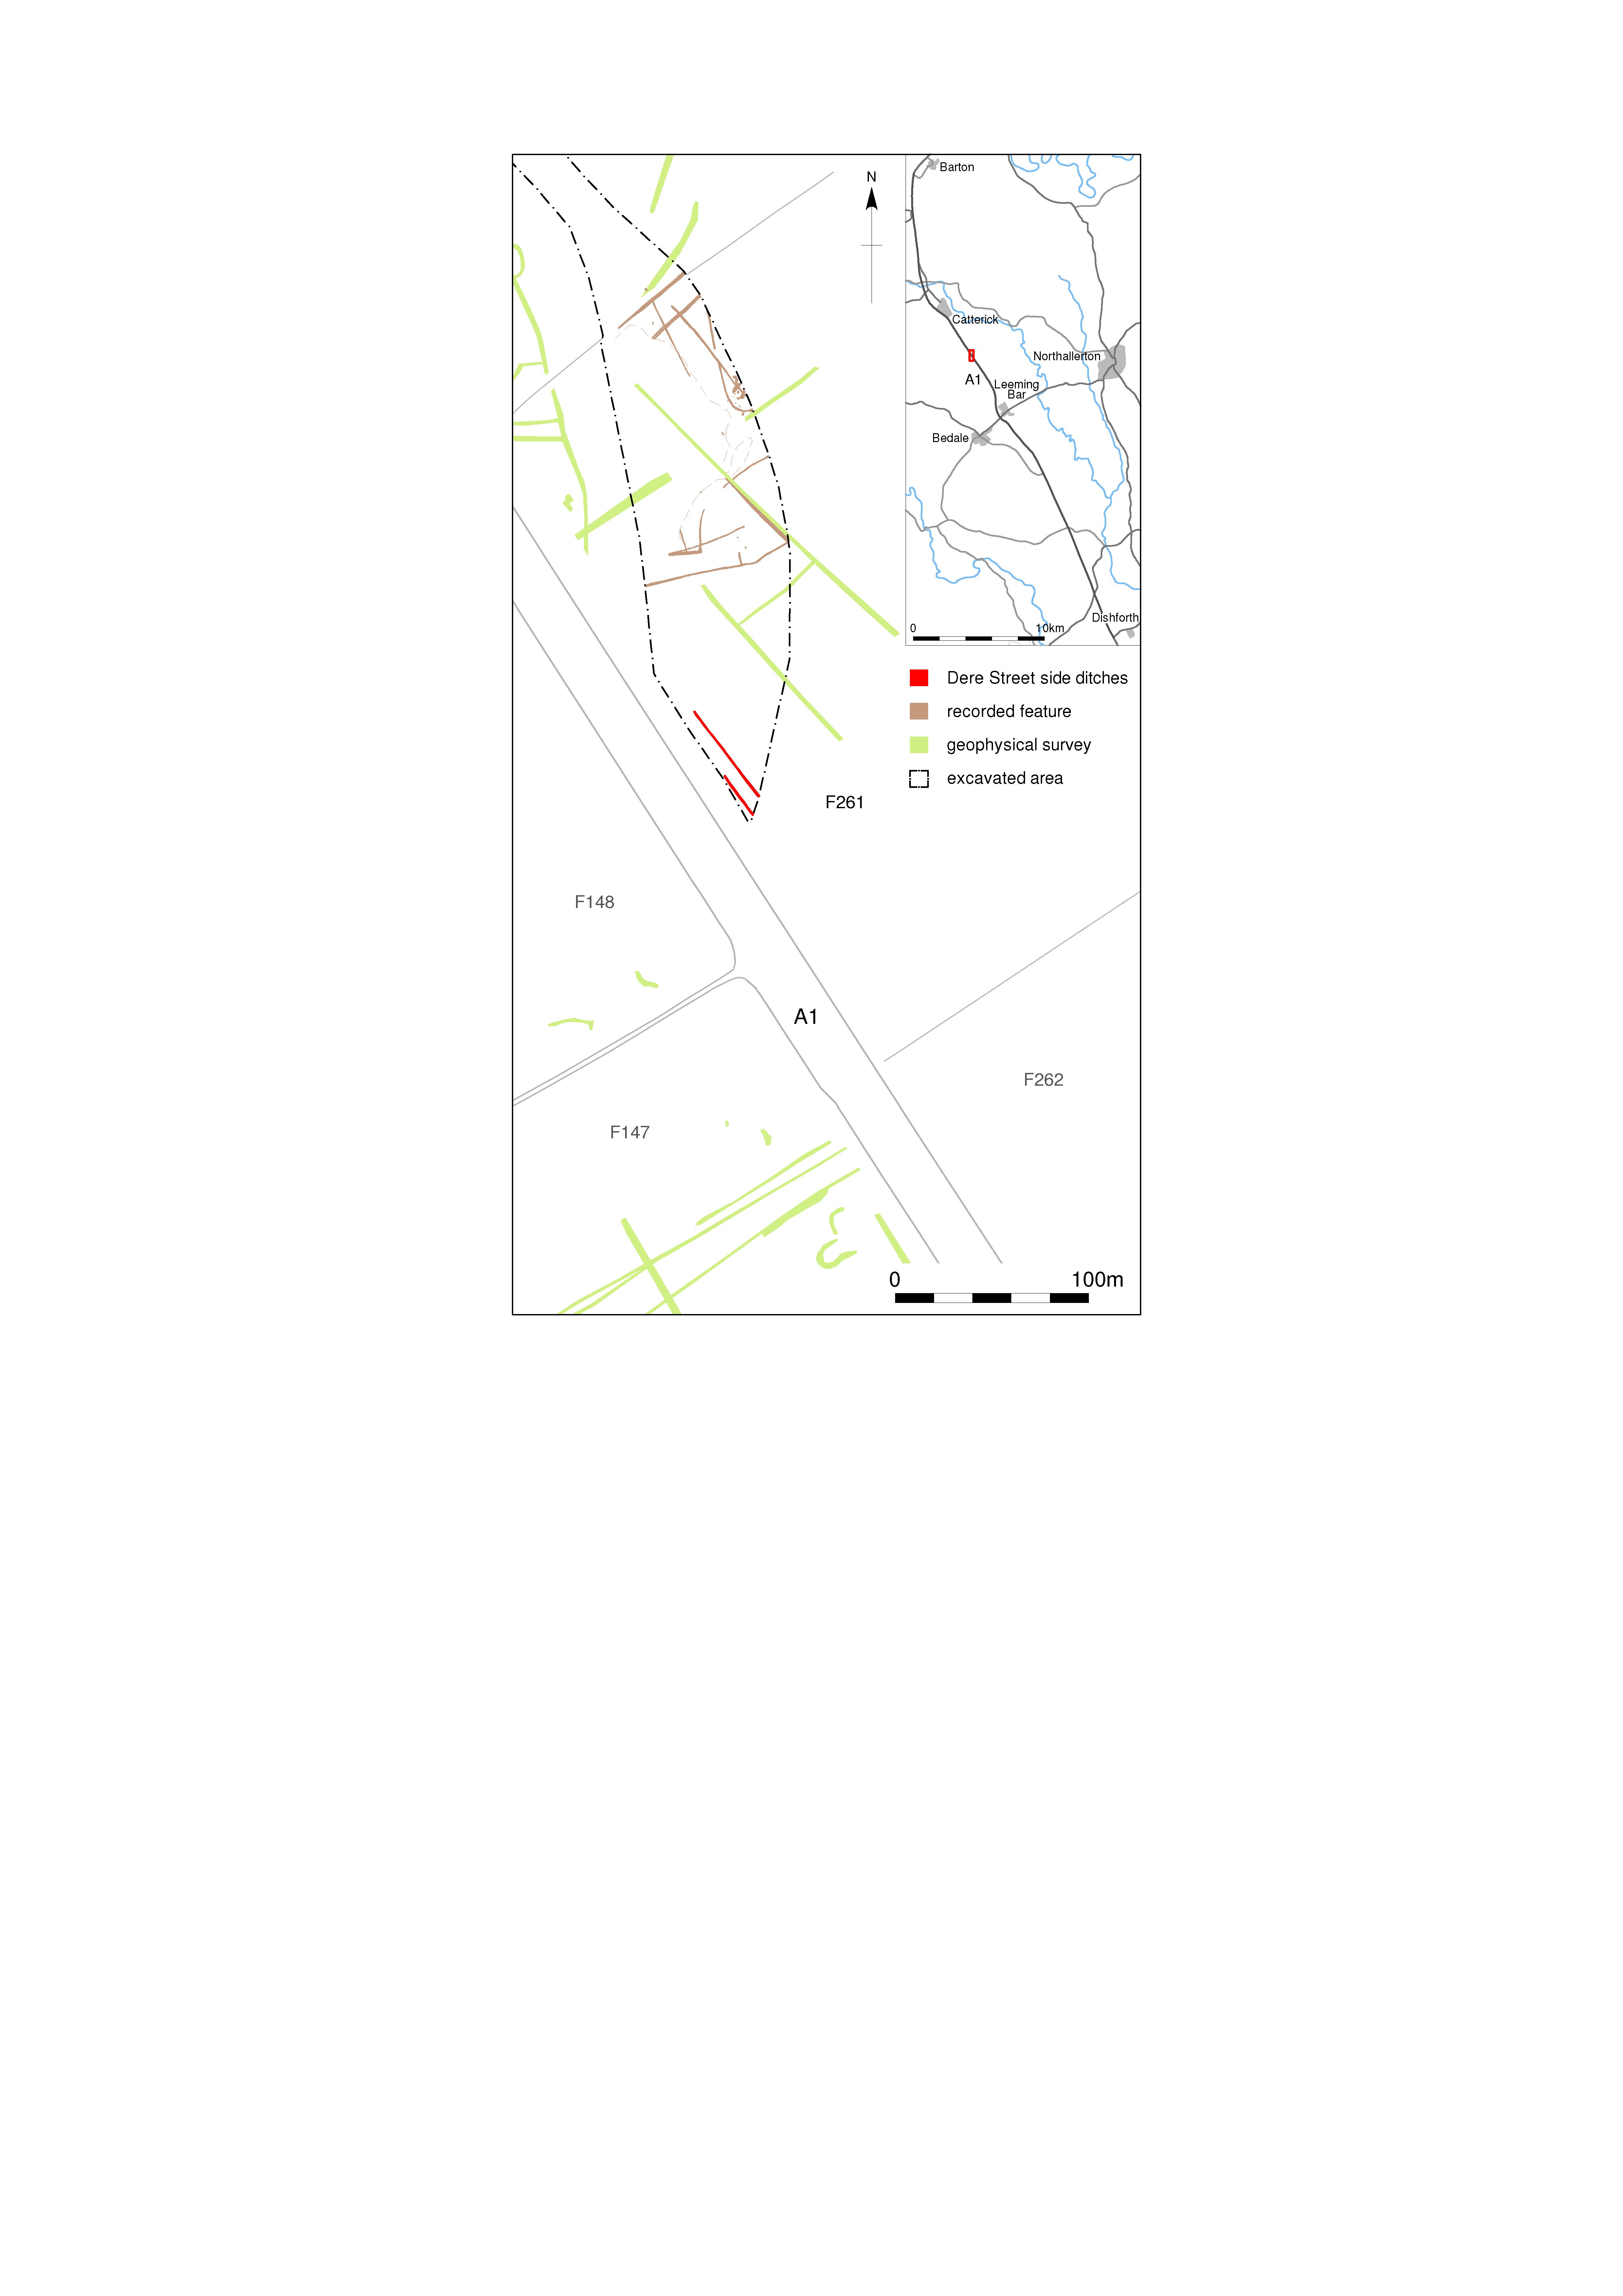
 at Bainesse and Cataractonium. as a JPG image")
|
Title: Figure 40: overview of Dere Street (Margary road 8b–c) at Bainesse and Cataractonium. Filename: DS_Fig-040.jpg (1 MB) |
JPG |
Info
Download |
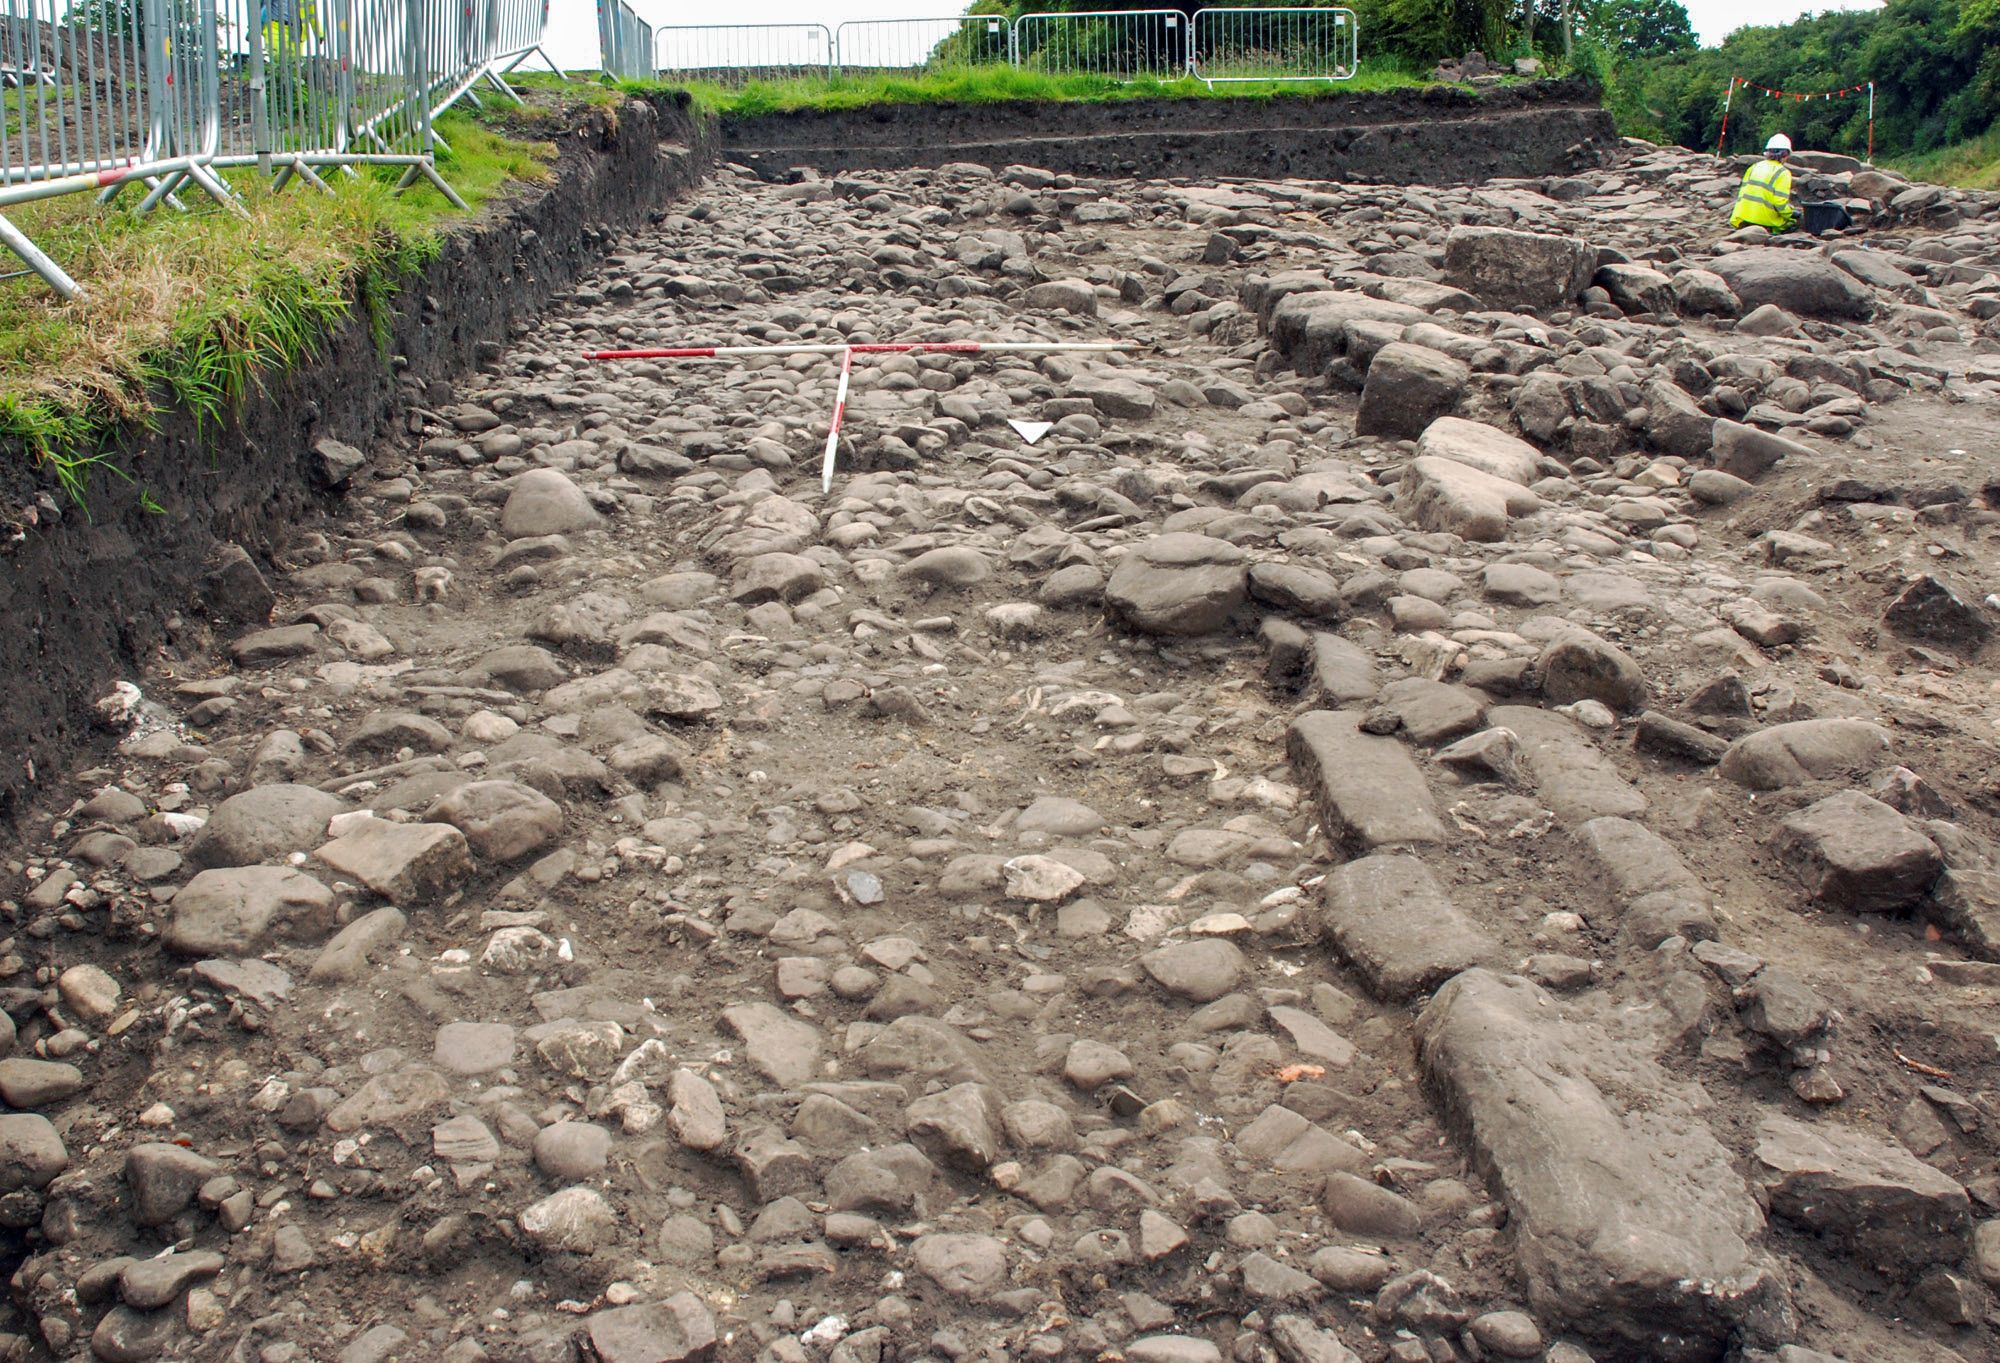
 at Cataractonium. as a JPG image")
|
Title: Figure 41: Dere Street (Margary road 8b–c) at Cataractonium. Filename: DS_Fig-041.jpg (1 MB) |
JPG |
Info
Download |

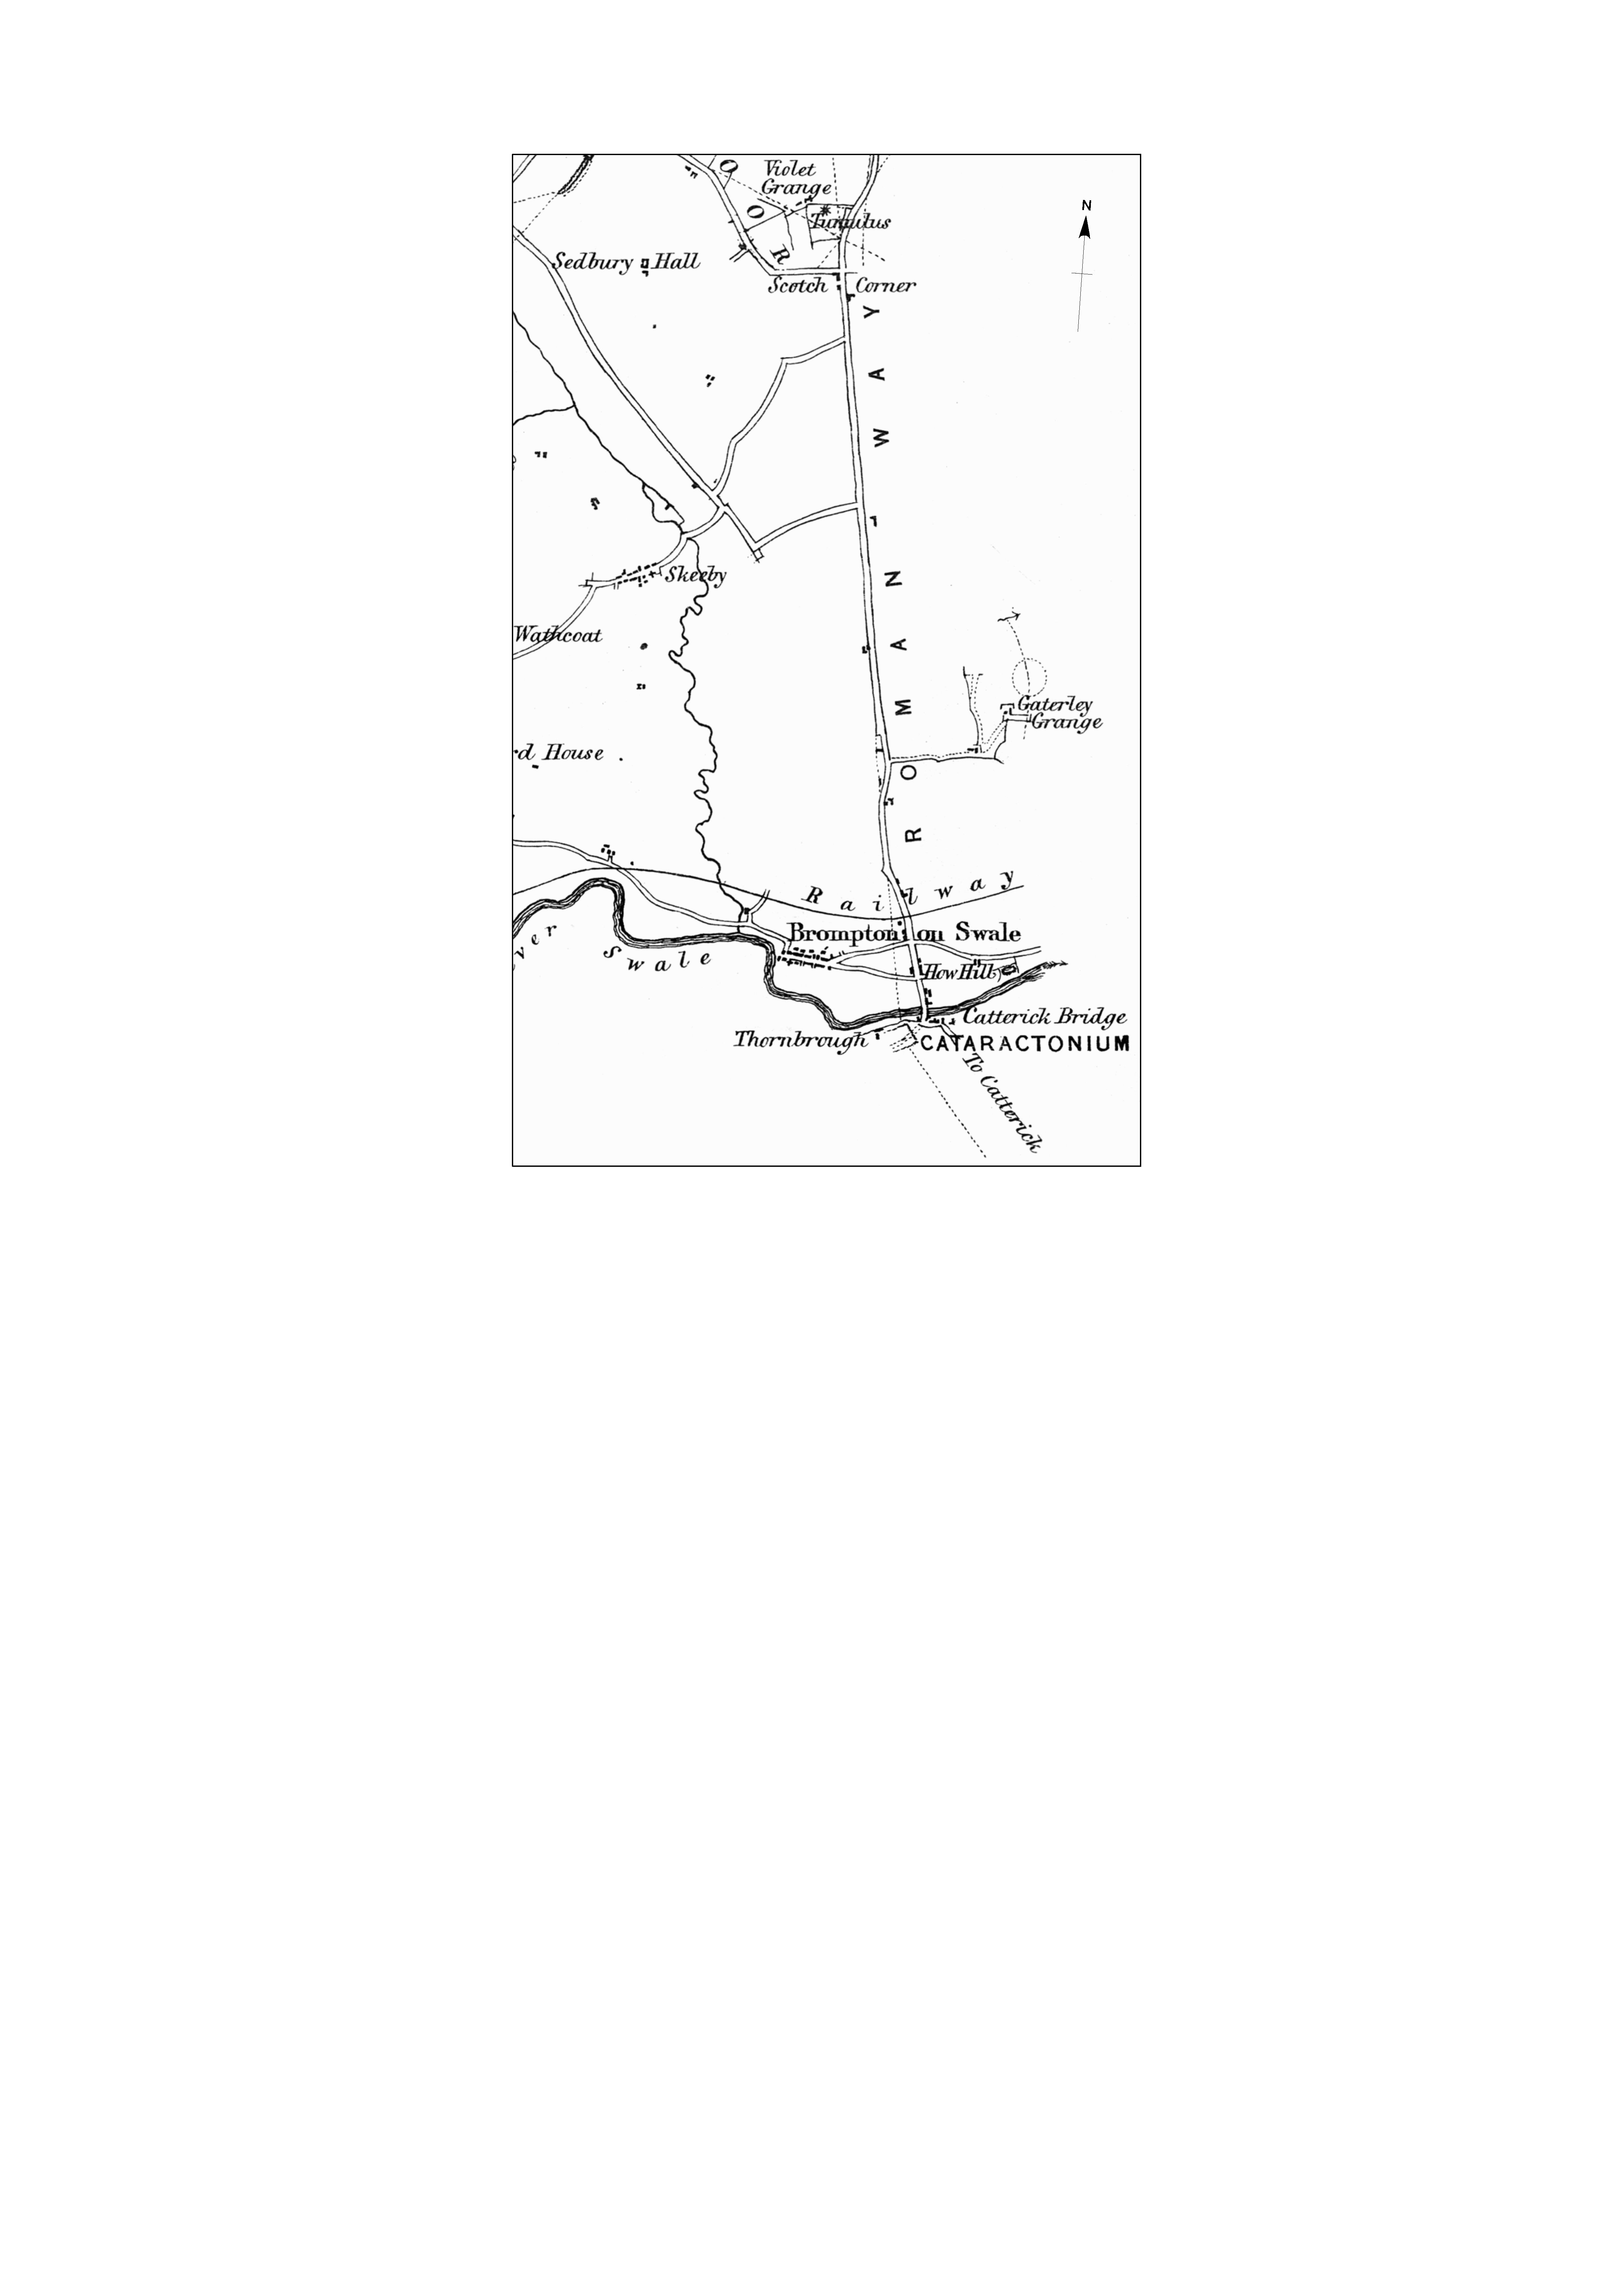
|
Title: Figure 42: detail of Cataractonium from of H. Maclauchlan’s ‘Map of ancient entrenchments between the Rivers Tees and Swale’ 1849. Filename: DS_Fig-042.jpg (816 kB) |
JPG |
Info
Download |
 showing Dere Street (Margary road 8b) entering the south gate of the town, past the forts to the immediate west, and extending northwards (Margary road 8c) on the north bank of the river. (Cambridge University Collection DQ-80; © Crown Copyright/MOD). as a JPG image")
|
Title: Figure 43: north-facing aerial photograph of Cataractonium (taken in 1949) showing Dere Street (Margary road 8b) entering the south gate of the town, past the forts to the immediate west, and extending northwards (Margary road 8c) on the north bank of the river. (Cambridge University Collection DQ-80; © Crown Copyright/MOD). Filename: DS_Fig-043.jpg (531 kB) |
JPG |
Info
Download |
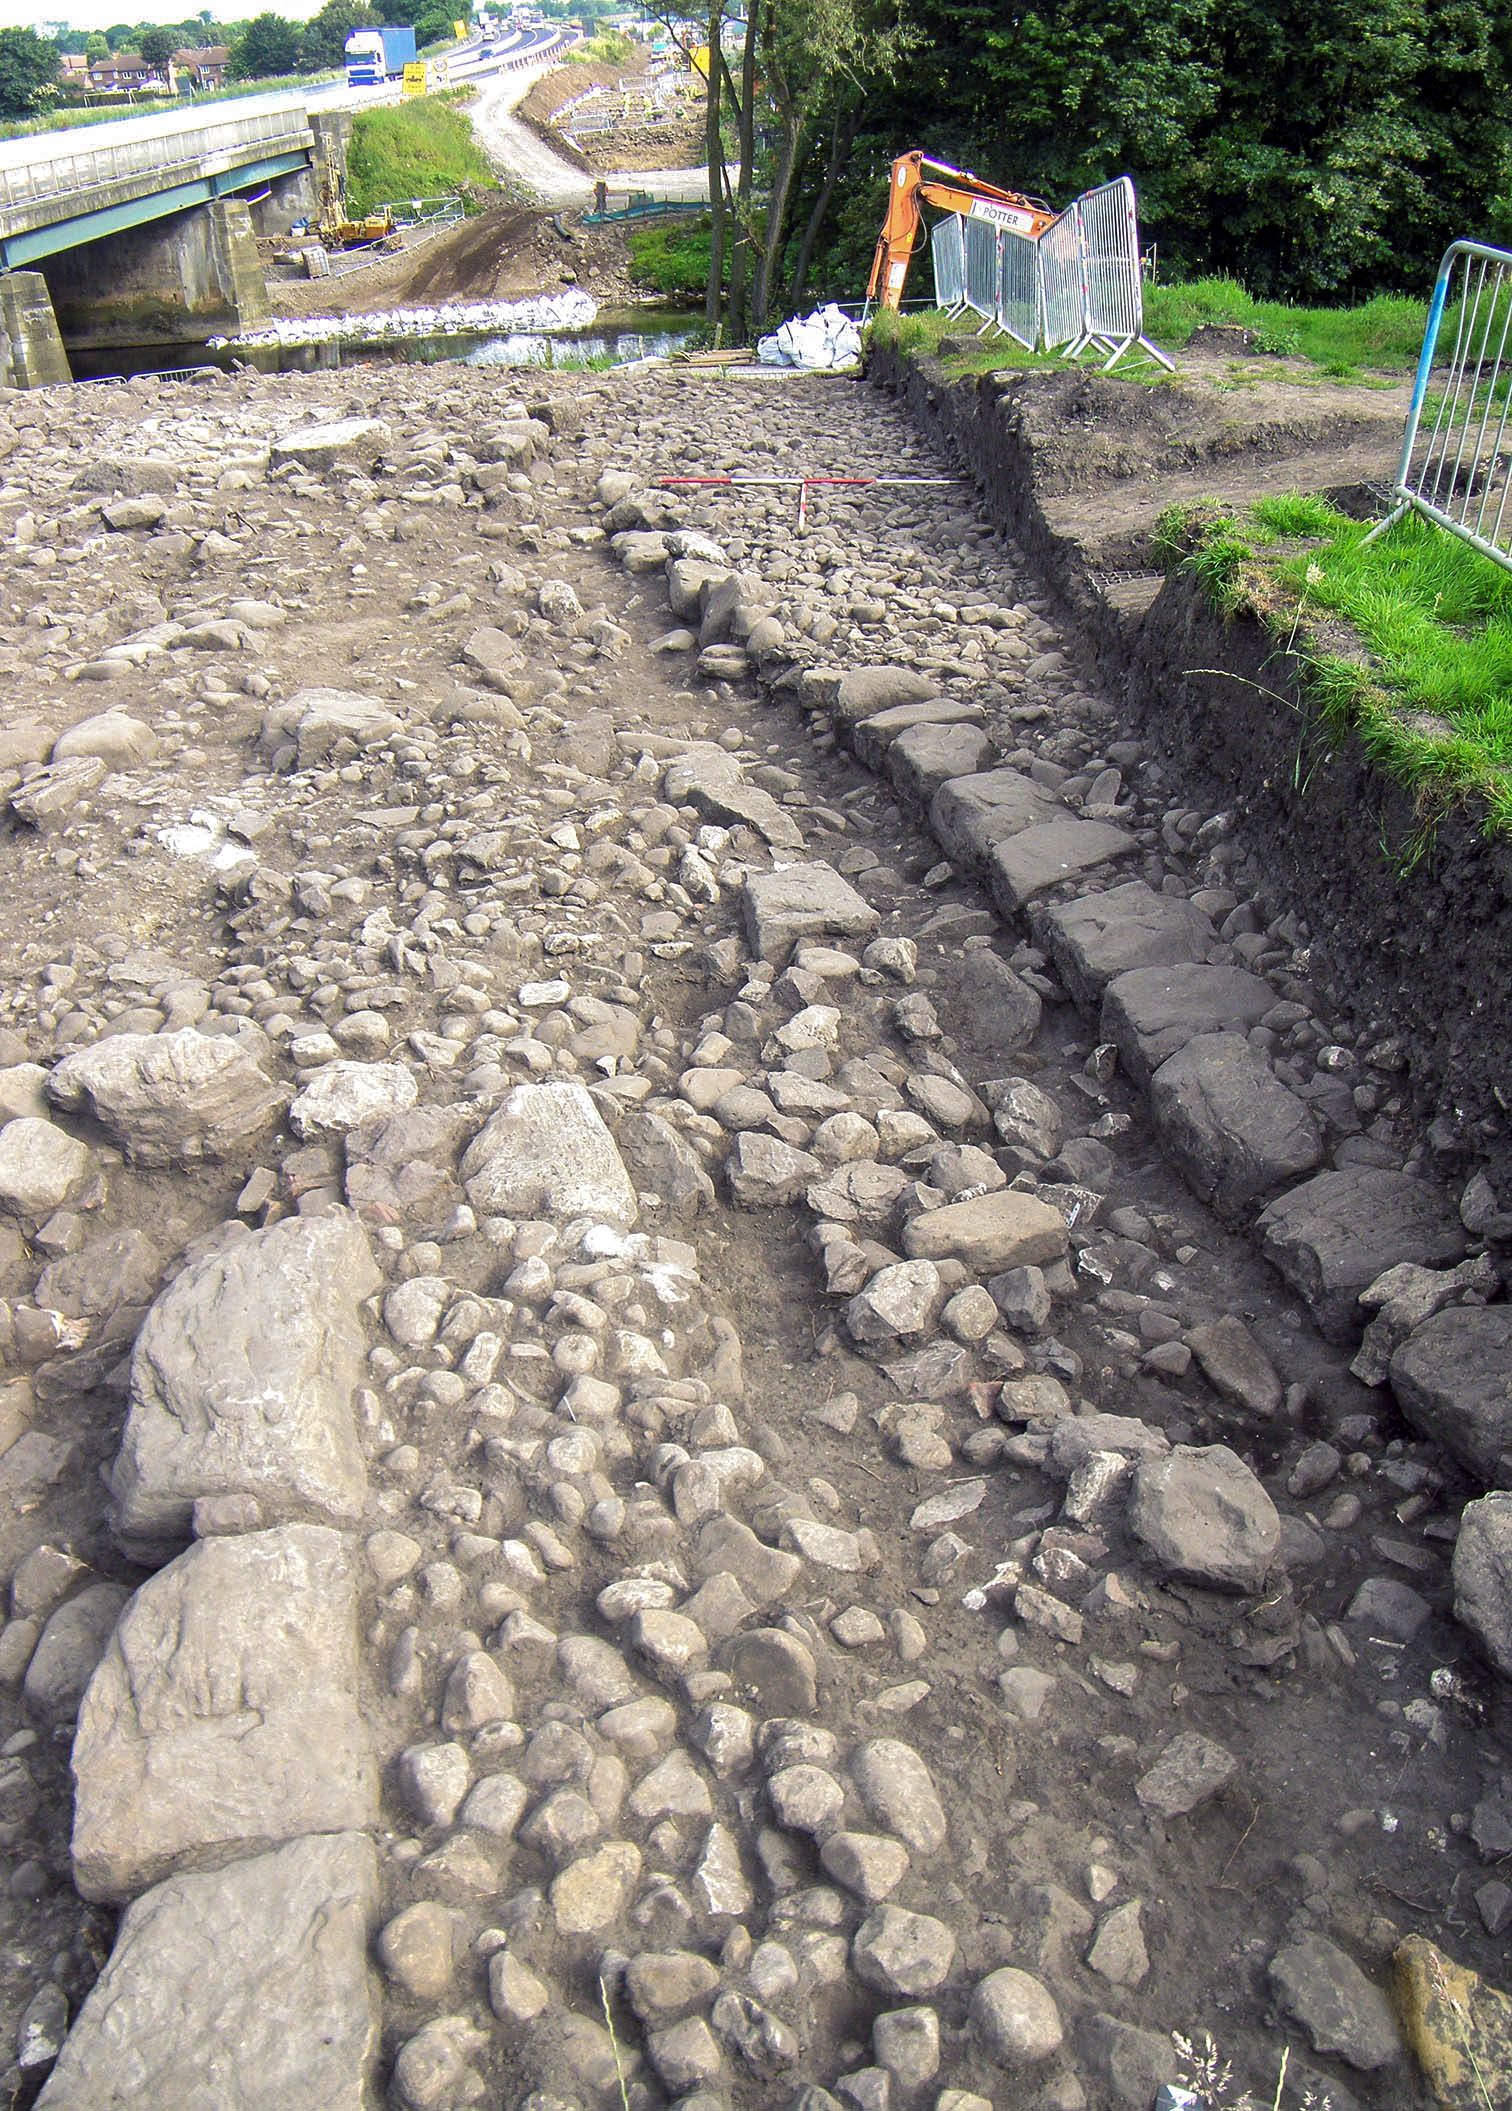
 with turn at Agricola Bridge on its approach to the River Swale. as a JPG image")
|
Title: Figure 44: south-facing view of Dere Street (Margary road 8b) with turn at Agricola Bridge on its approach to the River Swale. Filename: DS_Fig-044.jpg (2 MB) |
JPG |
Info
Download |
 with western roadside drain at Agricola Bridge. as a JPG image")
|
Title: Figure 45. Dere Street (Margary road 8b) with western roadside drain at Agricola Bridge. Filename: DS_Fig-045.jpg (687 kB) |
JPG |
Info
Download |
 western kerb at Agricola Bridge. as a JPG image")
|
Title: Figure 46. Dere Street (Margary road 8b) western kerb at Agricola Bridge. Filename: DS_Fig-046.jpg (755 kB) |
JPG |
Info
Download |
 and archaeological interventions north of the River Swale at Cataractonium. as a JPG image")
|
Title: Figure 47: plan of Dere Street (Margary road 8c) and archaeological interventions north of the River Swale at Cataractonium. Filename: DS_Fig-047.jpg (1 MB) |
JPG |
Info
Download |
 on its northern approach to the River Swale and Roman bridge abutment. as a JPG image")
|
Title: Figure 48: CfA Site 511 re-exposed section through Dere Street (Margary road 8c) on its northern approach to the River Swale and Roman bridge abutment. Filename: DS_Fig-048.jpg (3 MB) |
JPG |
Info
Download |
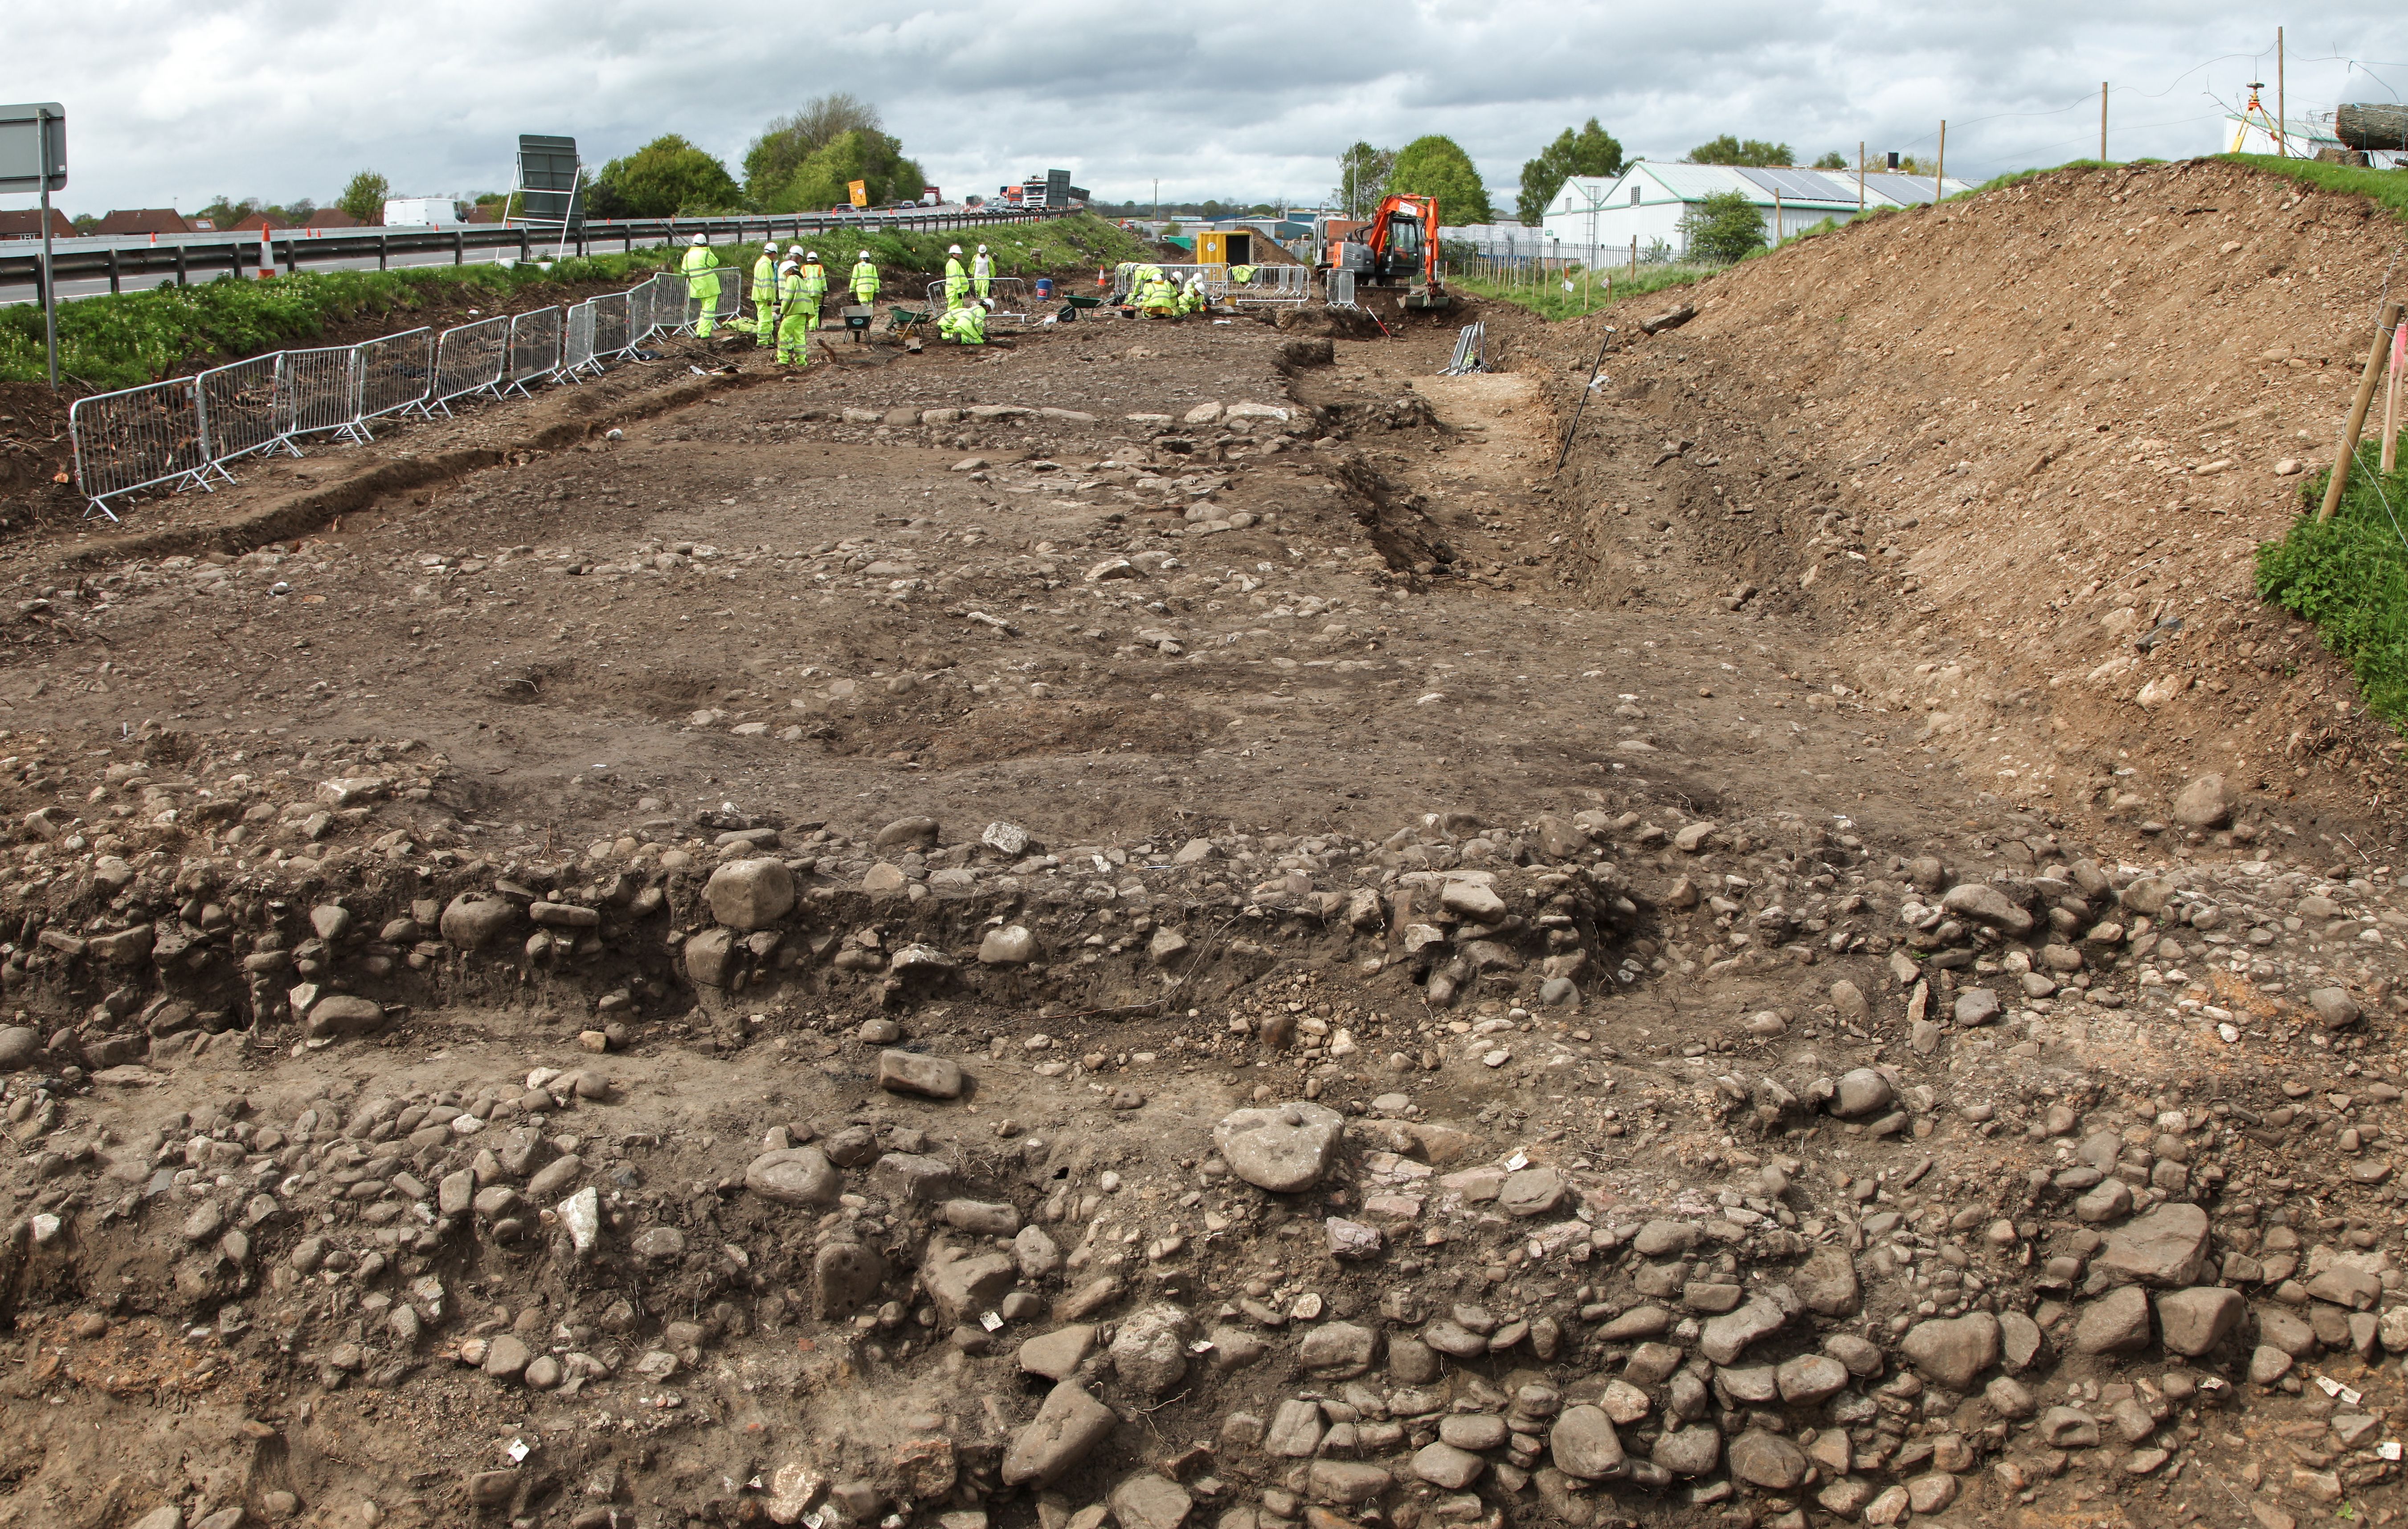
 at Brompton East (A1 scheme Field 179). as a JPG image")
|
Title: Figure 49: truncated remains of early Dere Street (Margary road 8c) at Brompton East (A1 scheme Field 179). Filename: DS_Fig-049.jpg (1 MB) |
JPG |
Info
Download |
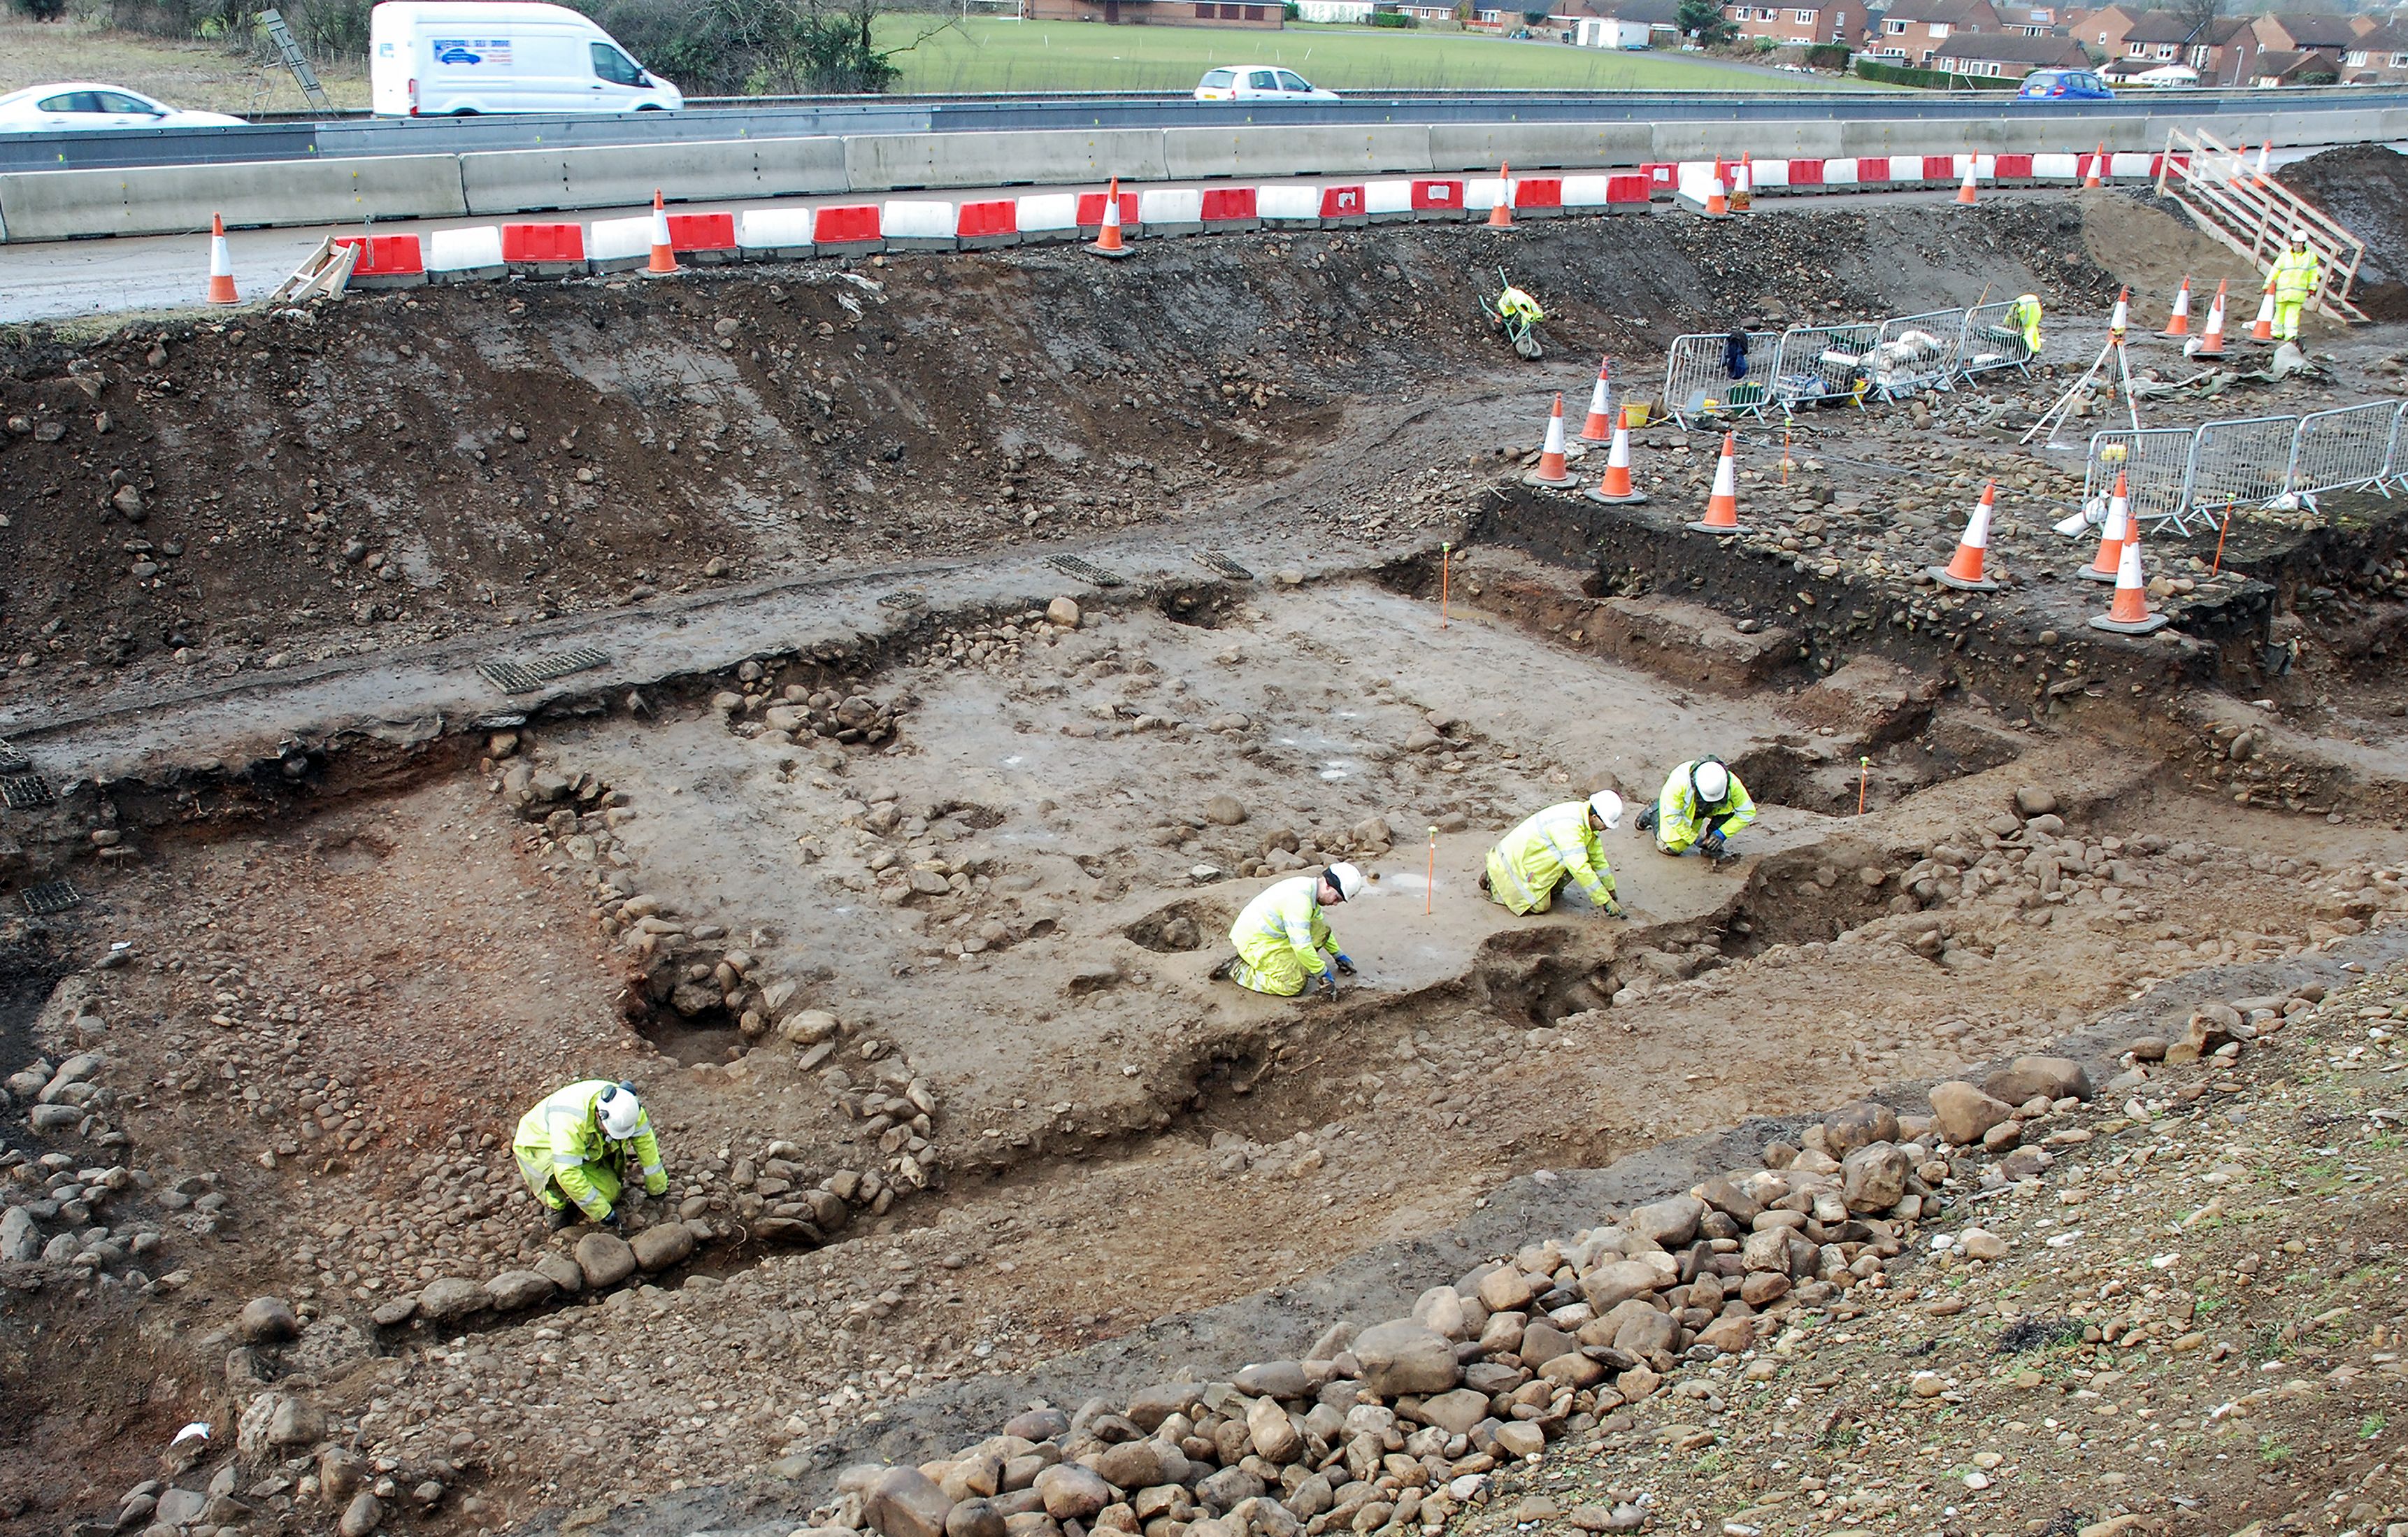
 at Brompton East (A1 scheme Field 179). as a JPG image")
|
Title: Figure 50: cleaning back from the edge of Dere Street (Margary road 8c) at Brompton East (A1 scheme Field 179). Filename: DS_Fig-050.jpg (1 MB) |
JPG |
Info
Download |
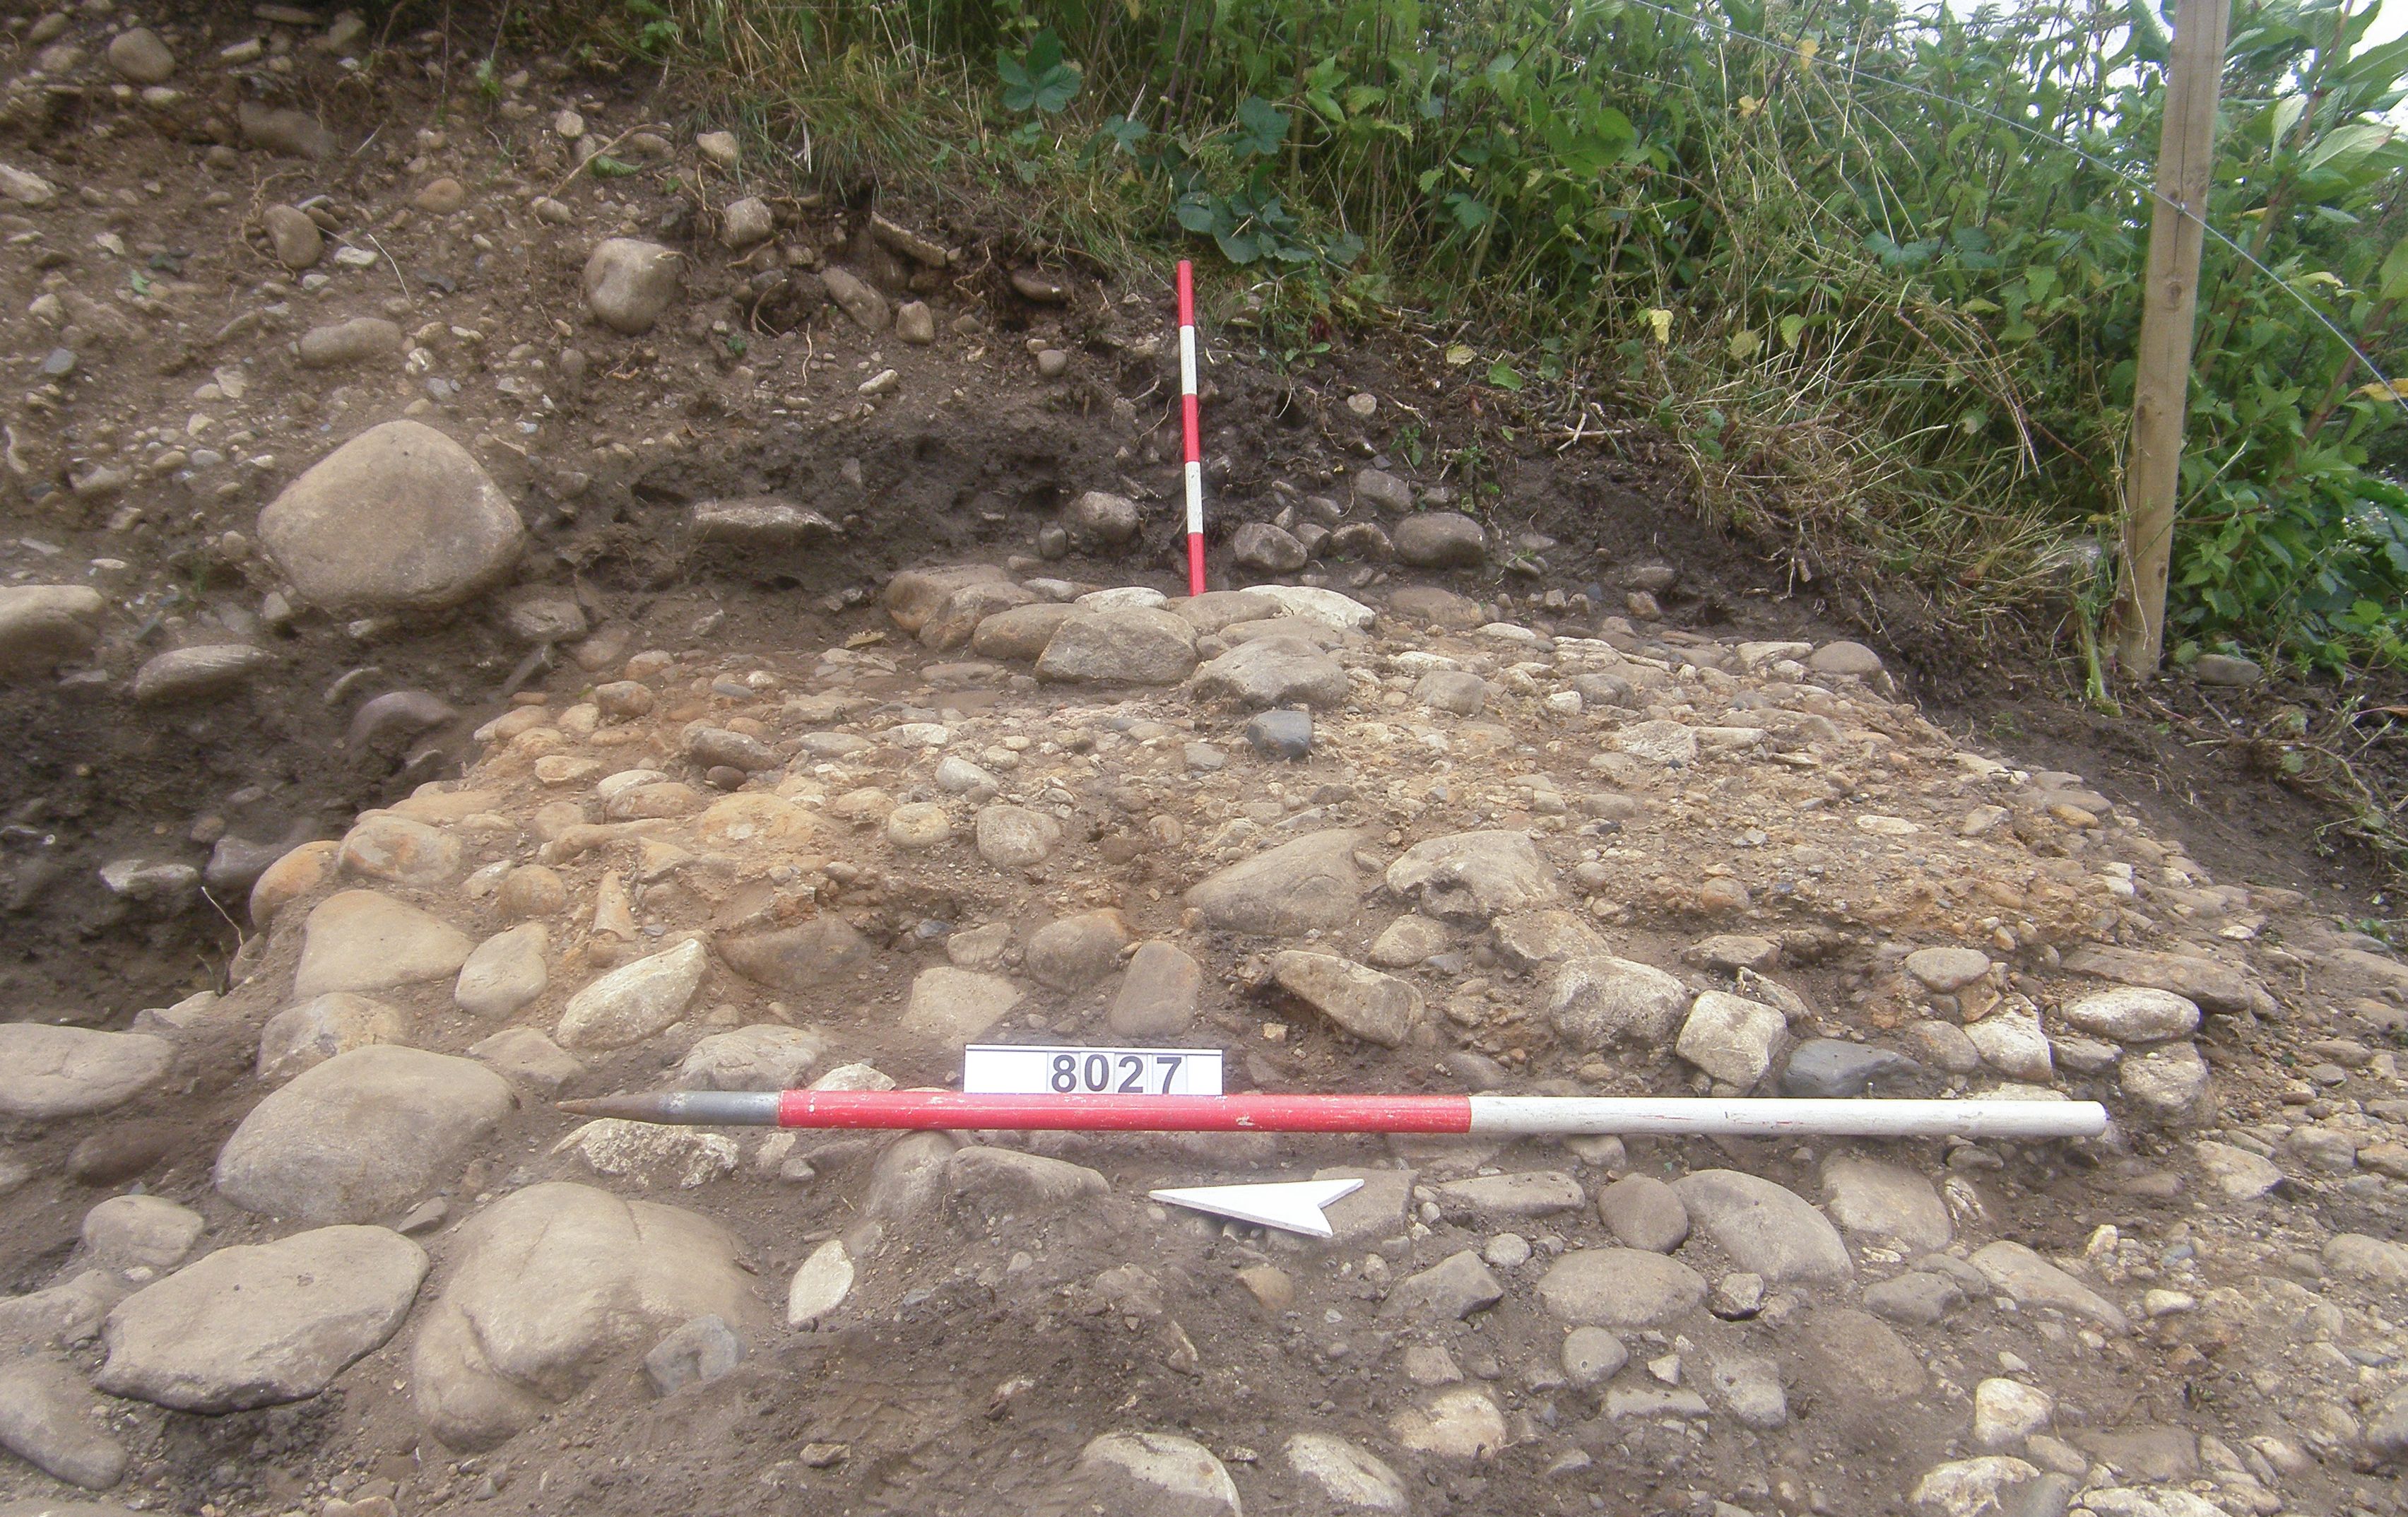
 at the River Swale bridge abutment (A1 scheme Field 179). as a JPG image")
|
Title: Figure 51: a surviving remnant of Dere Street (Margary road 8c) at the River Swale bridge abutment (A1 scheme Field 179). Filename: DS_Fig-051.jpg (1 MB) |
JPG |
Info
Download |
 at Bridge Road, Brompton-on-Swale. as a JPG image")
|
Title: Figure 52: iterations of Dere Street (Margary road 8c) at Bridge Road, Brompton-on-Swale. Filename: DS_Fig-052.jpg (980 kB) |
JPG |
Info
Download |
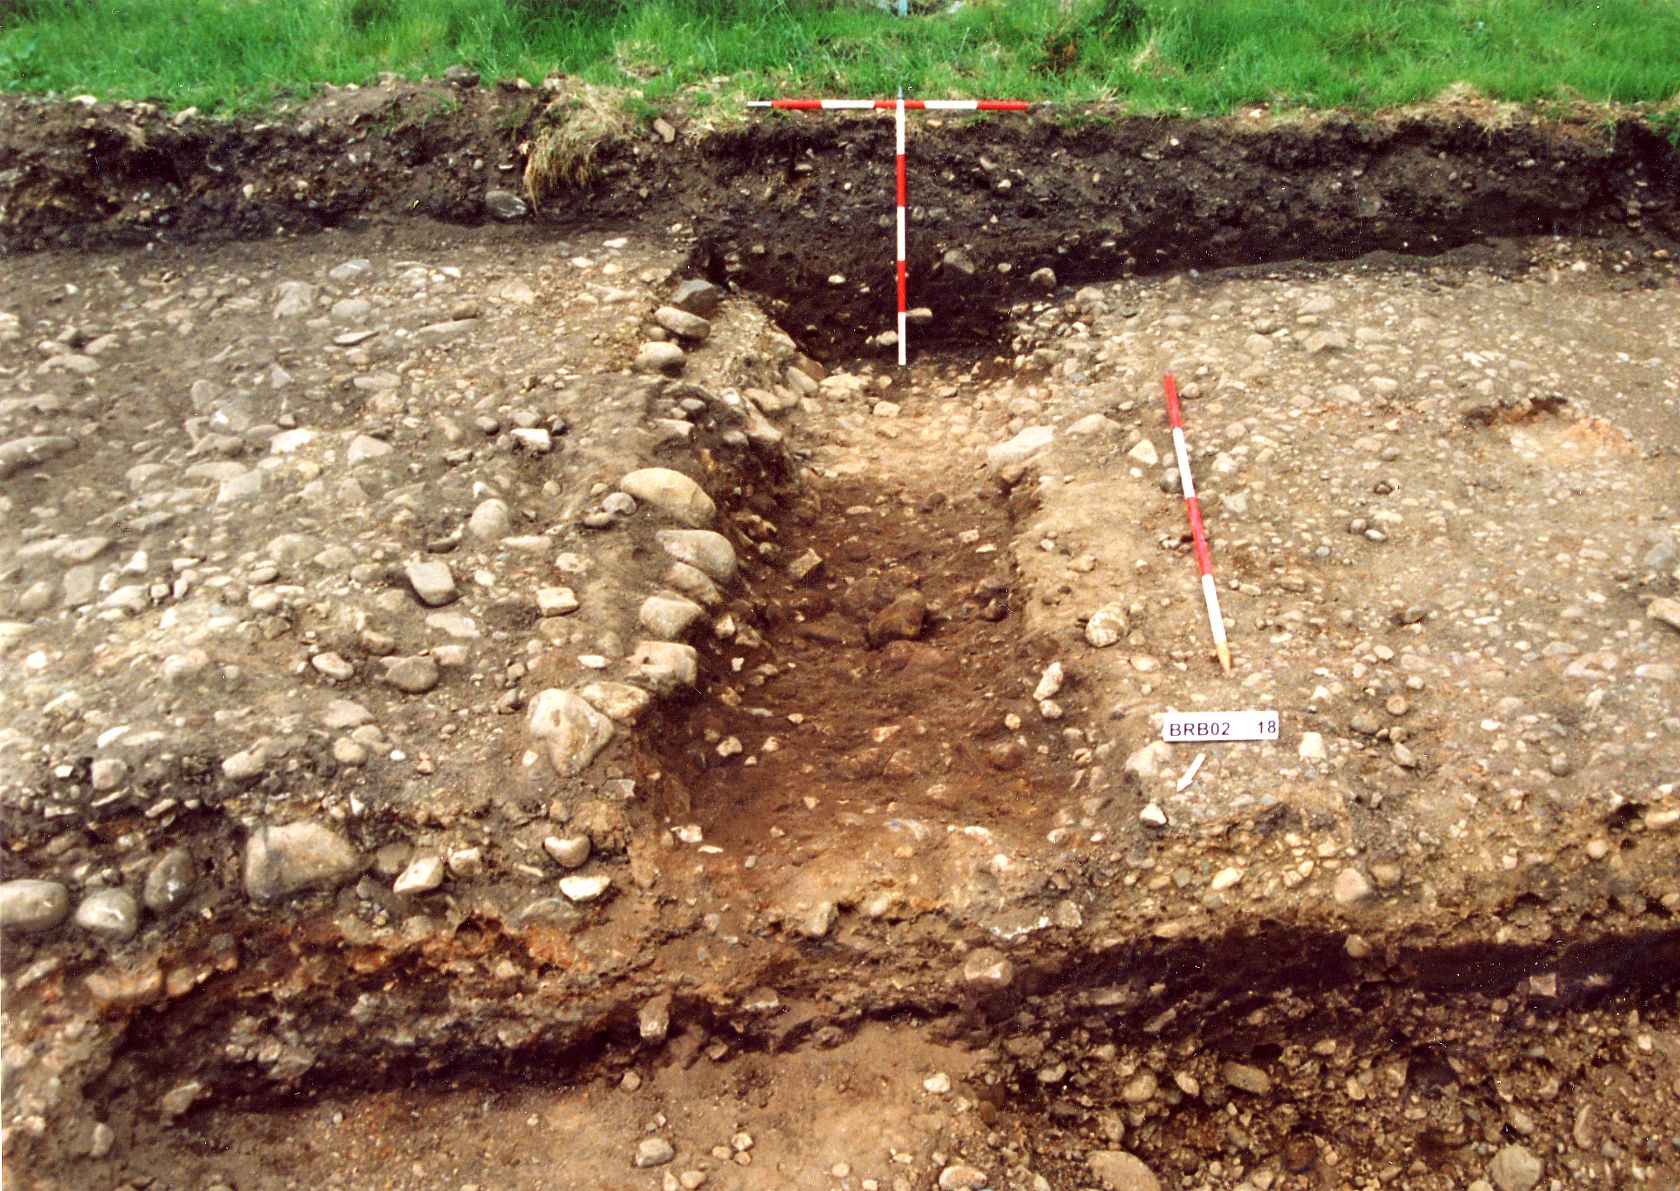
 cut through by later iteration ditch at Bridge Road, Brompton-on-Swale. as a JPG image")
|
Title: Figure 53: Dere Street (Margary road 8c) cut through by later iteration ditch at Bridge Road, Brompton-on-Swale. Filename: DS_Fig-053.jpg (499 kB) |
JPG |
Info
Download |
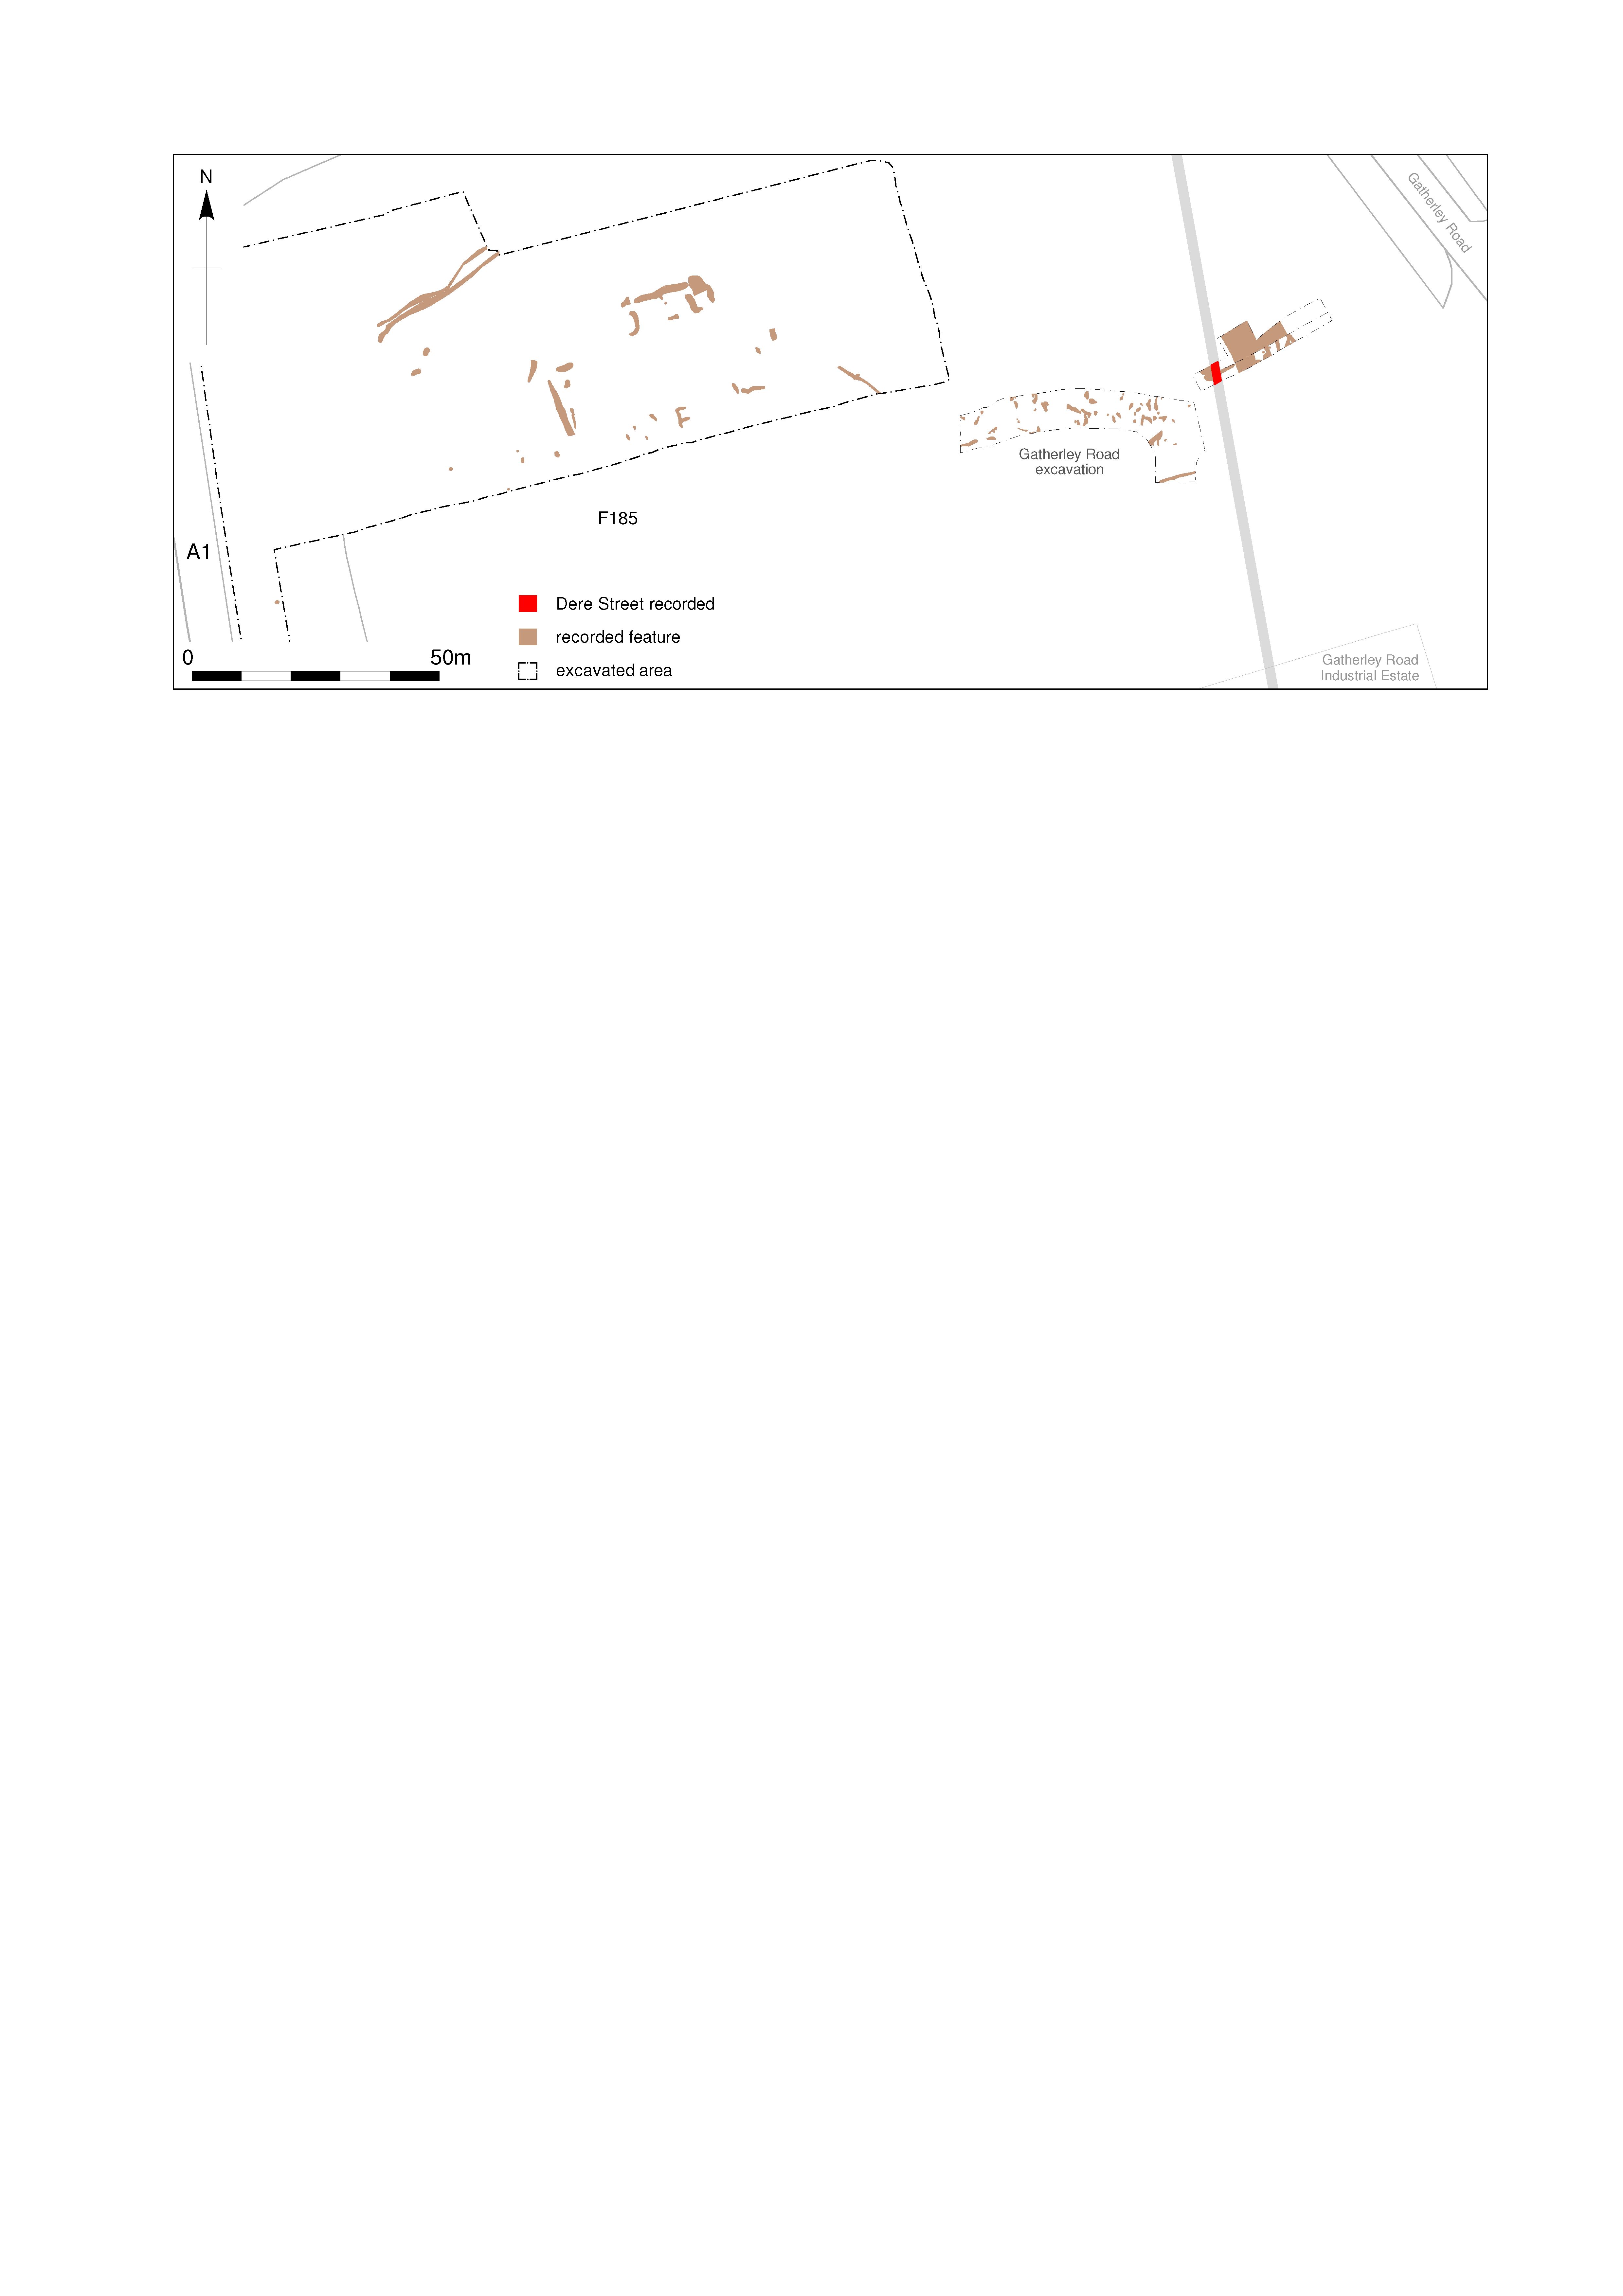
 at Gatherley Road, Brompton-on-Swale. as a JPG image")
|
Title: Figure 54: Dere Street (Margary road 8c) at Gatherley Road, Brompton-on-Swale. Filename: DS_Fig-054.jpg (718 kB) |
JPG |
Info
Download |
 between Cataractonium and Scotch Corner. as a JPG image")
|
Title: Figure 55: Dere Street (Margary road 8c) between Cataractonium and Scotch Corner. Filename: DS_Fig-055.jpg (1 MB) |
JPG |
Info
Download |

|
Title: Figure 56: detail of Scotch Corner from of H. Maclauchlan’s ‘Map of ancient entrenchments between the Rivers Tees and Swale’ 1849. Filename: DS_Fig-056.jpg (724 kB) |
JPG |
Info
Download |

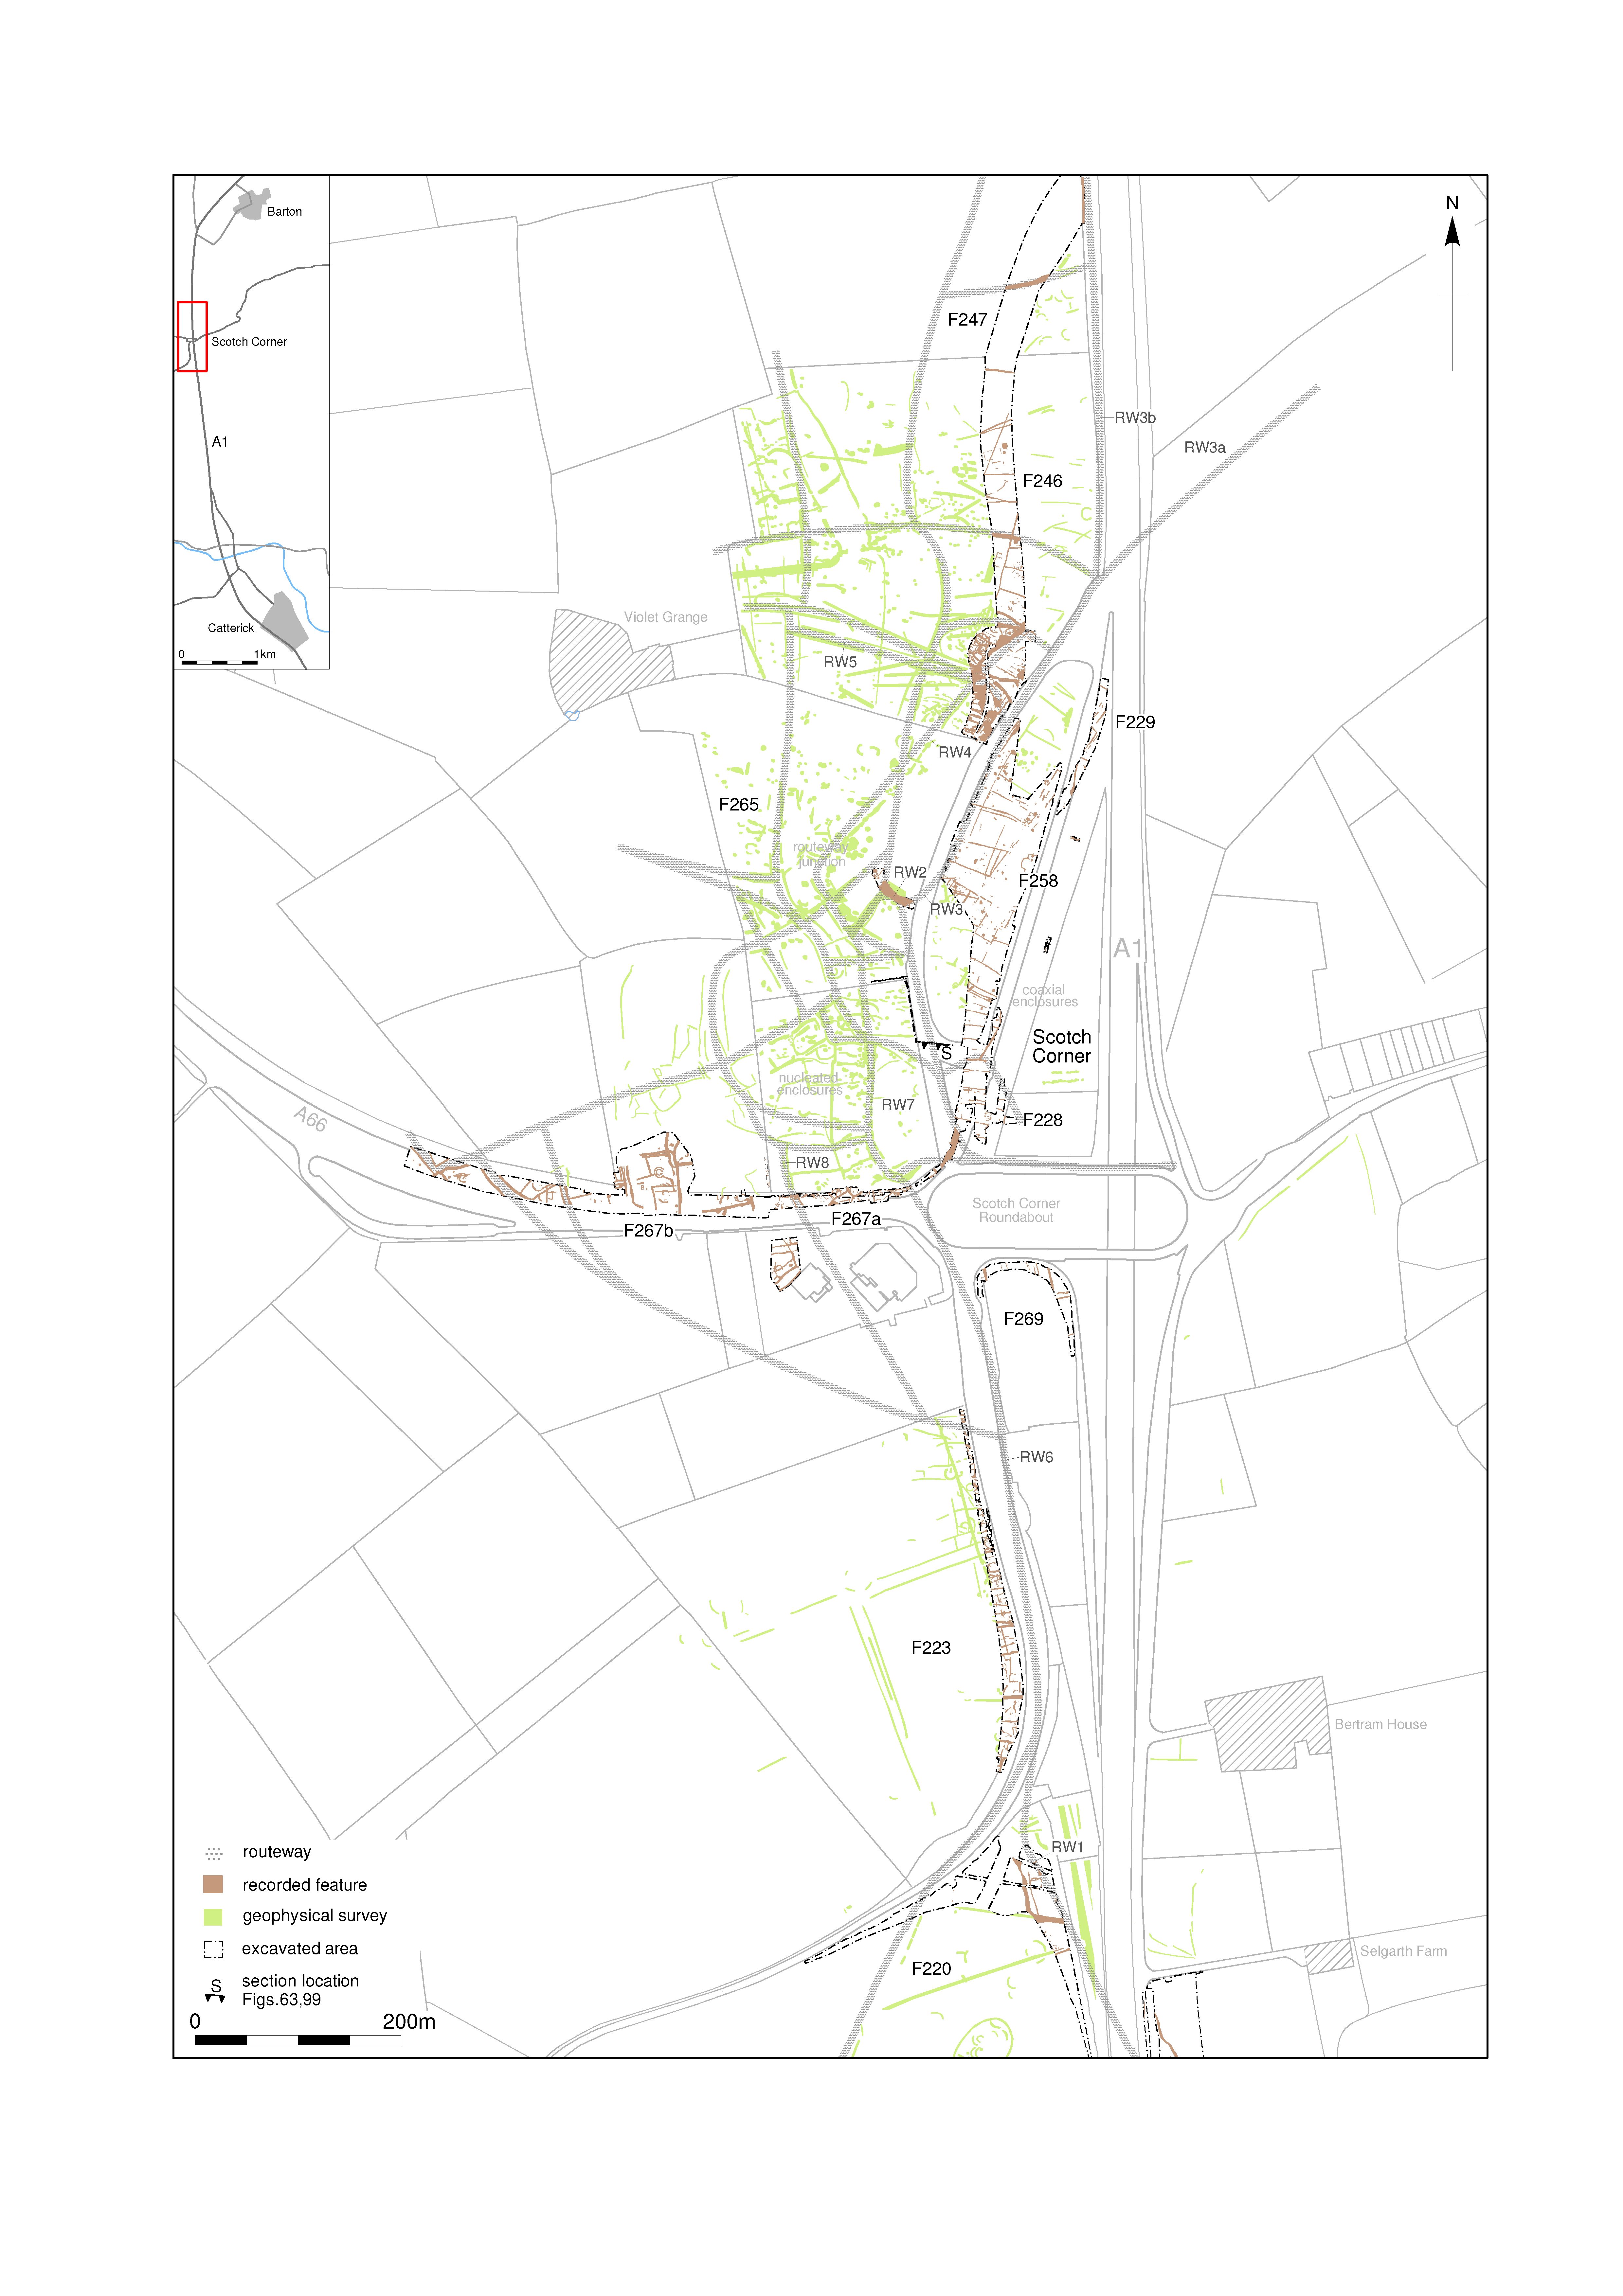
|
Title: Figure 57: Archaeological features and extrapolated network of pre-Roman routeways around Scotch Corner. Filename: DS_Fig-057.jpg (1 MB) |
JPG |
Info
Download |
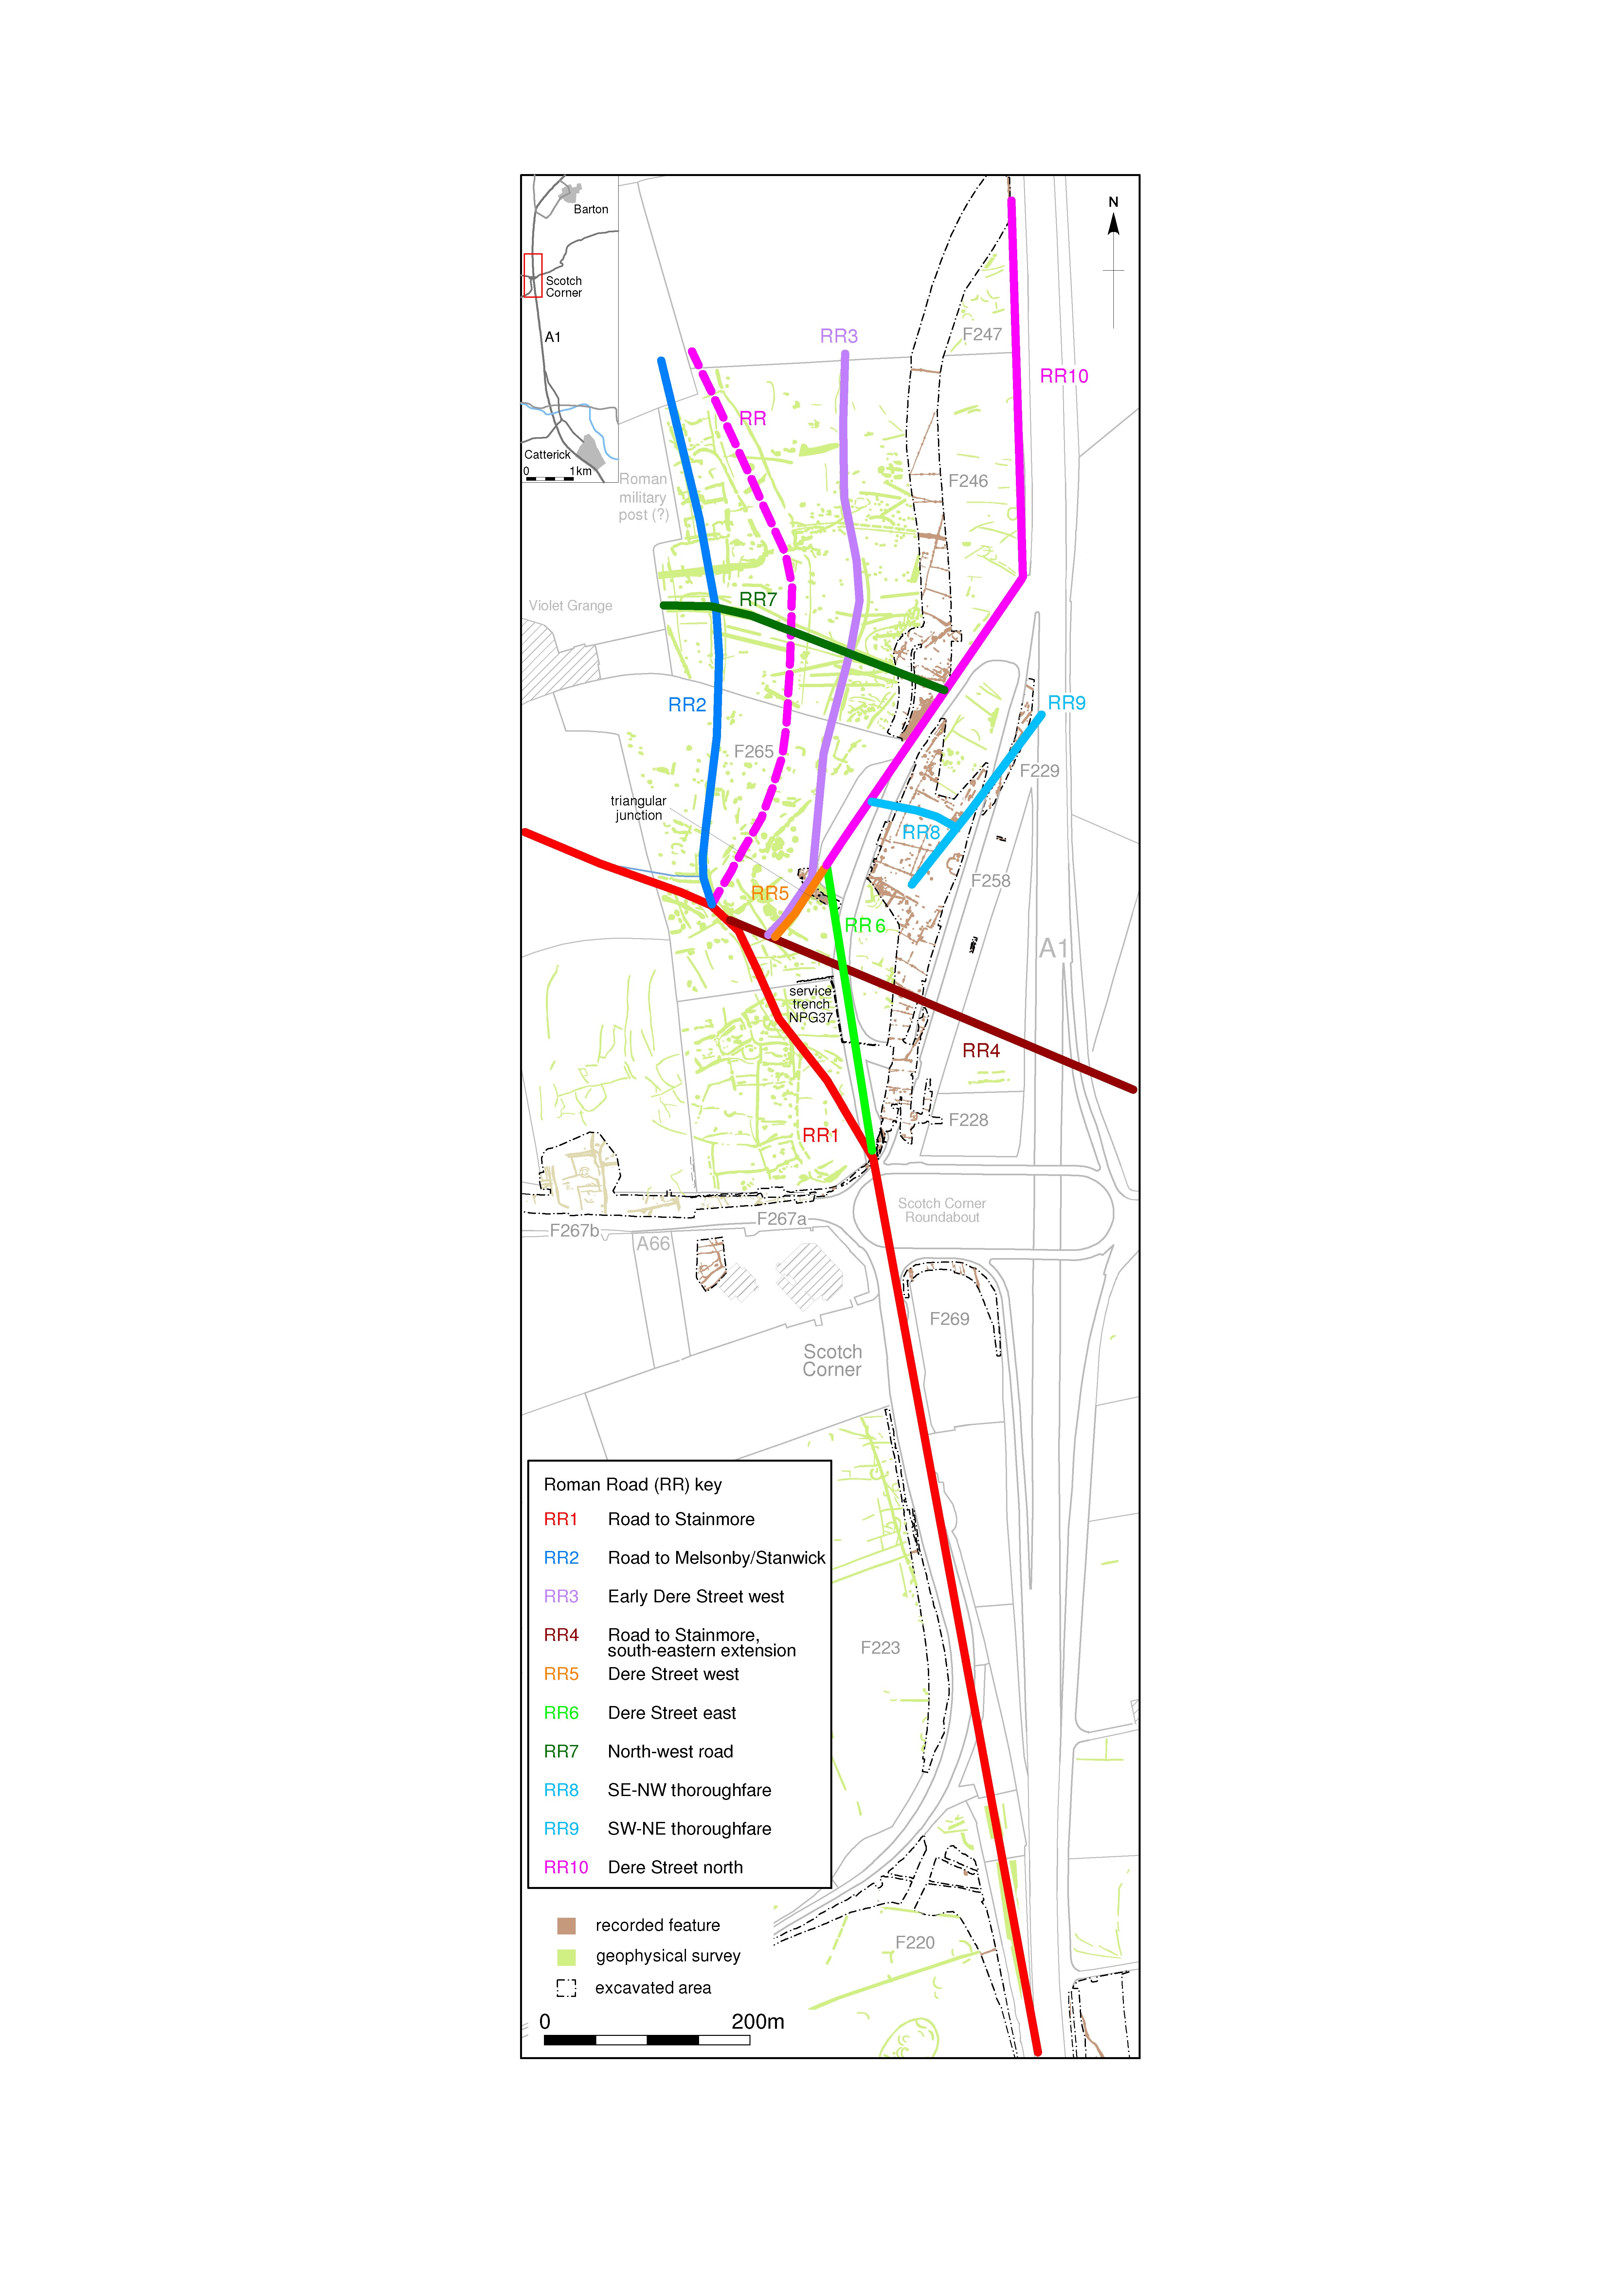
 around Scotch Corner. as a JPG image")
|
Title: Figure 58: Roman roads (RR1–10) around Scotch Corner. Filename: DS_Fig-058.jpg (1 MB) |
JPG |
Info
Download |

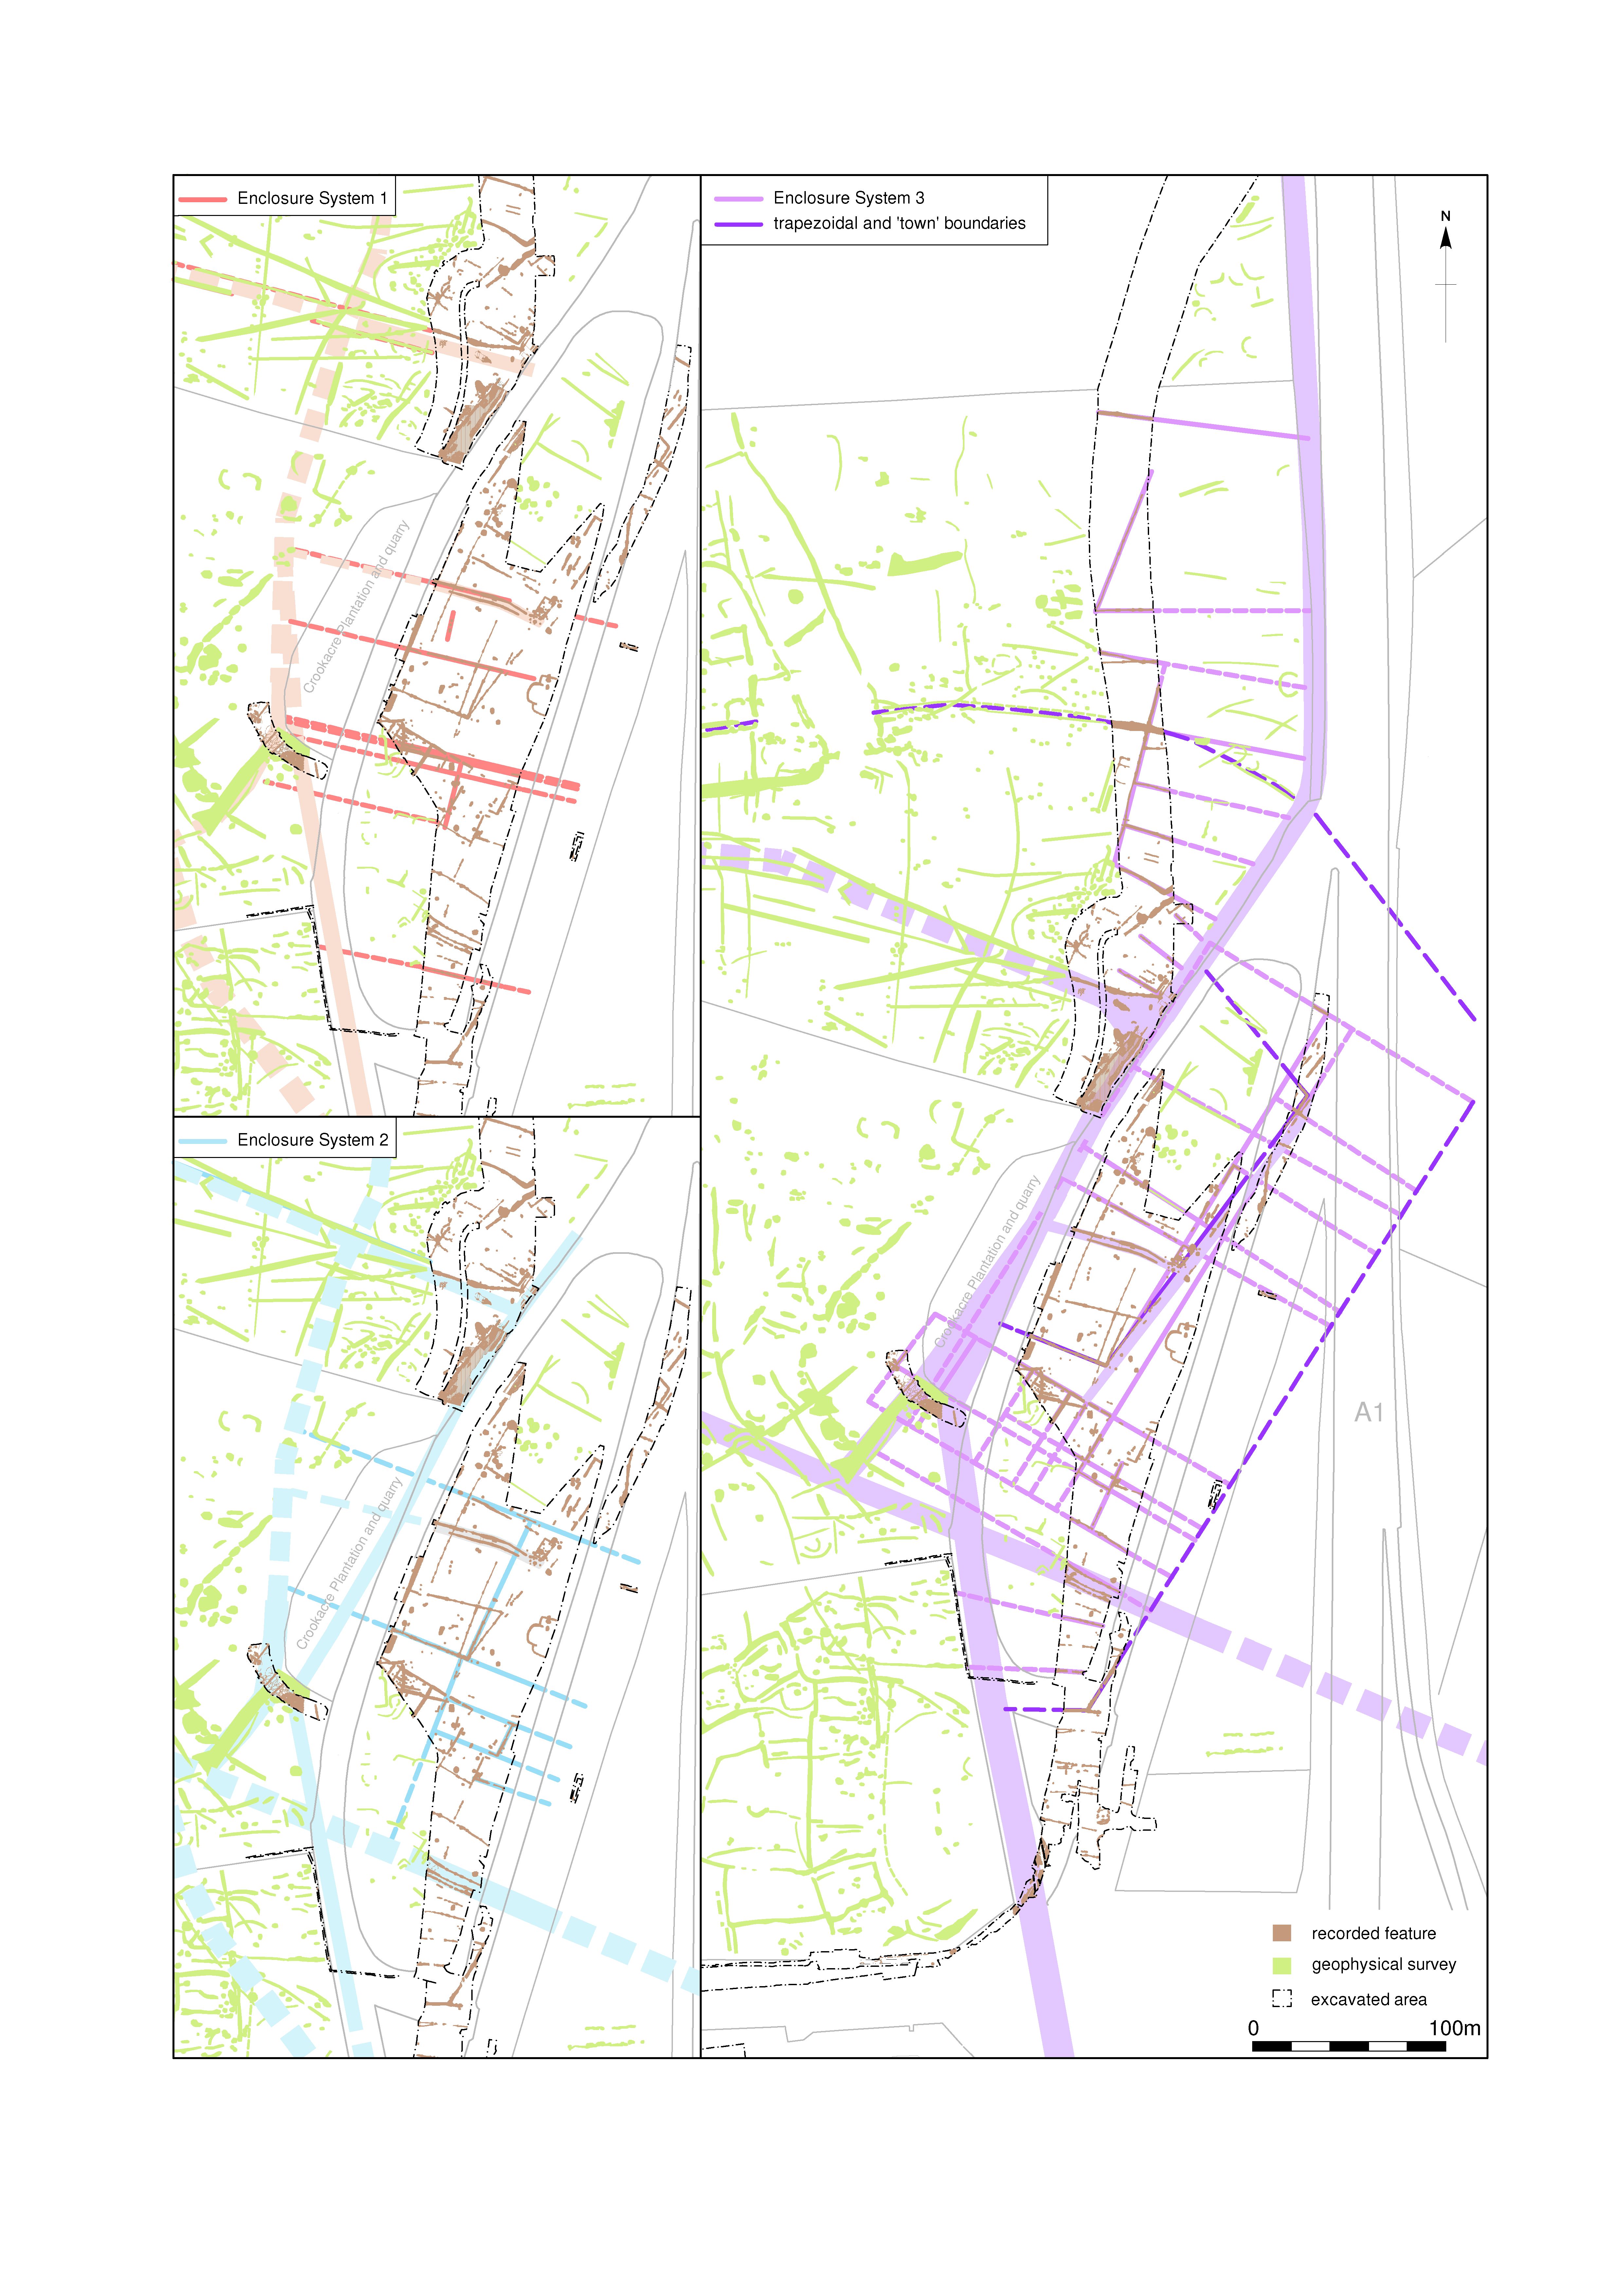
|
Title: Figure 59: Early Roman Enclosure Systems 1–3 at Scotch Corner. Filename: DS_Fig-059.jpg (2 MB) |
JPG |
Info
Download |

|
Title: Figure 60: roads and enclosures associated with the primary stage of Roman conquest at Scotch Corner. Filename: DS_Fig-060.jpg (831 kB) |
JPG |
Info
Download |
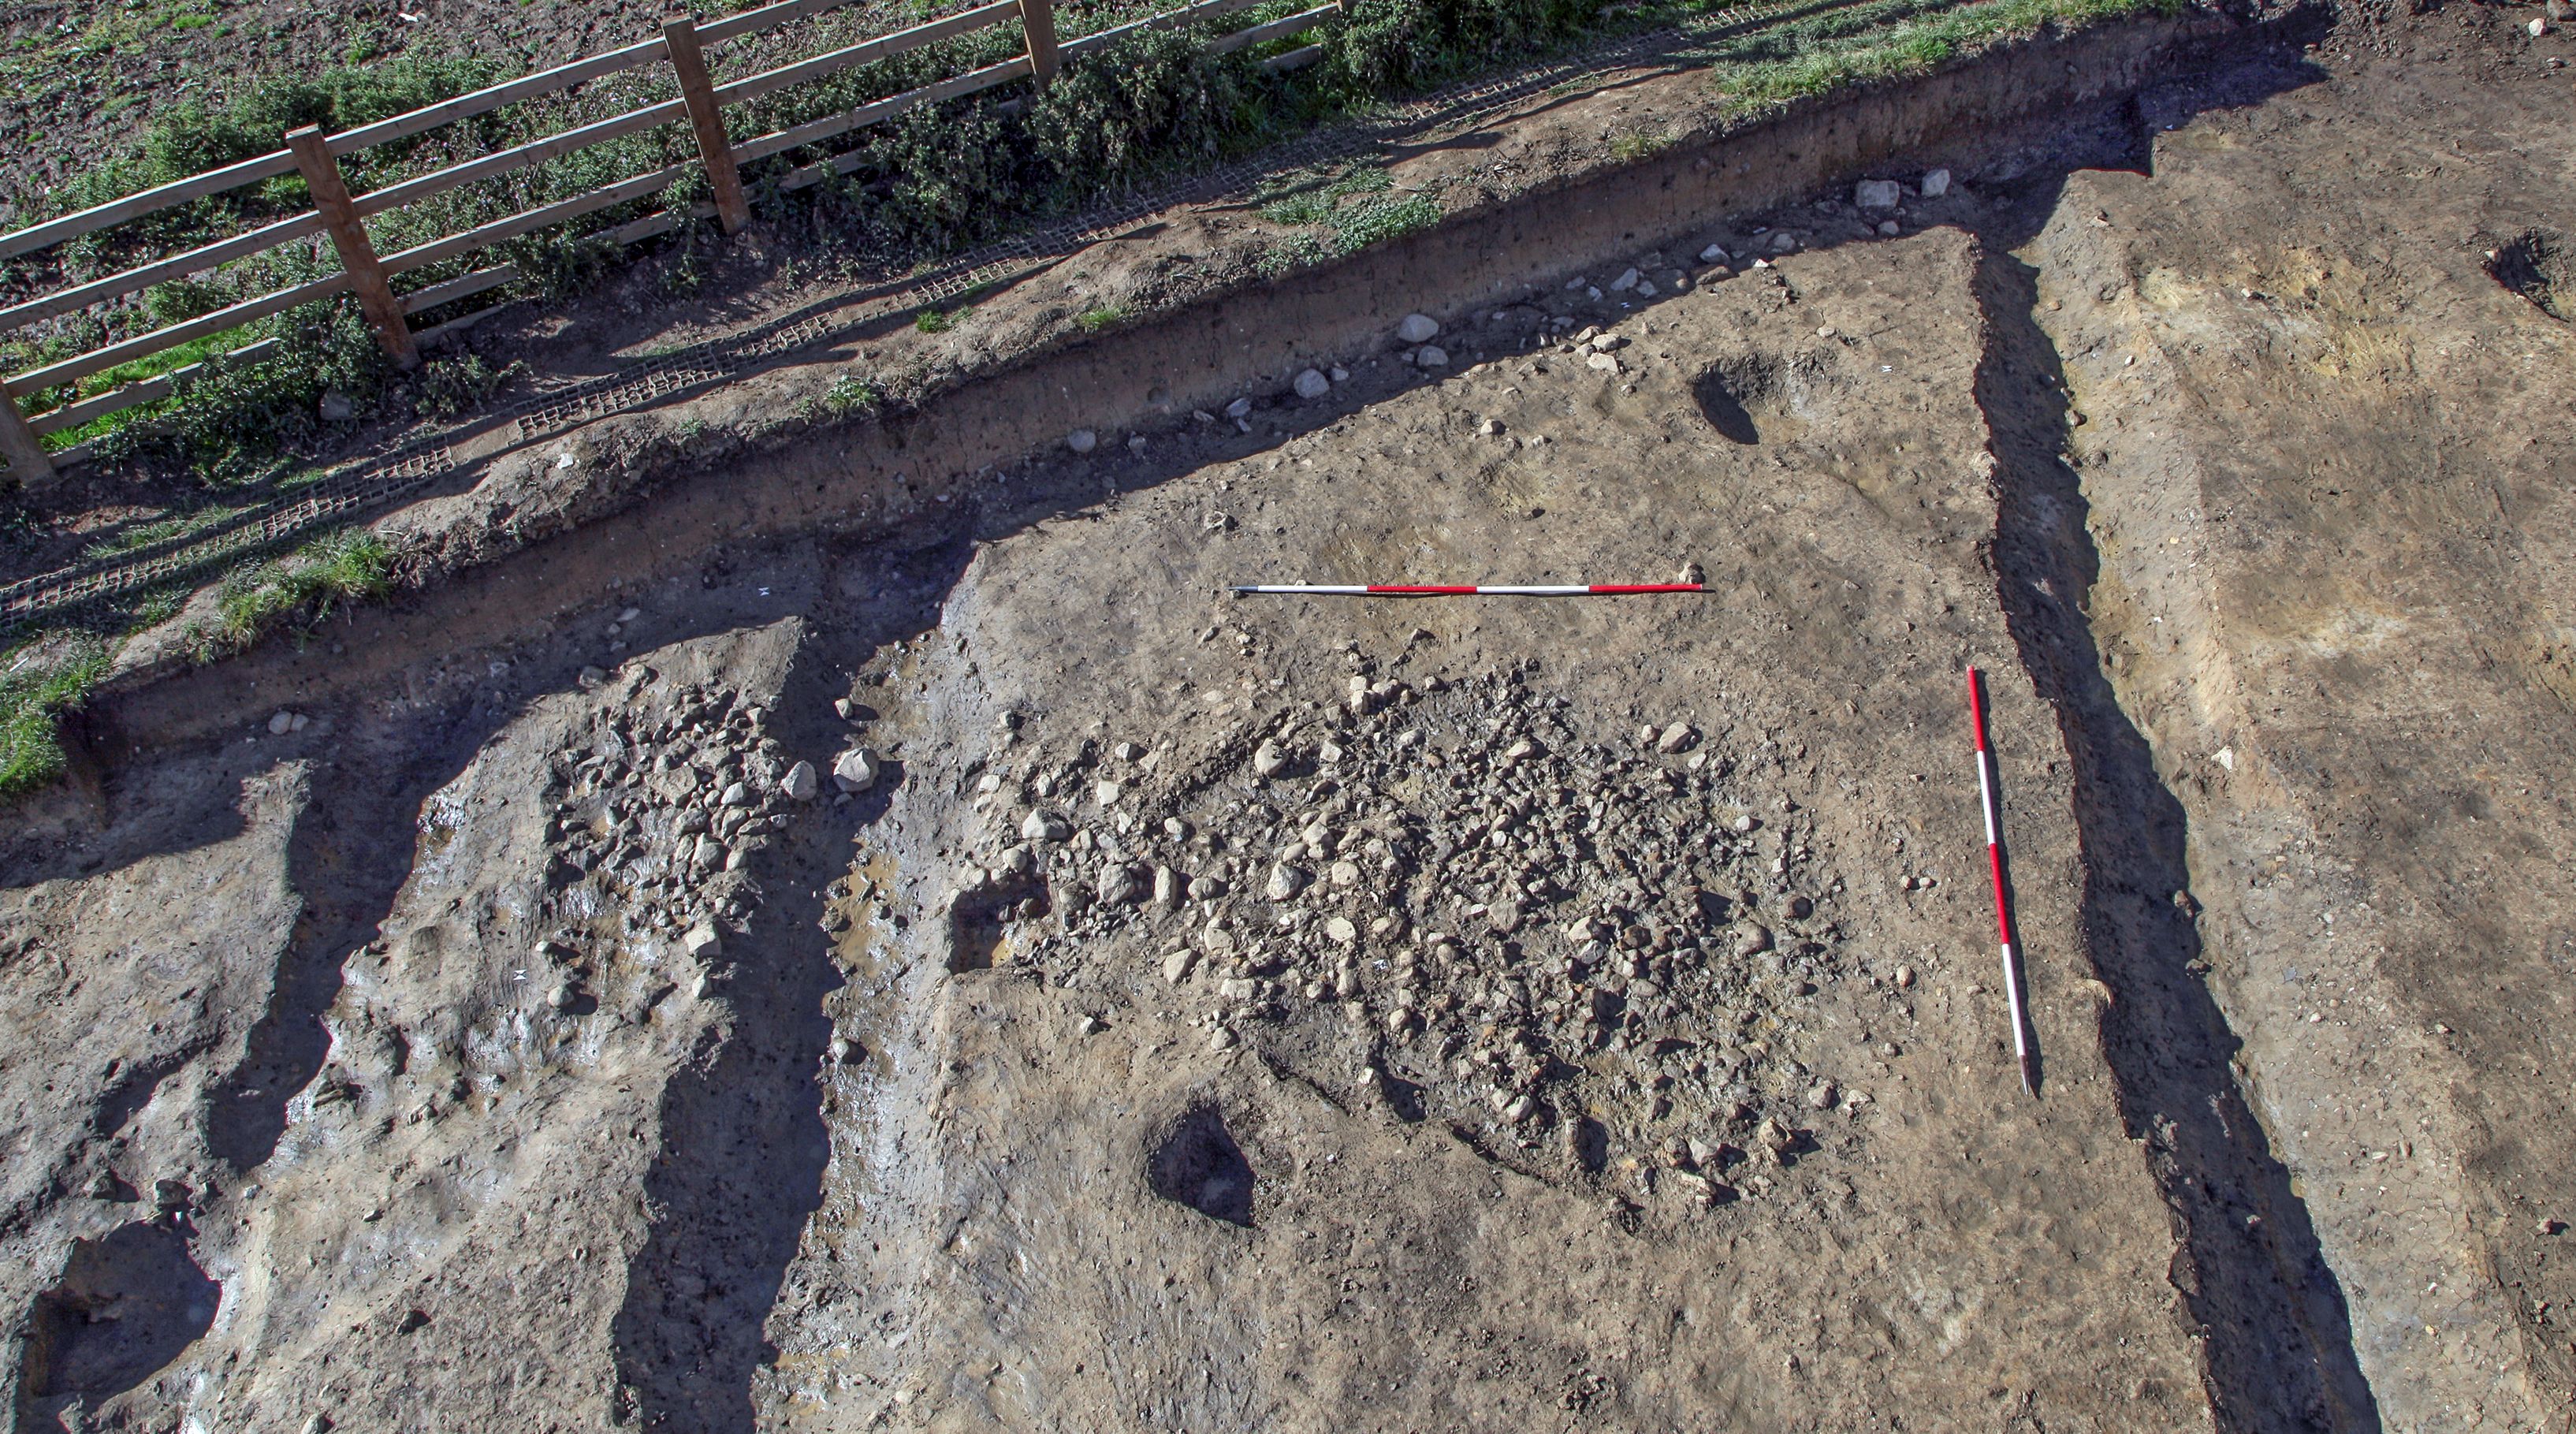
 leading north-west from its junction with RR1, and later road RR5 overlying it on a diverging alignment (A1 scheme Field 265). as a JPG image")
|
Title: Figure 61: Dere Street (Margary road 8c; road RR3, with ranging rods) leading north-west from its junction with RR1, and later road RR5 overlying it on a diverging alignment (A1 scheme Field 265). Filename: DS_Fig-061.jpg (2 MB) |
JPG |
Info
Download |
 immediately north of Scotch Corner roundabout. as a JPG image")
|
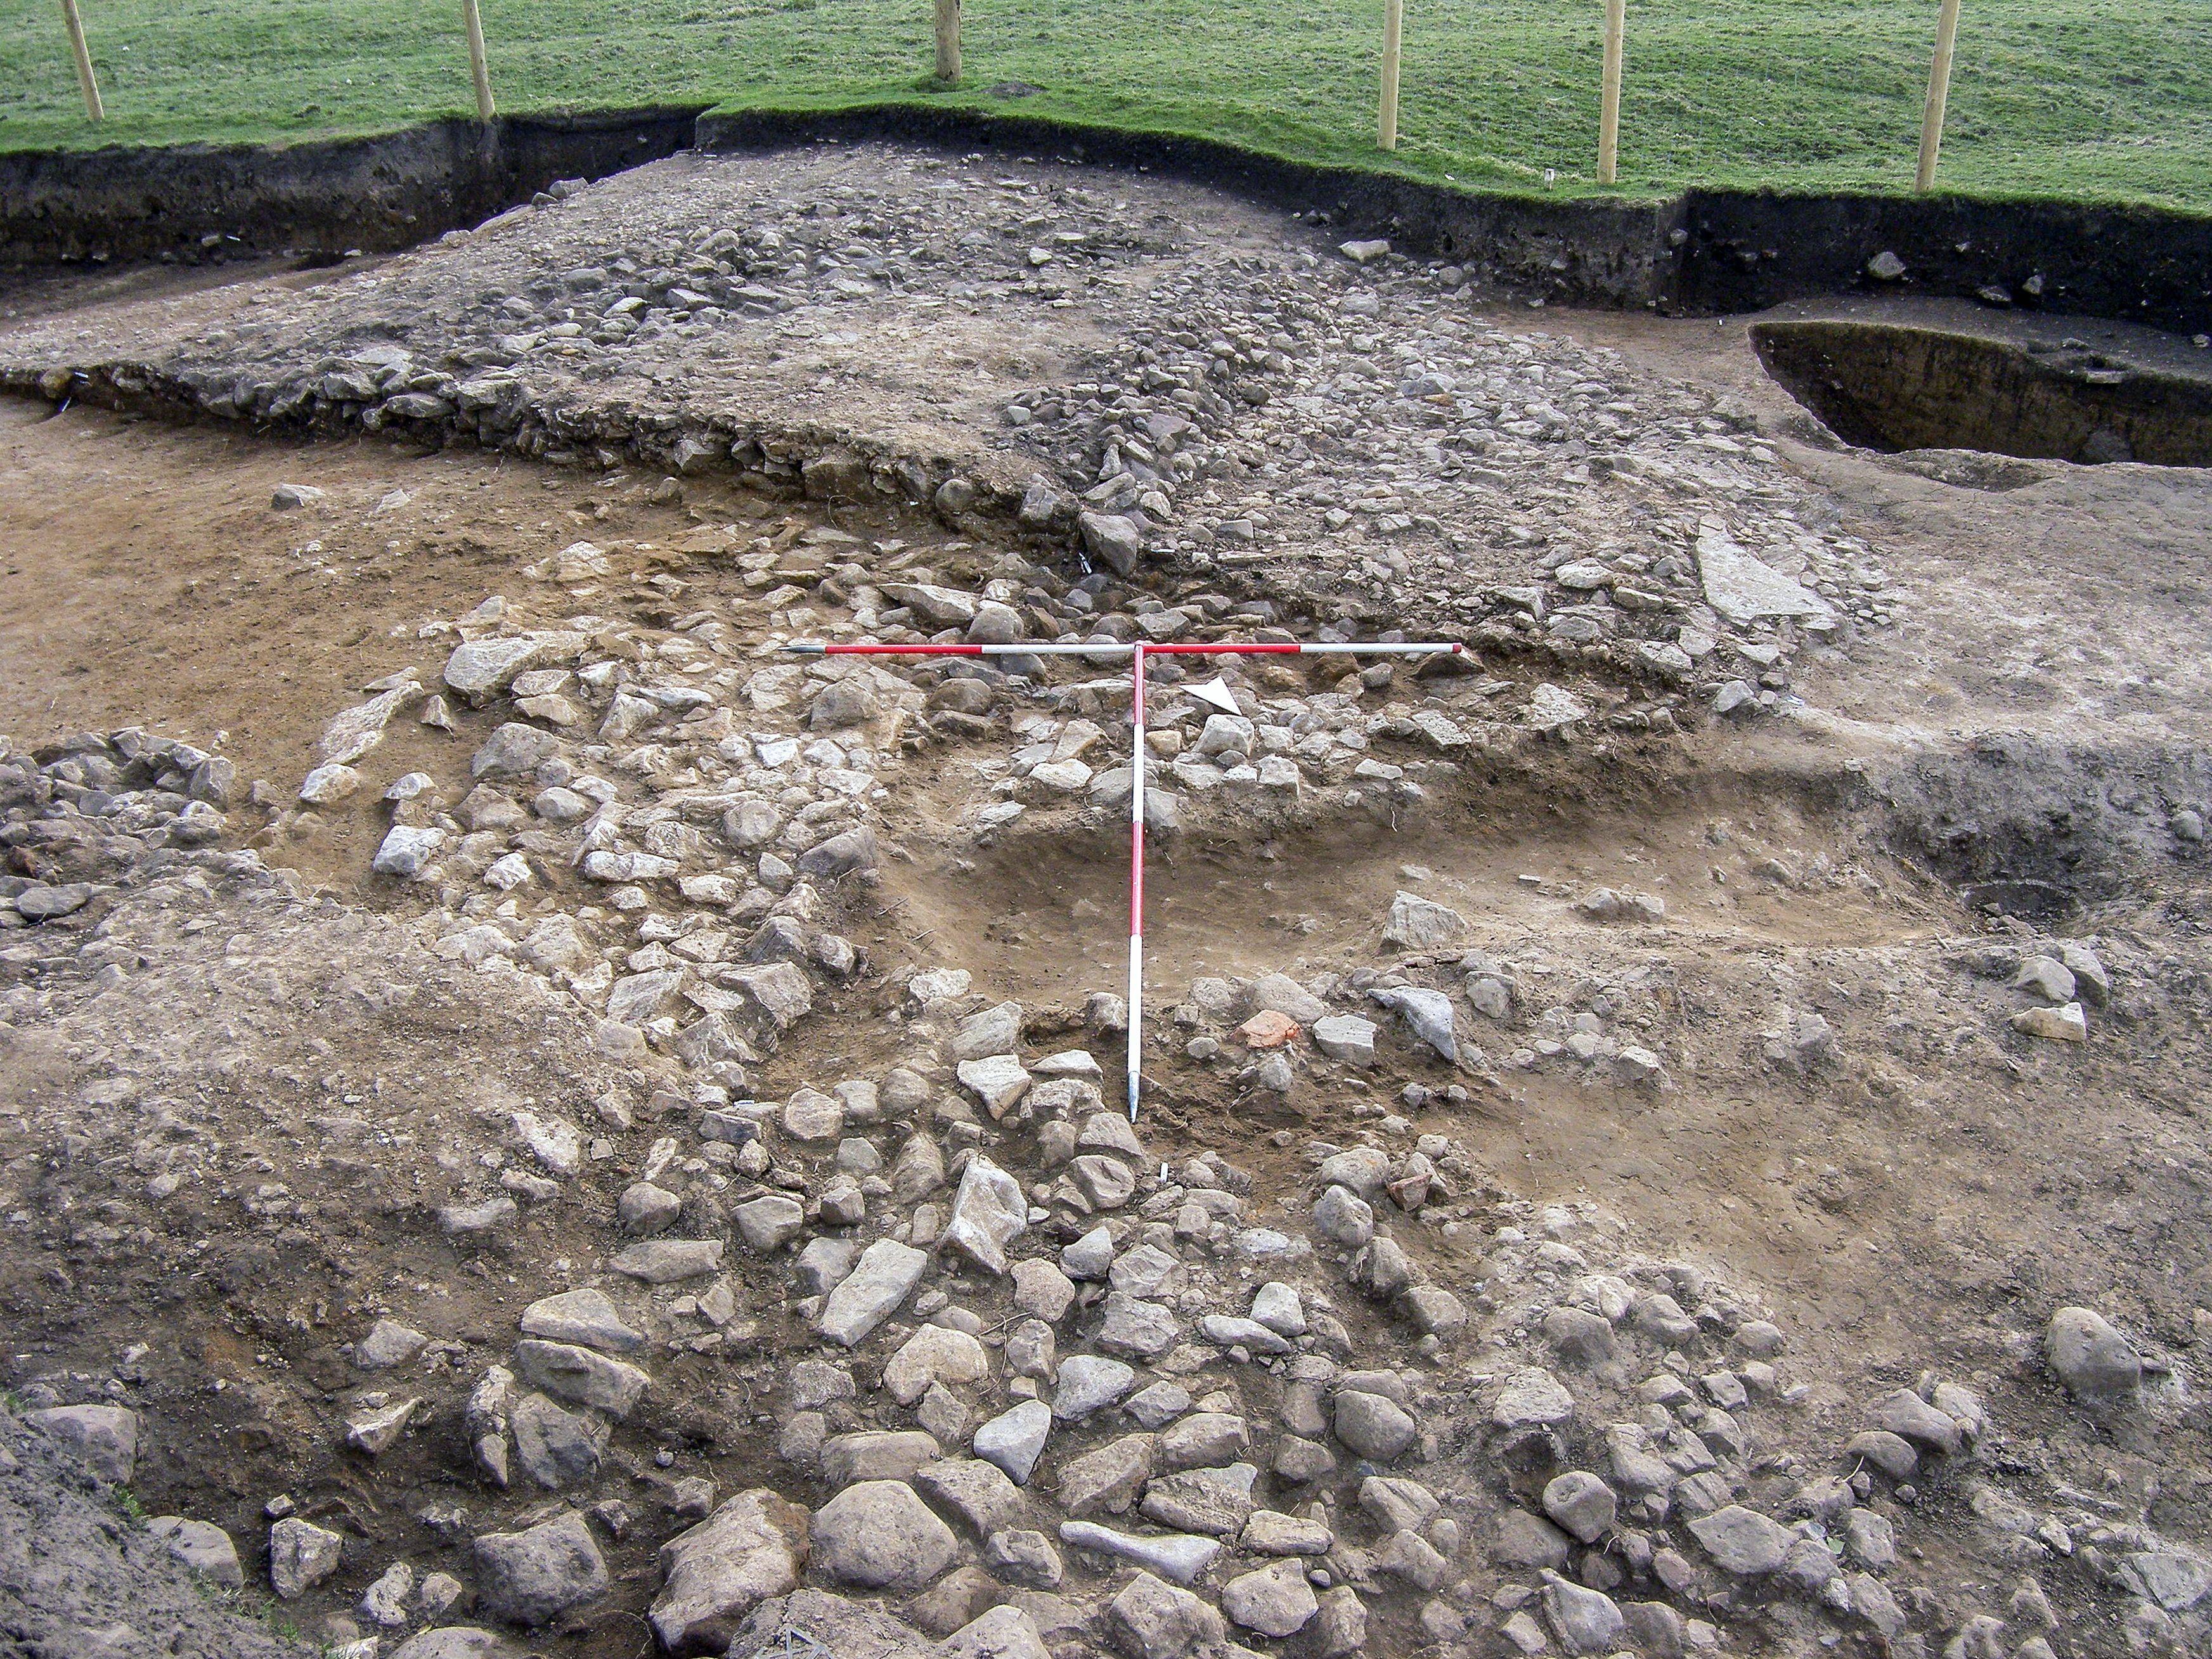
Title: Figure 62: section through Dere Street (Margary road 8c; RR6) immediately north of Scotch Corner roundabout. Filename: DS_Fig-062.jpg (1 MB) |
JPG |
Info
Download |
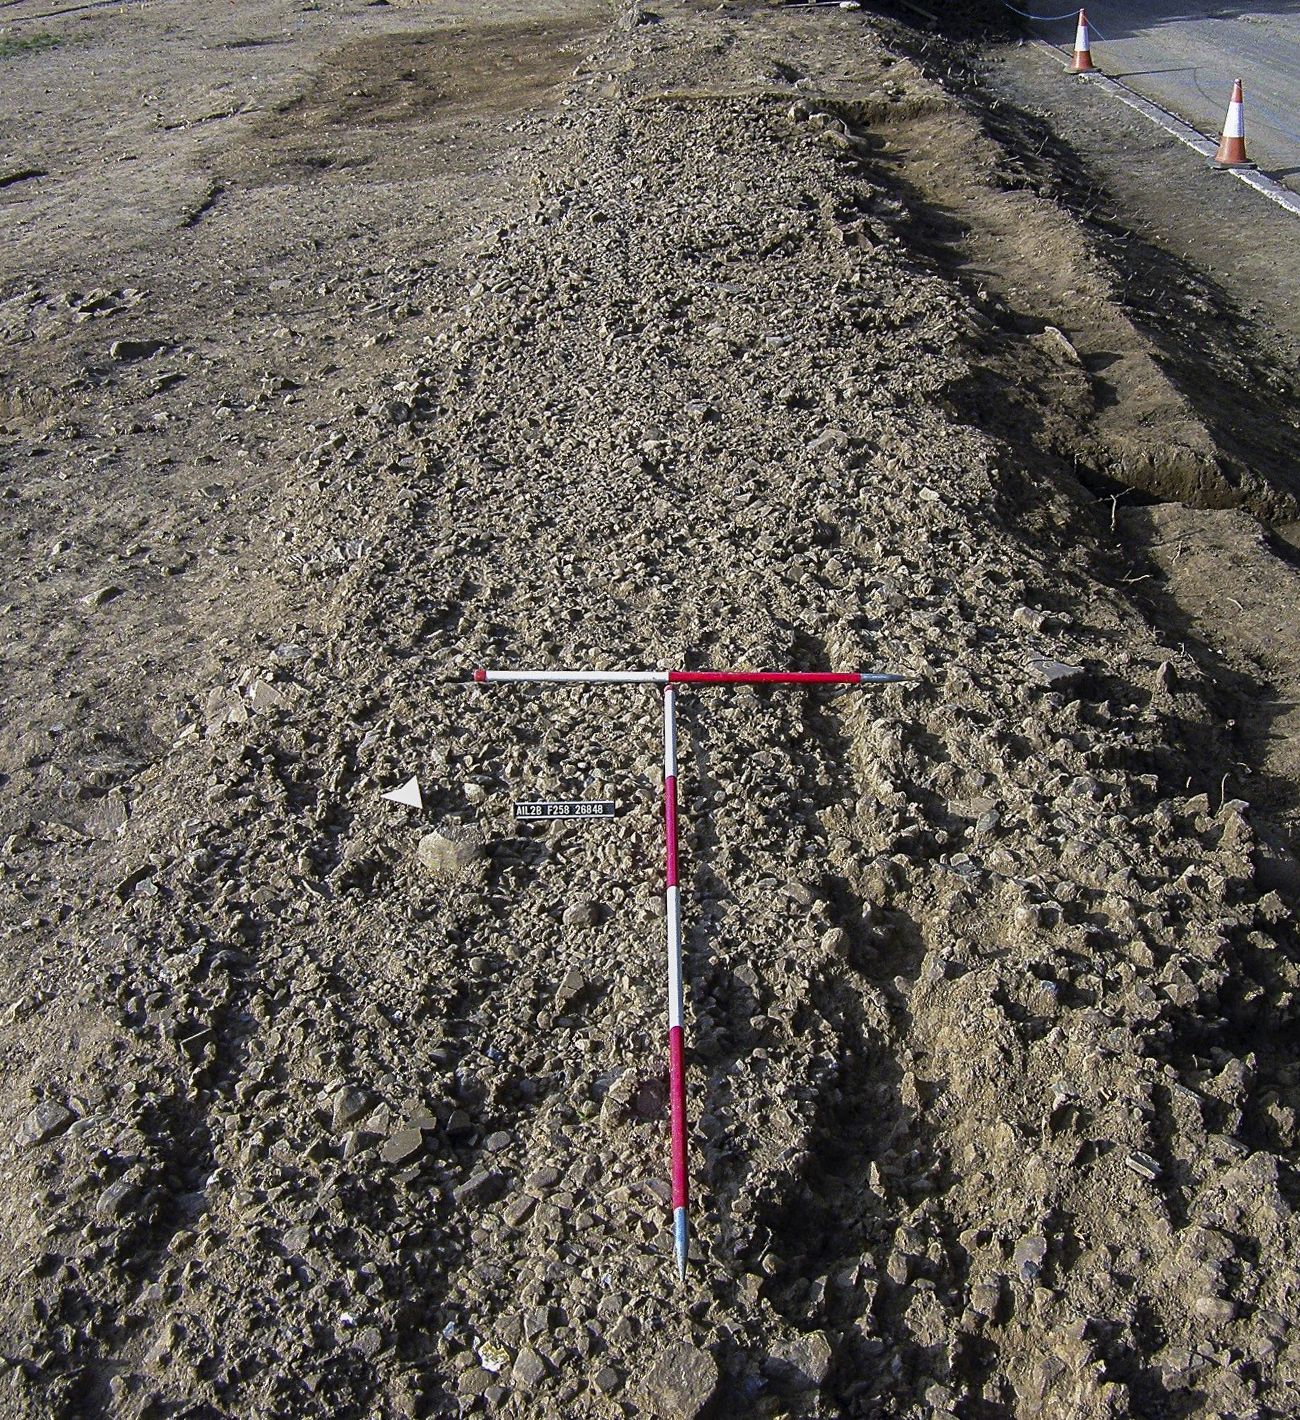
 with earlier and later routes and roads in service trench NPG37 at Scotch Corner (A1 scheme Field 258). as a JPG image")
|
Title: Figure 63: section through Dere Street (Margary road 8c) with earlier and later routes and roads in service trench NPG37 at Scotch Corner (A1 scheme Field 258). Filename: DS_Fig-063.jpg (771 kB) |
JPG |
Info
Download |
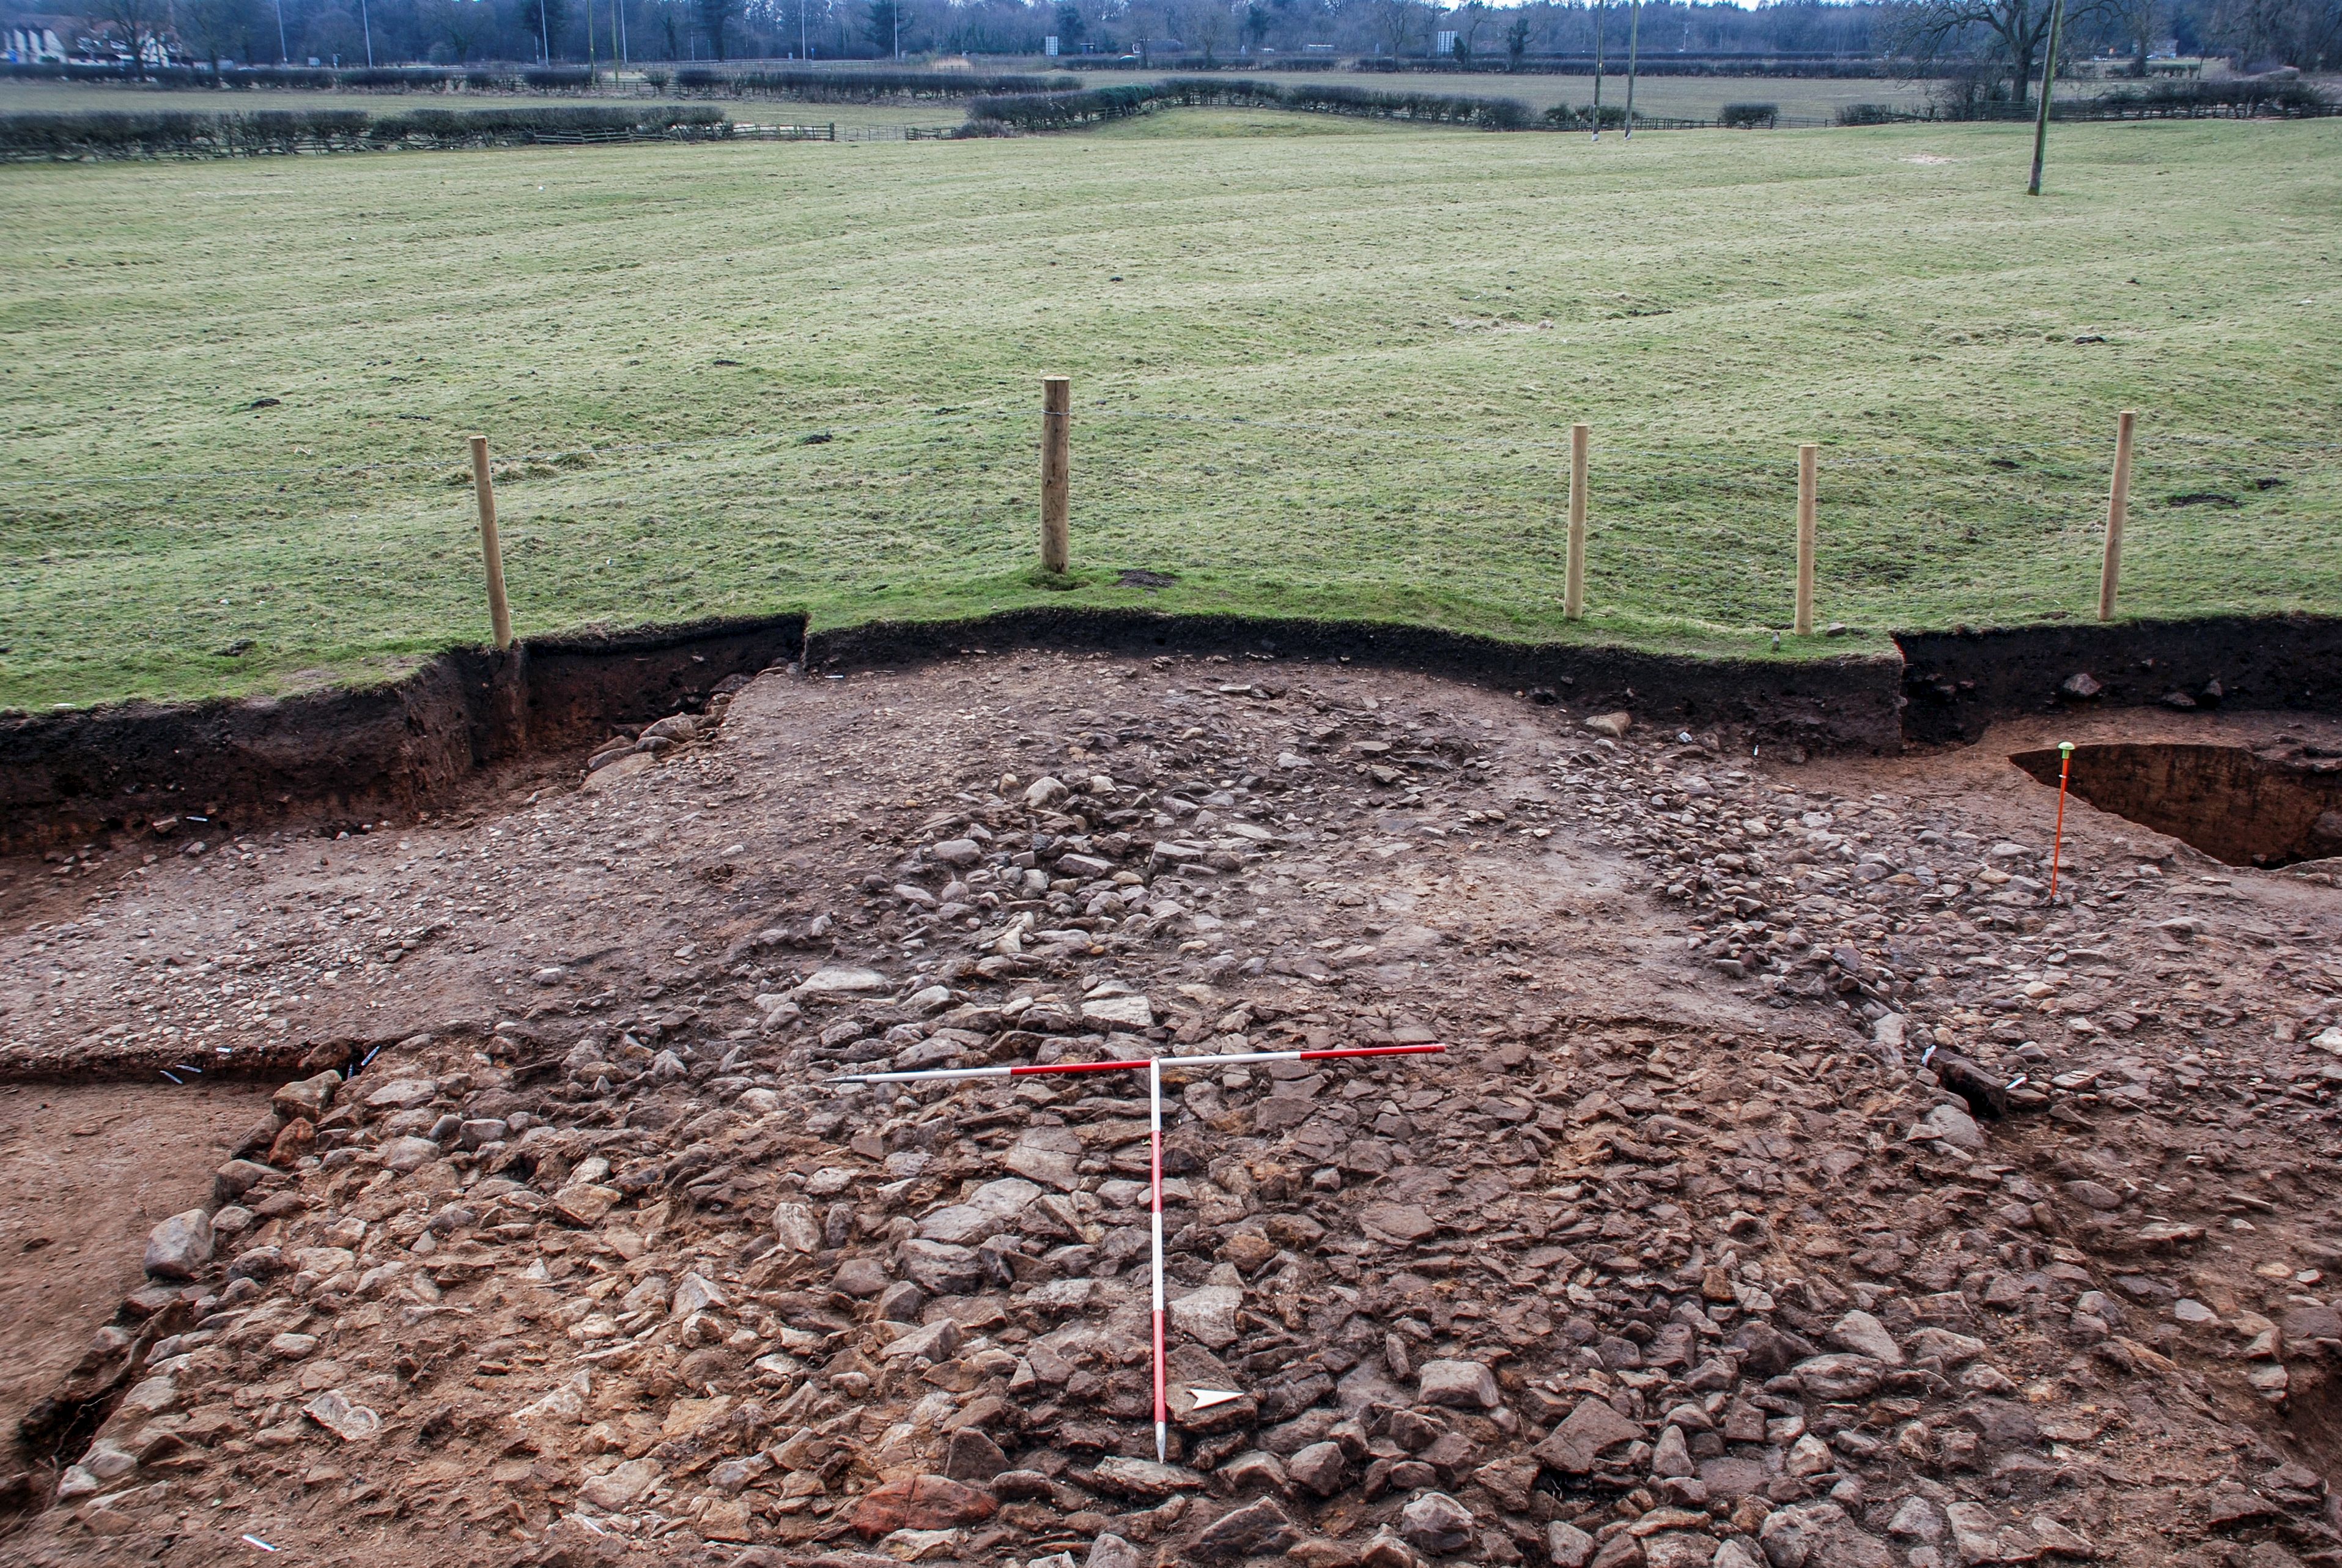
 roads RR5 and RR6 at Scotch Corner (A1 scheme Field 265). as a JPG image")
|
Title: Figure 64: the junction of Dere Street (Margary road 8c) roads RR5 and RR6 at Scotch Corner (A1 scheme Field 265). Filename: DS_Fig-064.jpg (1 MB) |
JPG |
Info
Download |

|
Title: Figure 65: the surviving west side of early Dere Street road RR6 and its earthwork look southwards to the Scotch Corner hotel and roundabout. Filename: DS_Fig-065.jpg (1 MB) |
JPG |
Info
Download |

|
Title: Figure 66: the final iteration of Dere Street road RR6 and its earthwork look southwards to the Scotch Corner hotel and roundabout. Filename: DS_Fig-066.jpg (1 MB) |
JPG |
Info
Download |
 in A1 scheme Field 258. as a JPG image")
|
Title: Figure 67: South-eastward extension RR4 of the road to Stainmore (RR1) in A1 scheme Field 258. Filename: DS_Fig-067.jpg (1 MB) |
JPG |
Info
Download |
. as a JPG image")
|
Title: Figure 68: surviving remnants of road RR4 at the edge of the excavation area (A1 scheme Field 258). Filename: DS_Fig-068.jpg (1 MB) |
JPG |
Info
Download |

|
Title: Figure 69: roads and enclosures associated with the later stage of Roman conquest at Scotch Corner. Filename: DS_Fig-069.jpg (879 kB) |
JPG |
Info
Download |
. as a JPG image")
|
Title: Figure 70: south-west facing view along the penultimate iteration of Dere Street road RR5 at Scotch Corner junction (A1 scheme Field 265). Filename: DS_Fig-070.jpg (2 MB) |
JPG |
Info
Download |
 road RR10 at the west edge of A1 scheme Field 258, Scotch Corner. as a JPG image")
|
Title: Figure 71: wheel ruts along Dere Street (Margary road 8c) road RR10 at the west edge of A1 scheme Field 258, Scotch Corner. Filename: DS_Fig-071.jpg (776 kB) |
JPG |
Info
Download |
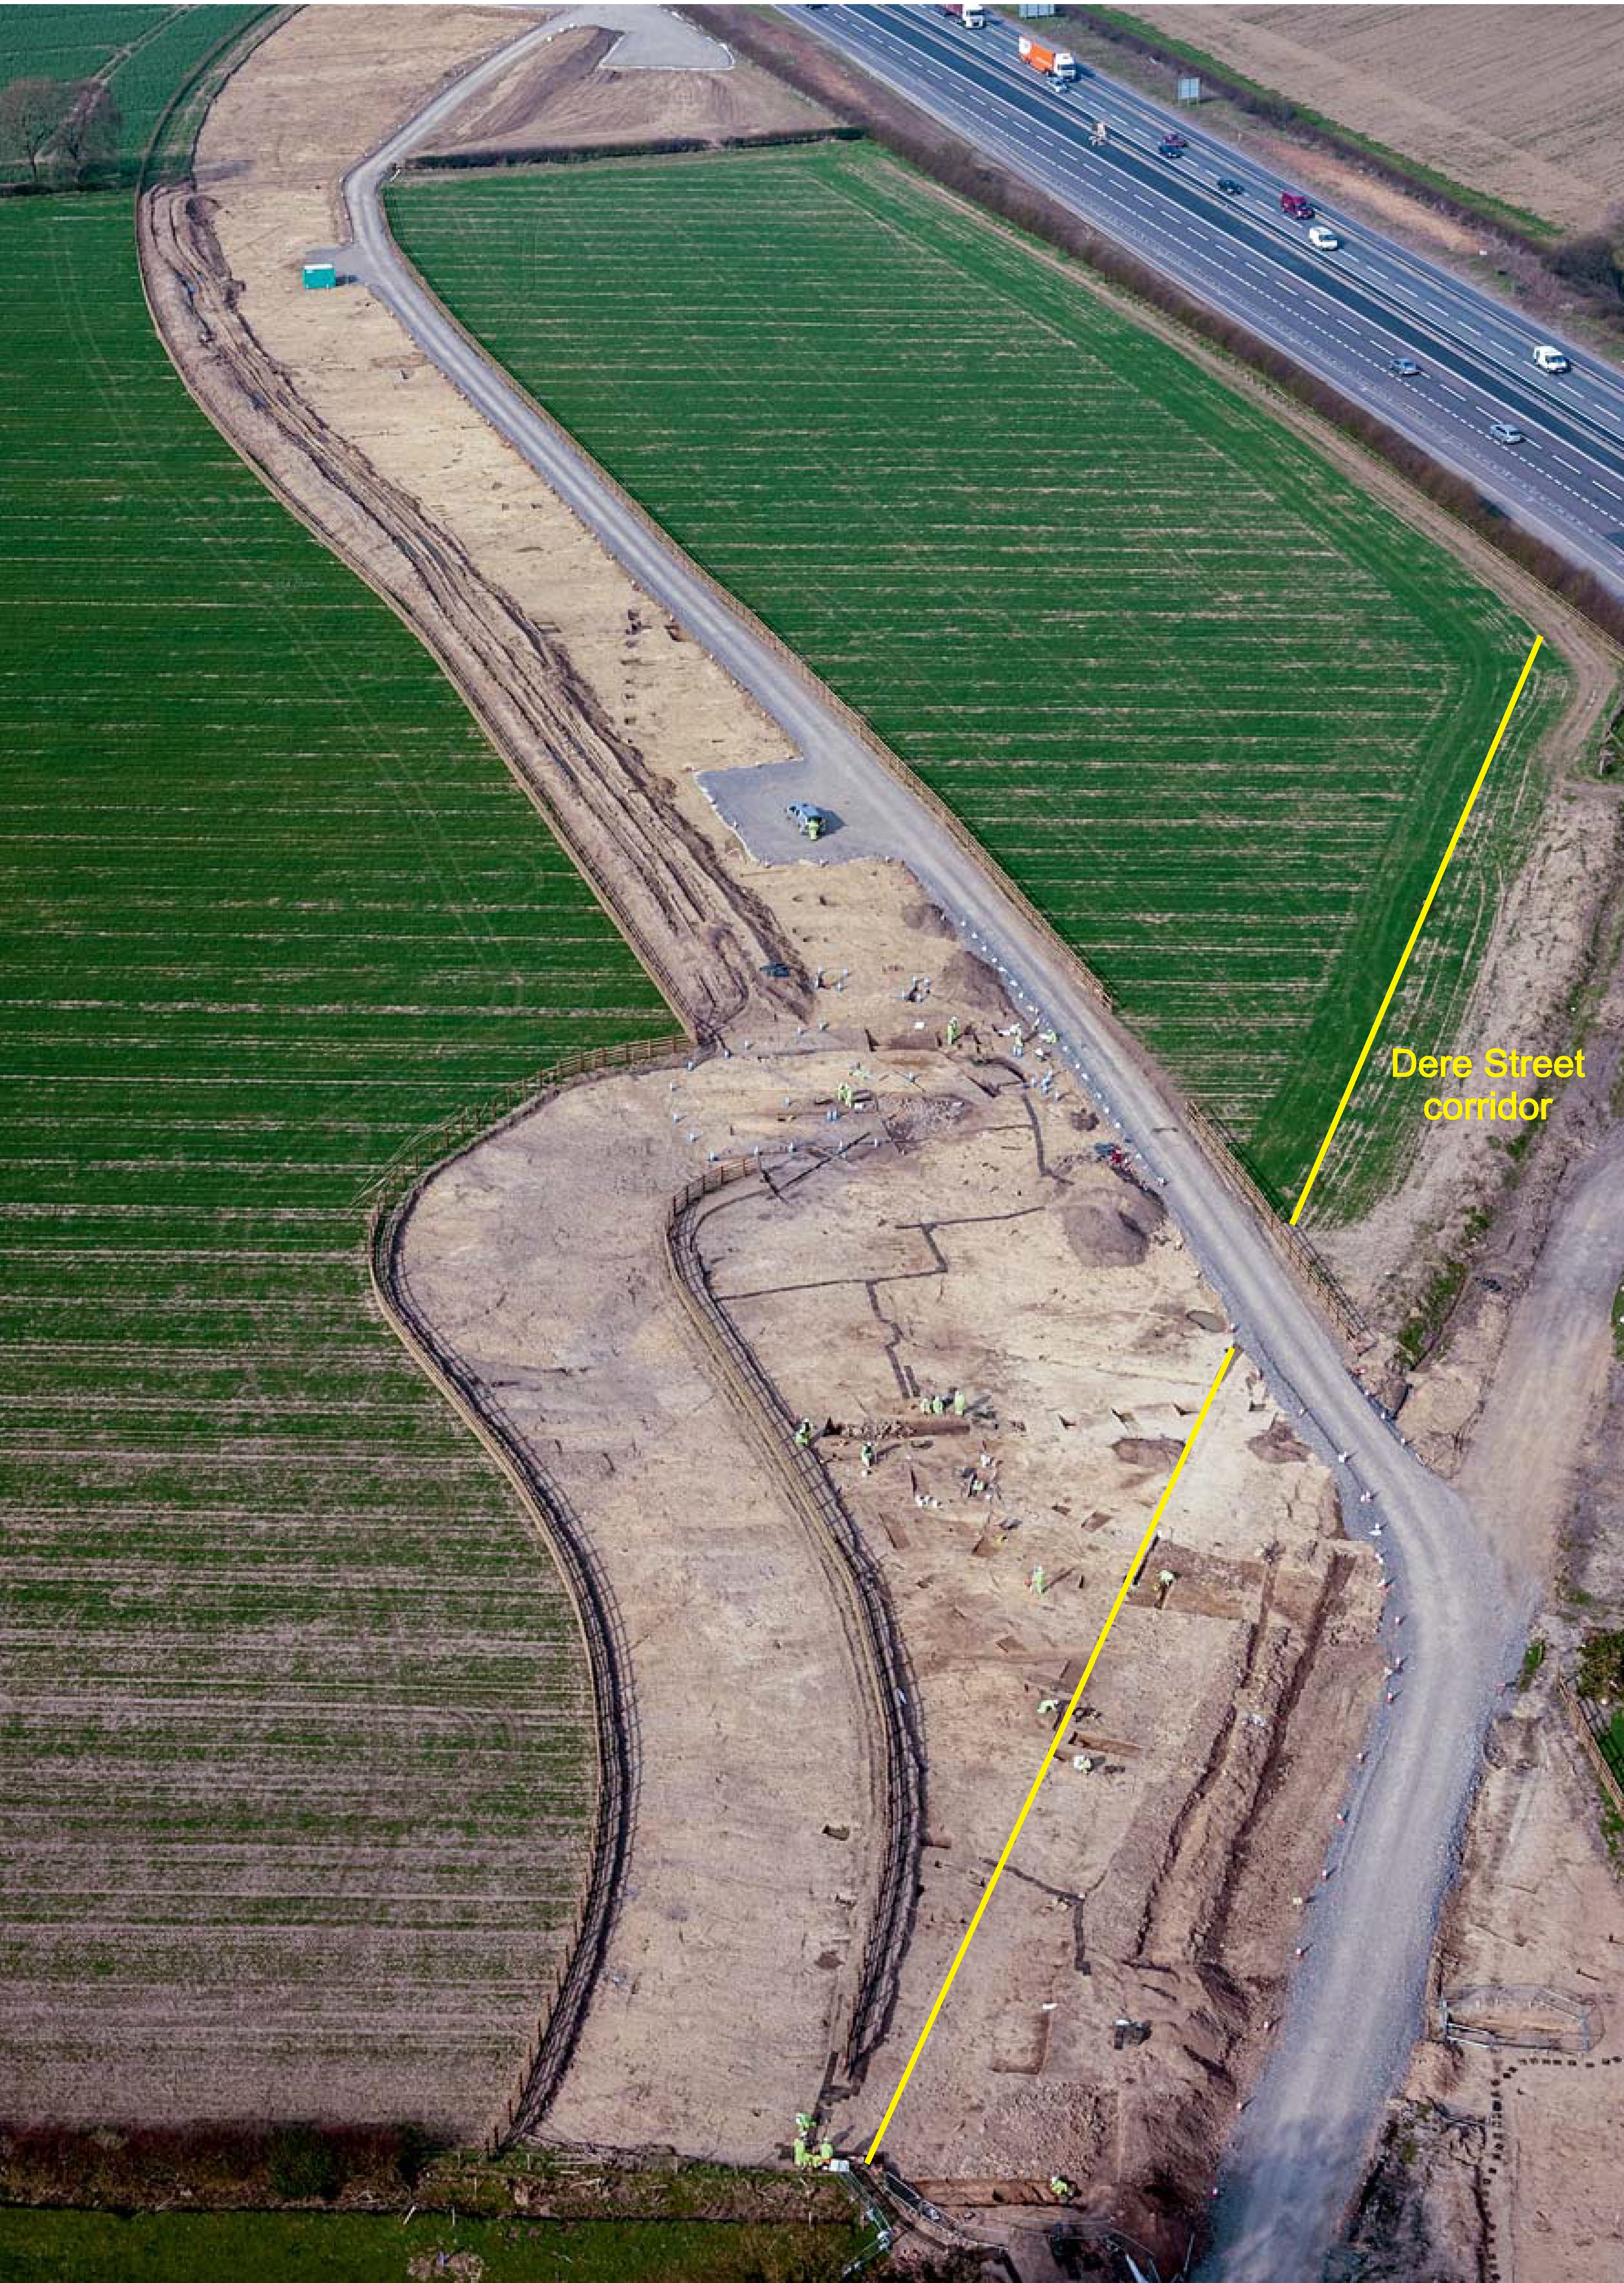
. as a JPG image")
|
Title: Figure 72: Dere Street road RR10 between Field 246 and the Great North Road corridor during excavation at Scotch Corner (© Highways England). Filename: DS_Fig-072.jpg (2 MB) |
JPG |
Info
Download |

|
Title: Figure 73: south-west facing view along early Dere Street road RR10 in A1 scheme Field 246, Scotch Corner. Filename: DS_Fig-073.jpg (2 MB) |
JPG |
Info
Download |

|
Title: Figure 74: view south-east across later Dere Street road RR10 with kerb/drain between carriageways, A1 scheme Field 246, Scotch Corner. Filename: DS_Fig-074.jpg (418 kB) |
JPG |
Info
Download |

|
Title: Figure 75: south-facing view of truncated and rutted Dere Street road RR10 in A1 scheme Field 247. Filename: DS_Fig-075.jpg (398 kB) |
JPG |
Info
Download |

|
Title: Figure 76: section through the final form of Dere Street road RR5 at the road junction, Field 265, Scotch Corner. Filename: DS_Fig-076.jpg (1 MB) |
JPG |
Info
Download |
, the turnpike and Great North Road at Hangbank Lane, Barton. as a JPG image")
|
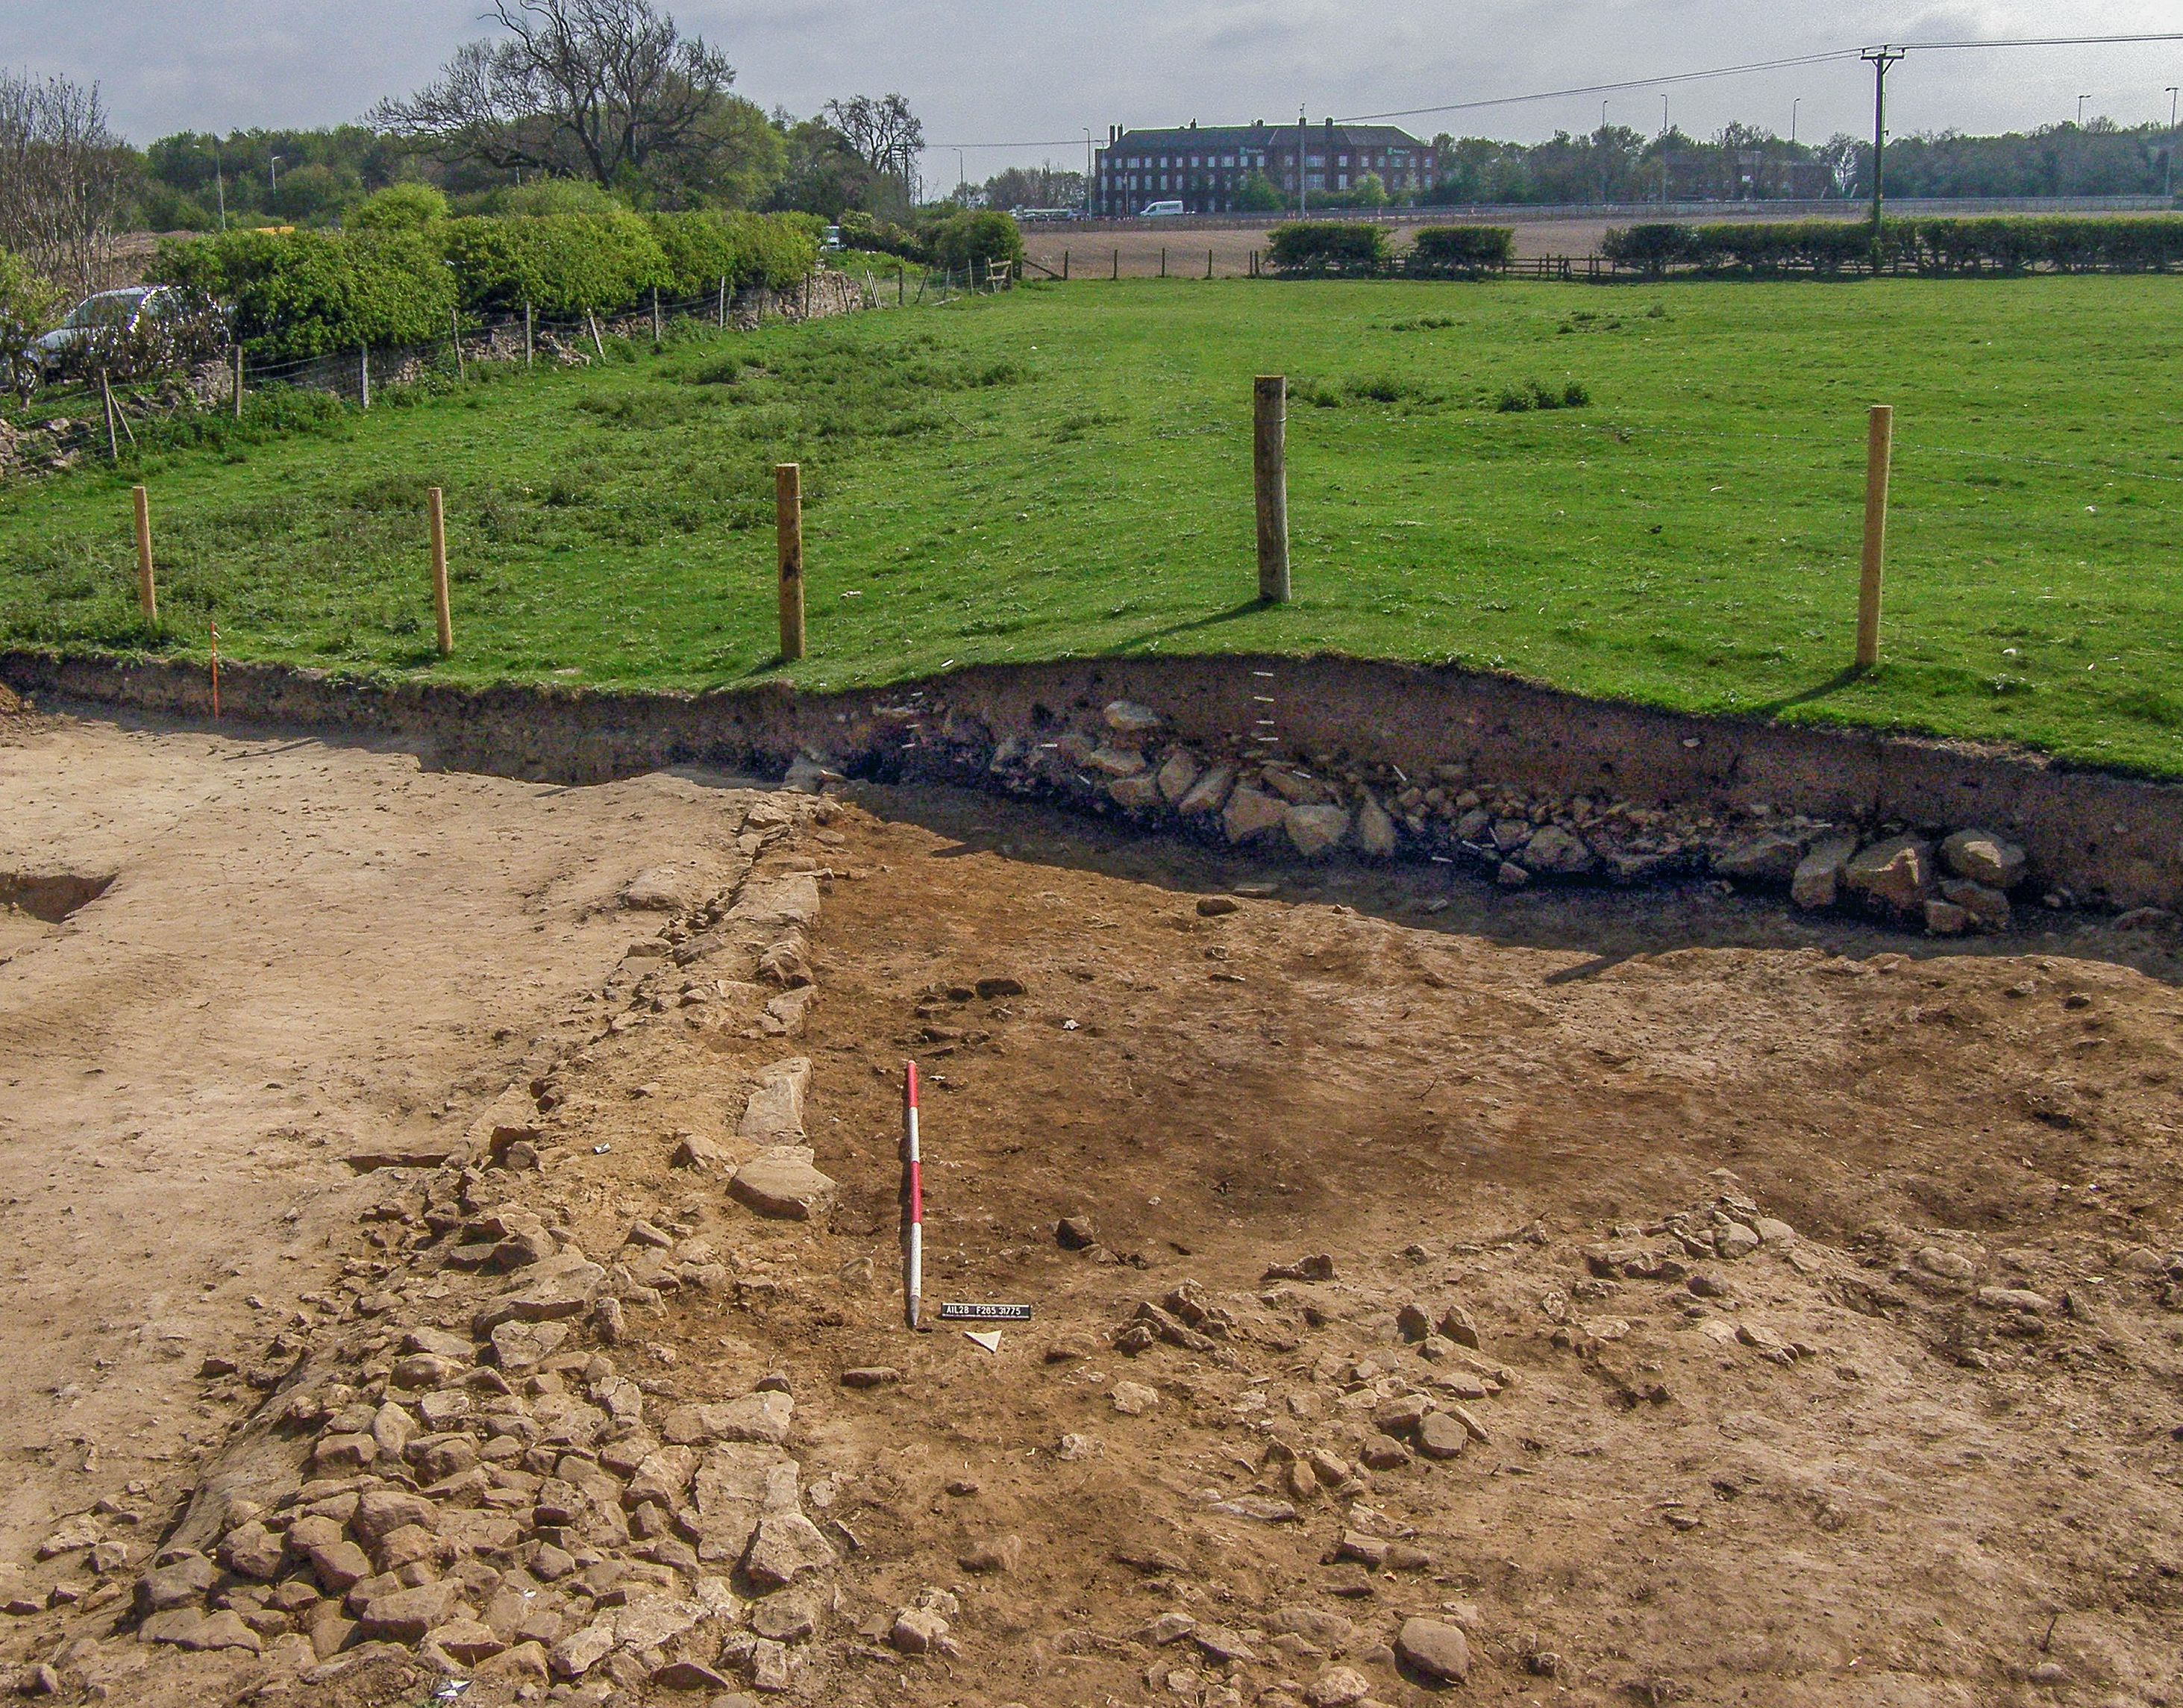
Title: Figure 77: view southwards along the course of Dere Street (Margary road 8c), the turnpike and Great North Road at Hangbank Lane, Barton. Filename: DS_Fig-077.jpg (2 MB) |
JPG |
Info
Download |
 at Barton Pond and a possible fort visible on LiDAR imagery. as a JPG image")
|
Title: Figure 78: location and plan of Dere Street (Margary road 8c) at Barton Pond and a possible fort visible on LiDAR imagery. Filename: DS_Fig-078.jpg (1 MB) |
JPG |
Info
Download |
. as a JPG image")
|
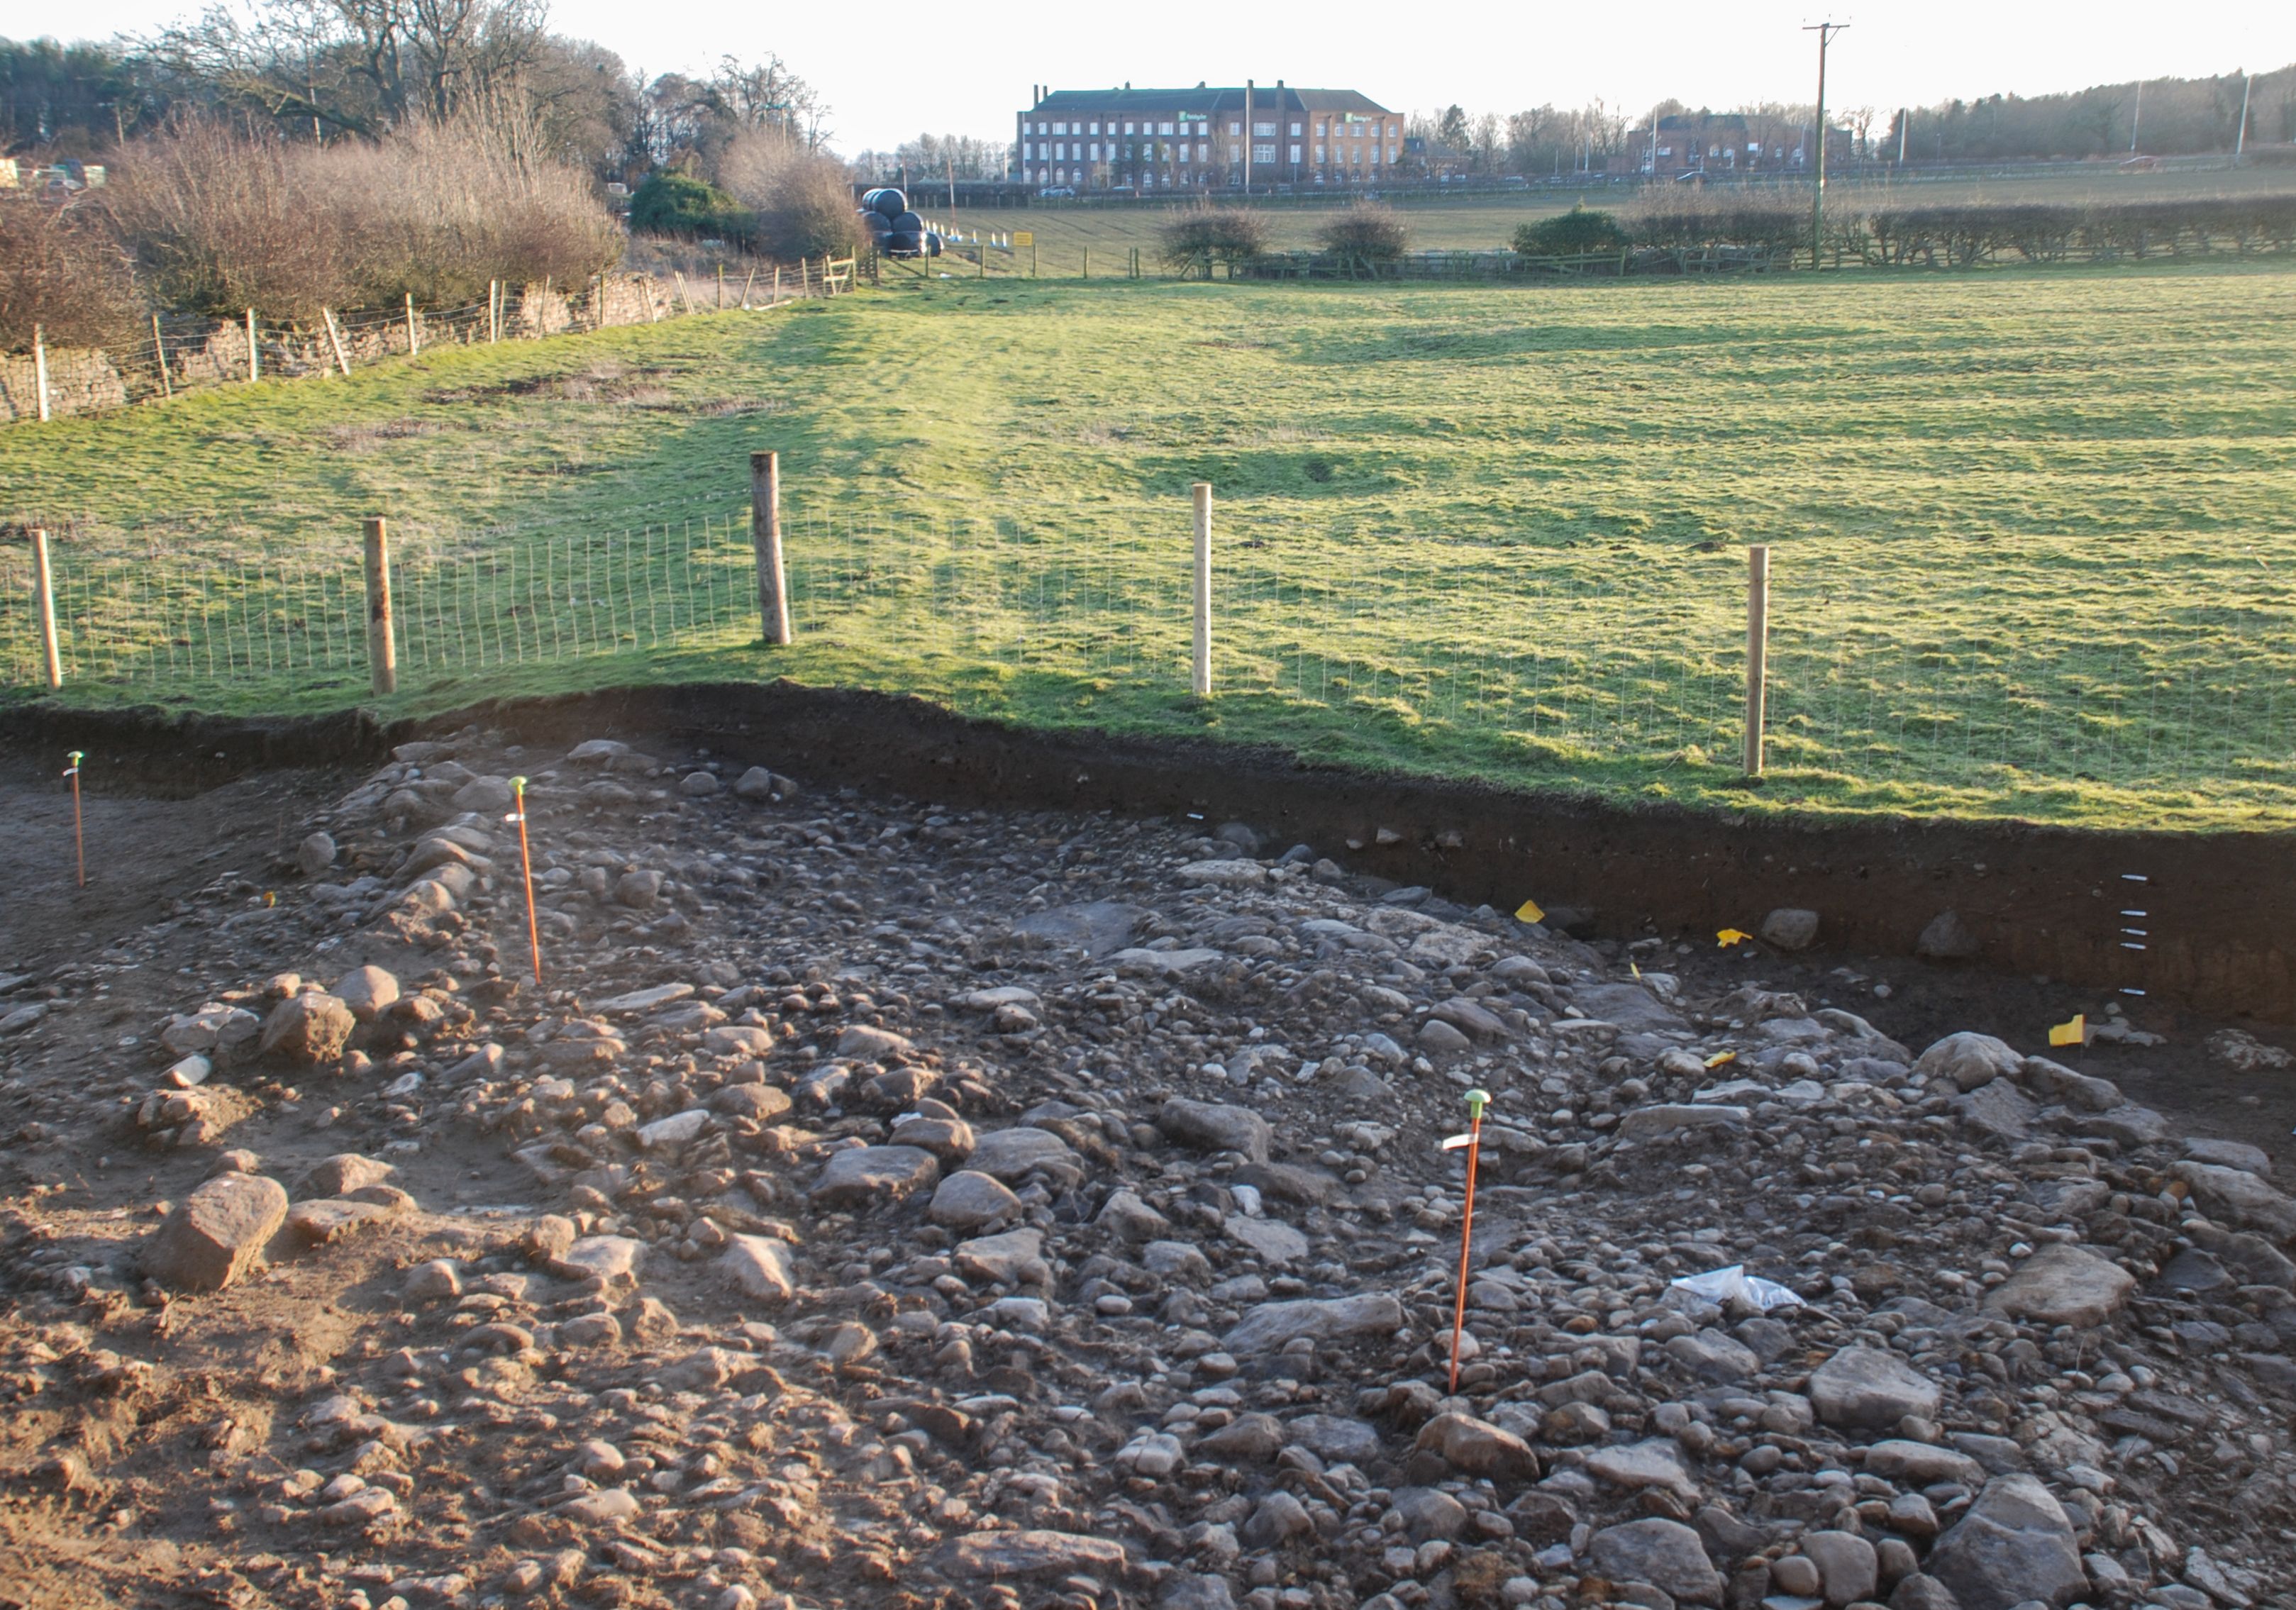
Title: Figure 79: transverse section through the remaining east side of Dere Street at Hangbank Lane, Barton (A1 scheme Field 242). Filename: DS_Fig-079.jpg (1 MB) |
JPG |
Info
Download |
, with bridge locations on the River Tees. as a JPG image")
|
Title: Figure 80: simplified plan of Roman Piercebridge fort and vicus, showing primary and secondary routes of Dere Street (Margary road 8c), with bridge locations on the River Tees. Filename: DS_Fig-080.jpg (991 kB) |
JPG |
Info
Download |
. as a JPG image")
|
Title: Figure 81: cropmarks at Piercebridge (Google Earth 2006). Filename: DS_Fig-081.jpg (297 kB) |
JPG |
Info
Download |
. as a JPG image")
|
Title: Figure 82: foundations of the Roman bridge at the secondary position on the River Tees, looking south along the adjusted approach of Dere Street (Margary road 8c). Filename: DS_Fig-082.jpg (2 MB) |
JPG |
Info
Download |
. as a JPG image")
|
Title: Figure 83: simplified plan of Binchester fort, vicus, and Dere Street (Margary road 8c–d; After Ferris 2010, fig. 2). Filename: DS_Fig-083.jpg (1 MB) |
JPG |
Info
Download |
. as a JPG image")
|
Title: Figure 84: cropmarks and earthworks at Binchester (Google Earth 2006). Filename: DS_Fig-084.jpg (690 kB) |
JPG |
Info
Download |
 to the north of Binchester. as a JPG image")
|
Title: Figure 85: Dere Street (Margary road 8d) to the north of Binchester. Filename: DS_Fig-085.jpg (2 MB) |
JPG |
Info
Download |

|
Title: Figure 86: locations of sites mentioned in the medieval sections. Filename: DS_Fig-086.jpg (1 MB) |
JPG |
Info
Download |

|
Title: Figure 87: locations of sites mentioned in the post-medieval section. Filename: DS_Fig-087.jpg (1 MB) |
JPG |
Info
Download |
. as a JPG image")
|
Title: Figure 88: C. Saxton’s map of Eboracensis (1577). Filename: DS_Fig-088.jpg (4 MB) |
JPG |
Info
Download |
. as a JPG image")
|
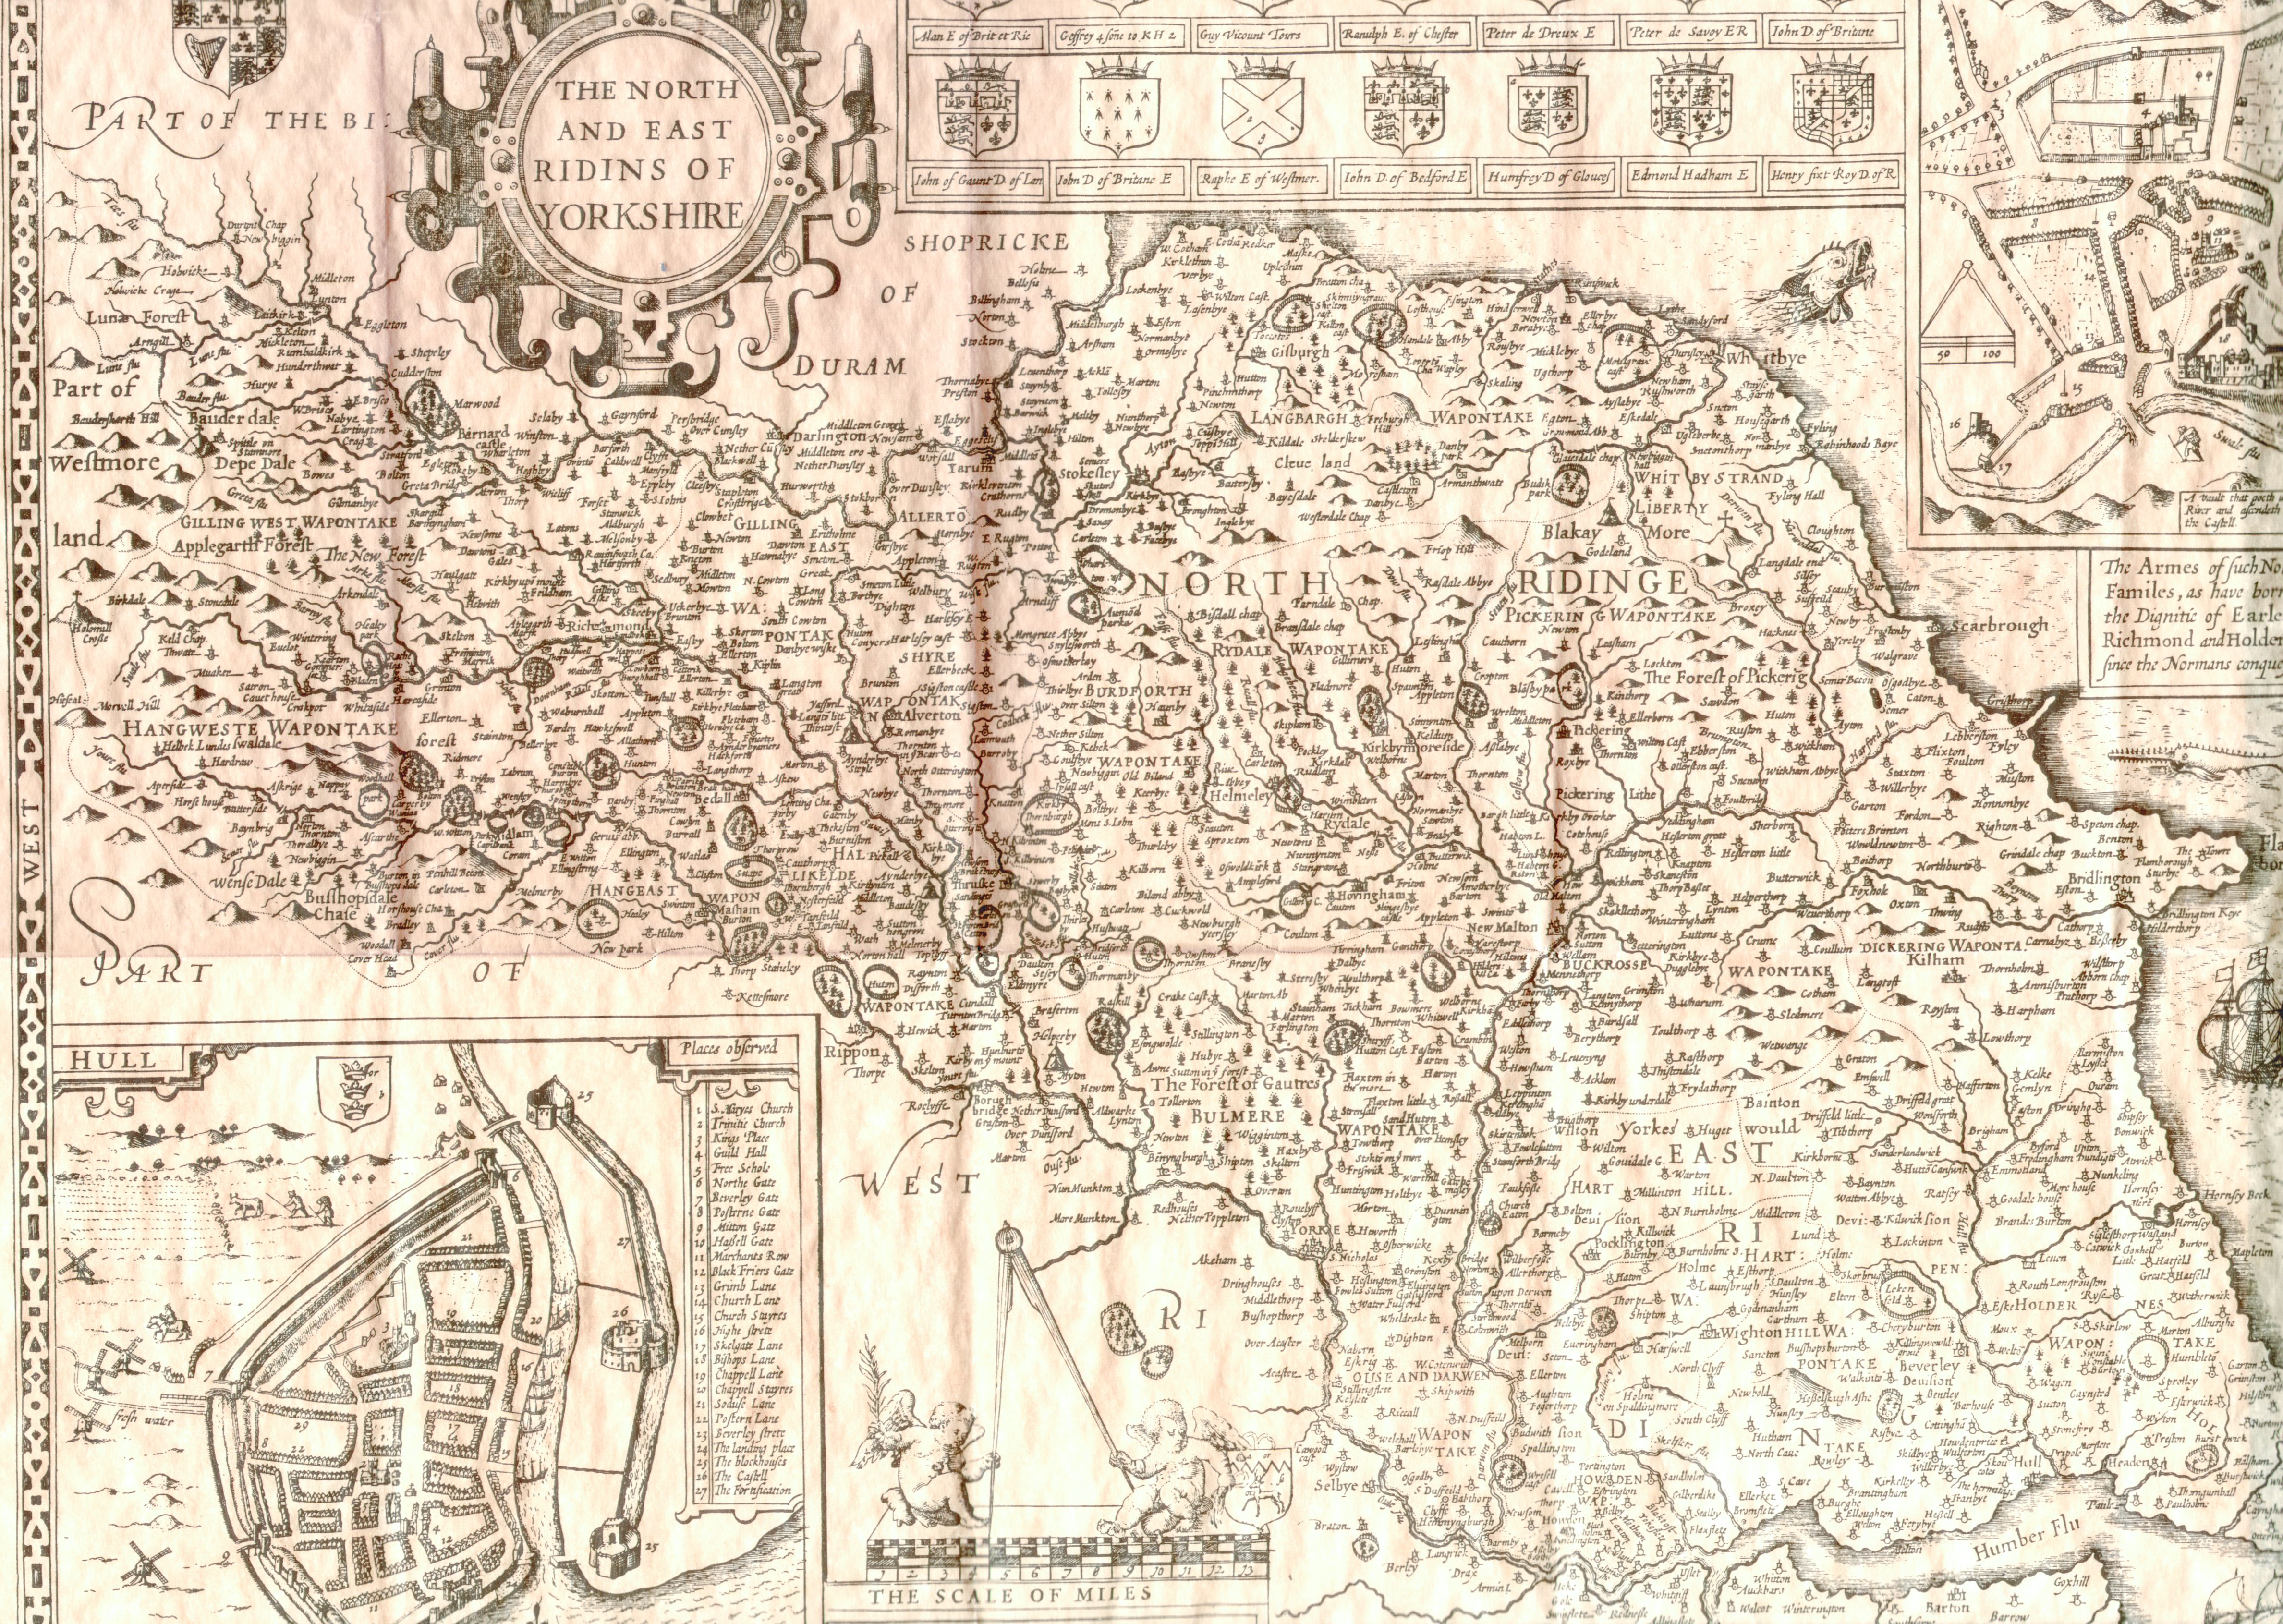
Title: Figure 89: J. Speede’s map of North and East Ridings of Yorkshire (1610). Filename: DS_Fig-089.jpg (2 MB) |
JPG |
Info
Download |
. as a JPG image")
|
Title: Figure 90: J. Ogilby’s road map of England (1675). Filename: DS_Fig-090.jpg (210 kB) |
JPG |
Info
Download |
, plate 8: York to Berwick upon Tweed. as a JPG image")
|
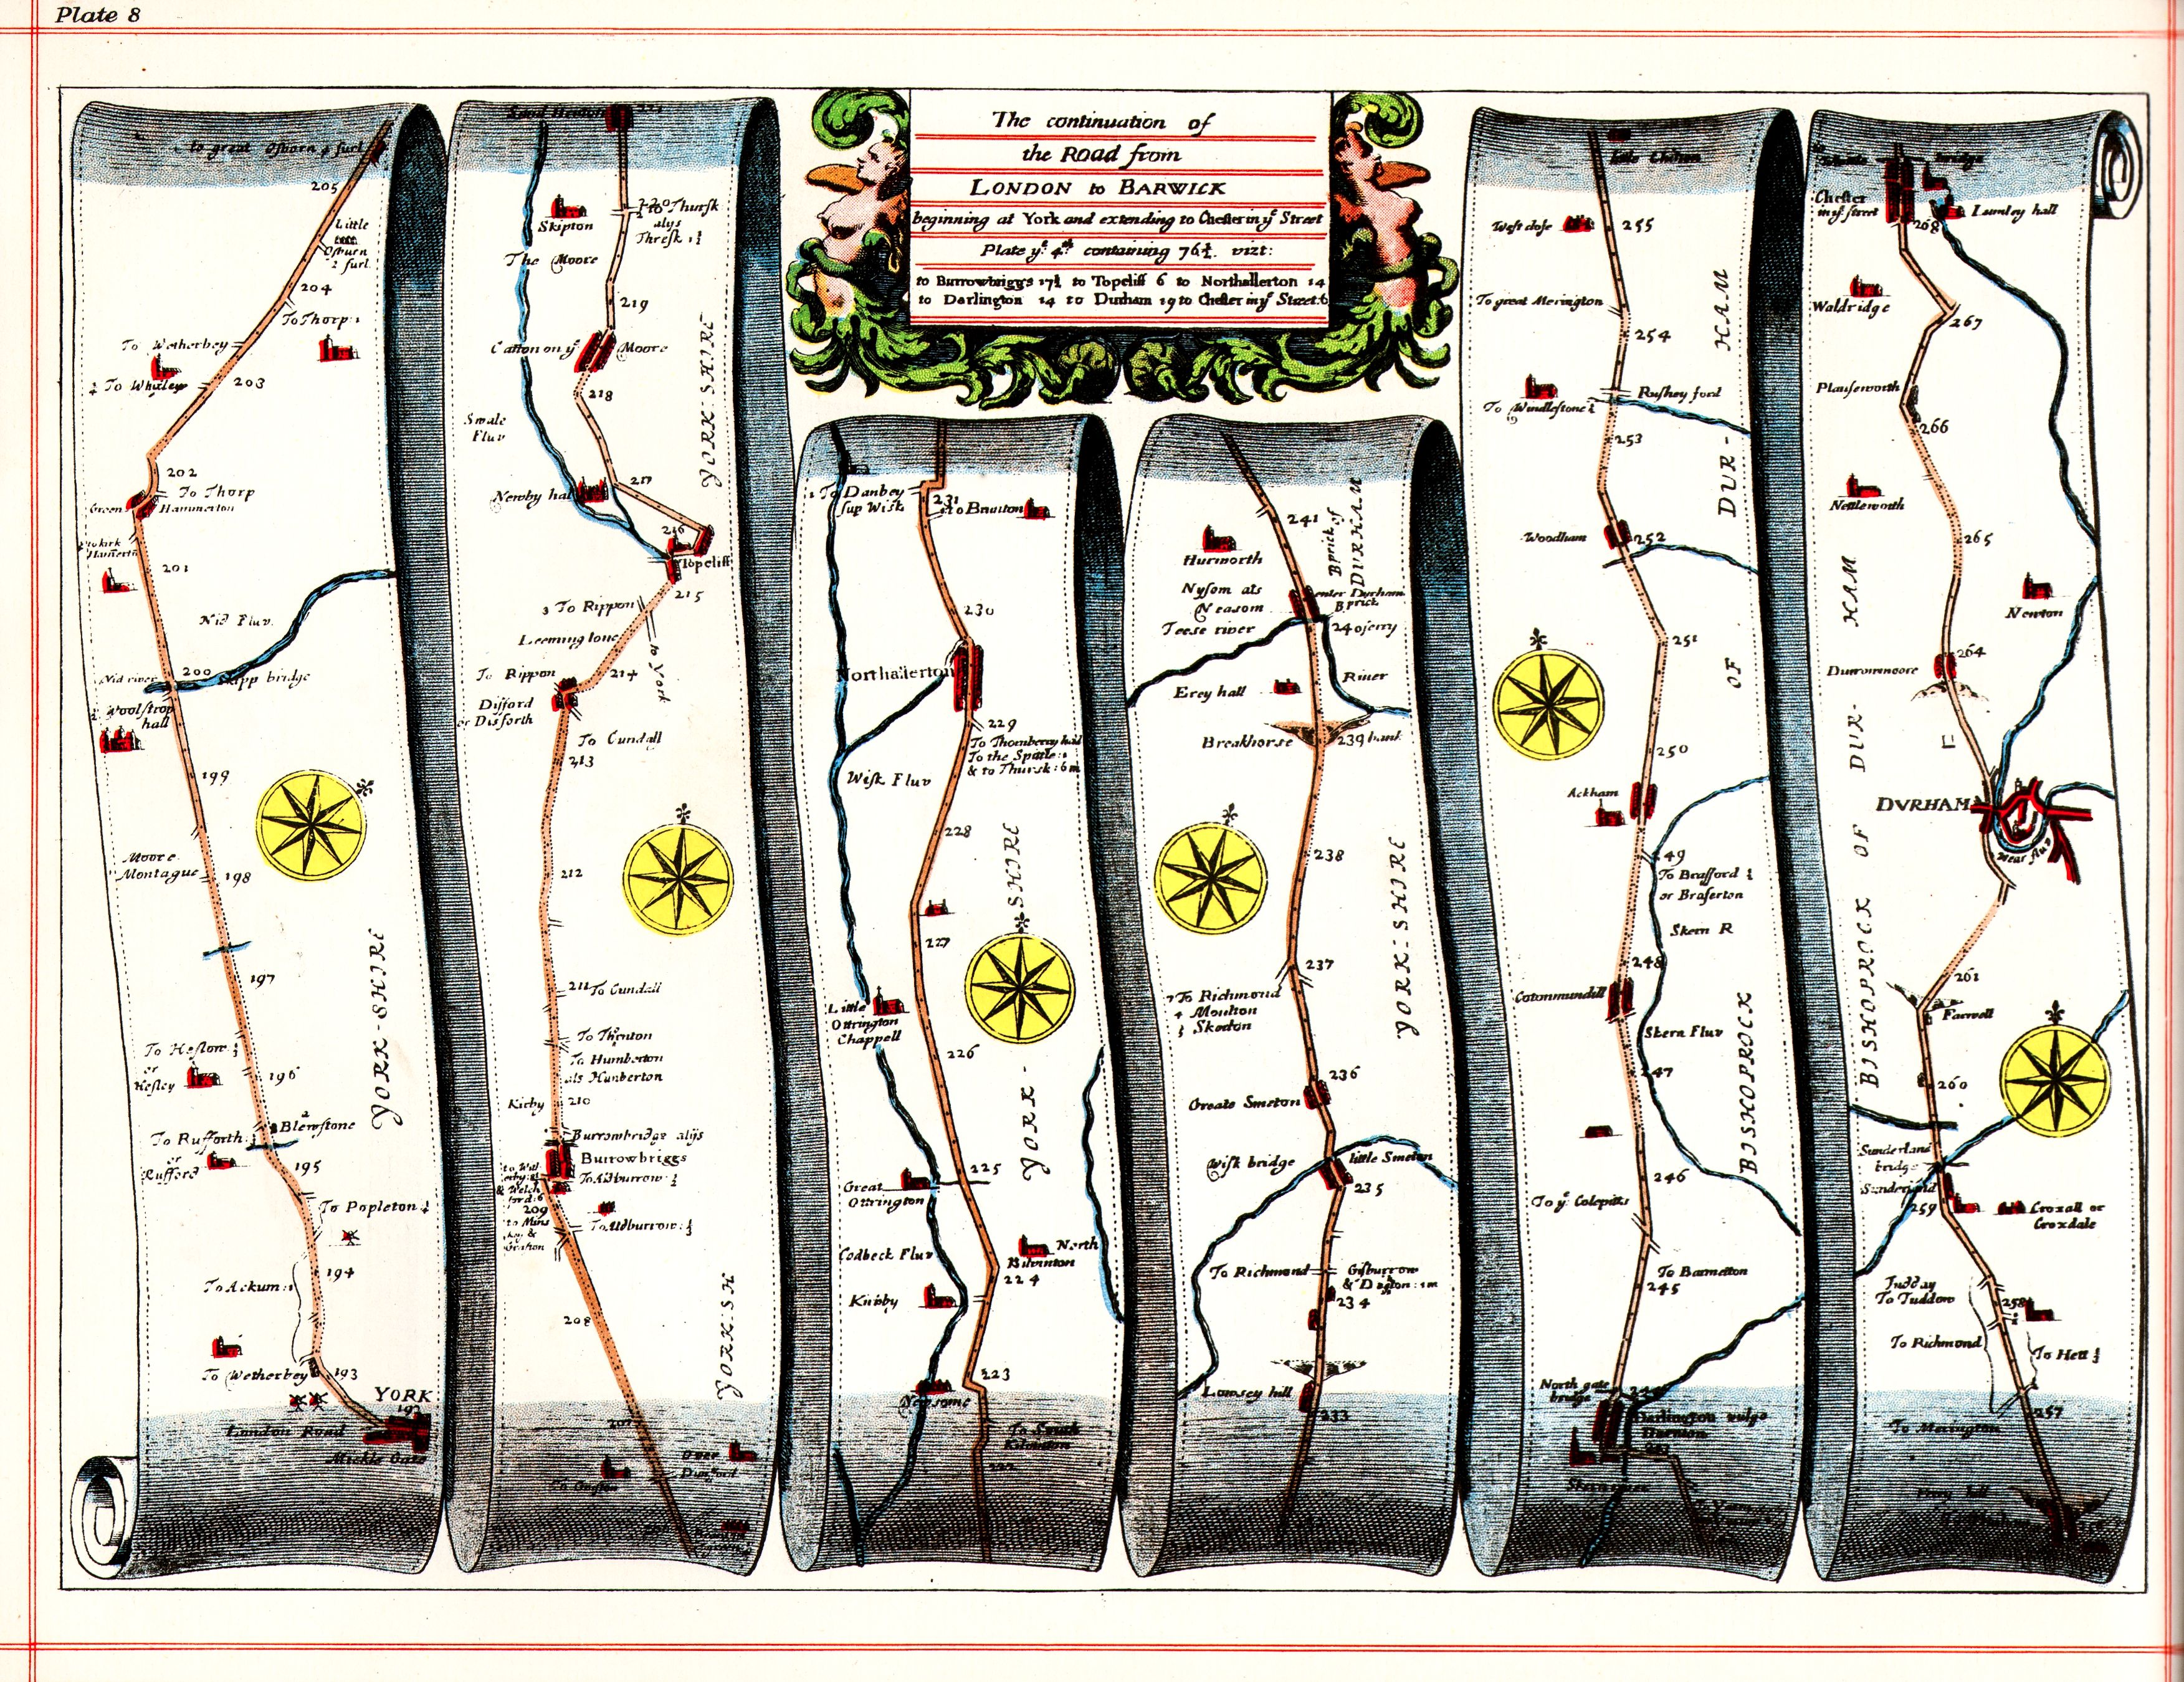
Title: Figure 91: J. Ogilby’s map (1675), plate 8: York to Berwick upon Tweed. Filename: DS_Fig-091.jpg (1 MB) |
JPG |
Info
Download |
, plate 8 : Ferrybridge to Barnard Castle. as a JPG image")
|
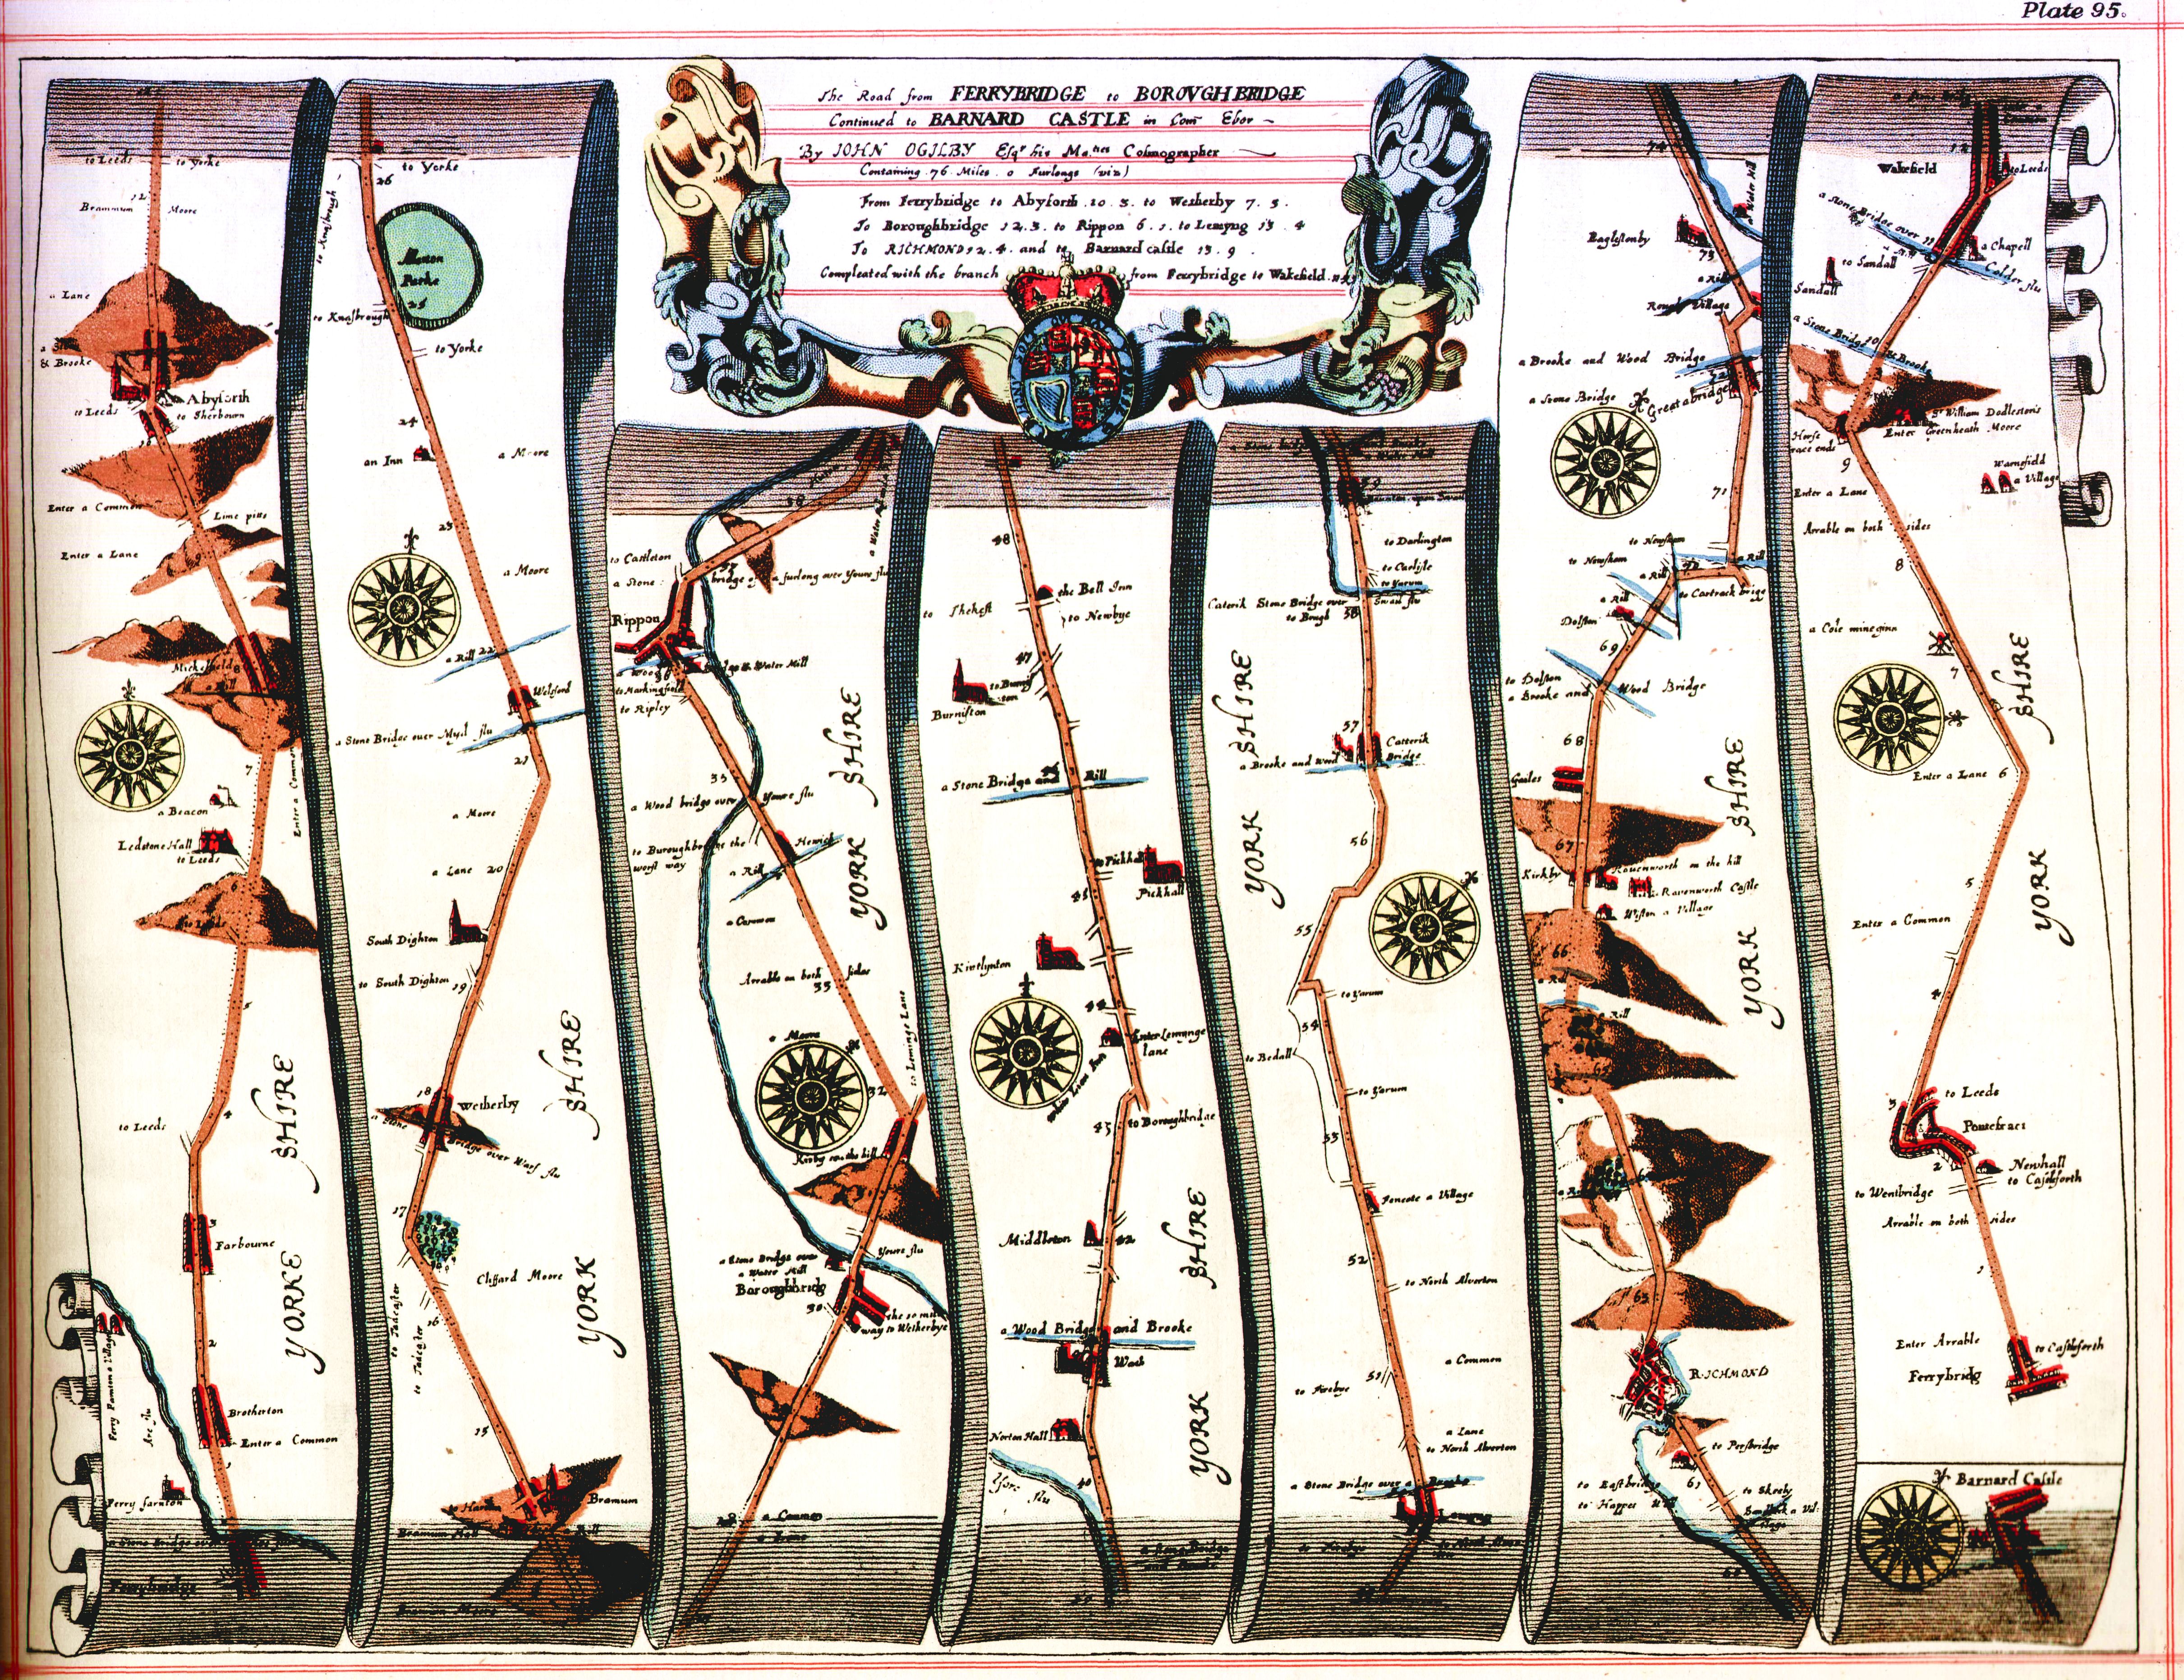
Title: Figure 92: J. Ogilby’s map (1675), plate 8 : Ferrybridge to Barnard Castle. Filename: DS_Fig-092.jpg (3 MB) |
JPG |
Info
Download |
: Pages 8, 7, 2 respectively. as a JPG image")
|
Title: Figure 93a–c: T. Jefferys’ map of (1776): Pages 8, 7, 2 respectively. Filename: DS_Fig-093a.jpg (19 MB) |
JPG |
Info
Download |
: Pages 8, 7, 2 respectively. as a JPG image")
|
Title: Figure 93a–c: T. Jefferys’ map of (1776): Pages 8, 7, 2 respectively. Filename: DS_Fig-093b.jpg (32 MB) |
JPG |
Info
Download |
: Pages 8, 7, 2 respectively. as a JPG image")
|
Title: Figure 93a–c: T. Jefferys’ map of (1776): Pages 8, 7, 2 respectively. Filename: DS_Fig-093c.jpg (21 MB) |
JPG |
Info
Download |
. as a JPG image")
|
Title: Figure 94: contemporary advertisement for the Edinburgh stagecoach (source unknown). Filename: DS_Fig-094.jpg (107 kB) |
JPG |
Info
Download |

|
Title: Figure 95: Healam Bridge, constructed in 1796 in conjunction with development of the turnpike. Filename: DS_Fig-095.jpg (2 MB) |
JPG |
Info
Download |

|
Title: Figure 96: section of Dere Street, the turnpike and Great North Road at the north end of Healam Bridge. Filename: DS_Fig-096.jpg (741 kB) |
JPG |
Info
Download |

|
Title: Figure 97: the turnpike sandwiched between Dere Street and the Great North Road at the north end of Healam Bridge. Filename: DS_Fig-097.jpg (1 MB) |
JPG |
Info
Download |

|
Title: Figure 98: the turnpike sandwiched between Dere Street and the Great North Road at Leeming Road, Leeming Bar. Filename: DS_Fig-098.jpg (1 MB) |
JPG |
Info
Download |

|
Title: Figure 99: south-facing section through the turnpike overlying Dere Street with the Great North Road above, trench NPG37, Field 258, Scotch Corner. Filename: DS_Fig-099.jpg (728 kB) |
JPG |
Info
Download |

|
Title: Figure 100: section through the turnpike overlying Dere Street with the Great North Road above, trench NPG37, Field 258, Scotch Corner. Filename: DS_Fig-100.jpg (1 MB) |
JPG |
Info
Download |
 showing railway branch lines. as a JPG image")
|
Title: Figure 101: Ordnance Survey First Edition map (1859) showing railway branch lines. Filename: DS_Fig-101.jpg (4 MB) |
JPG |
Info
Download |
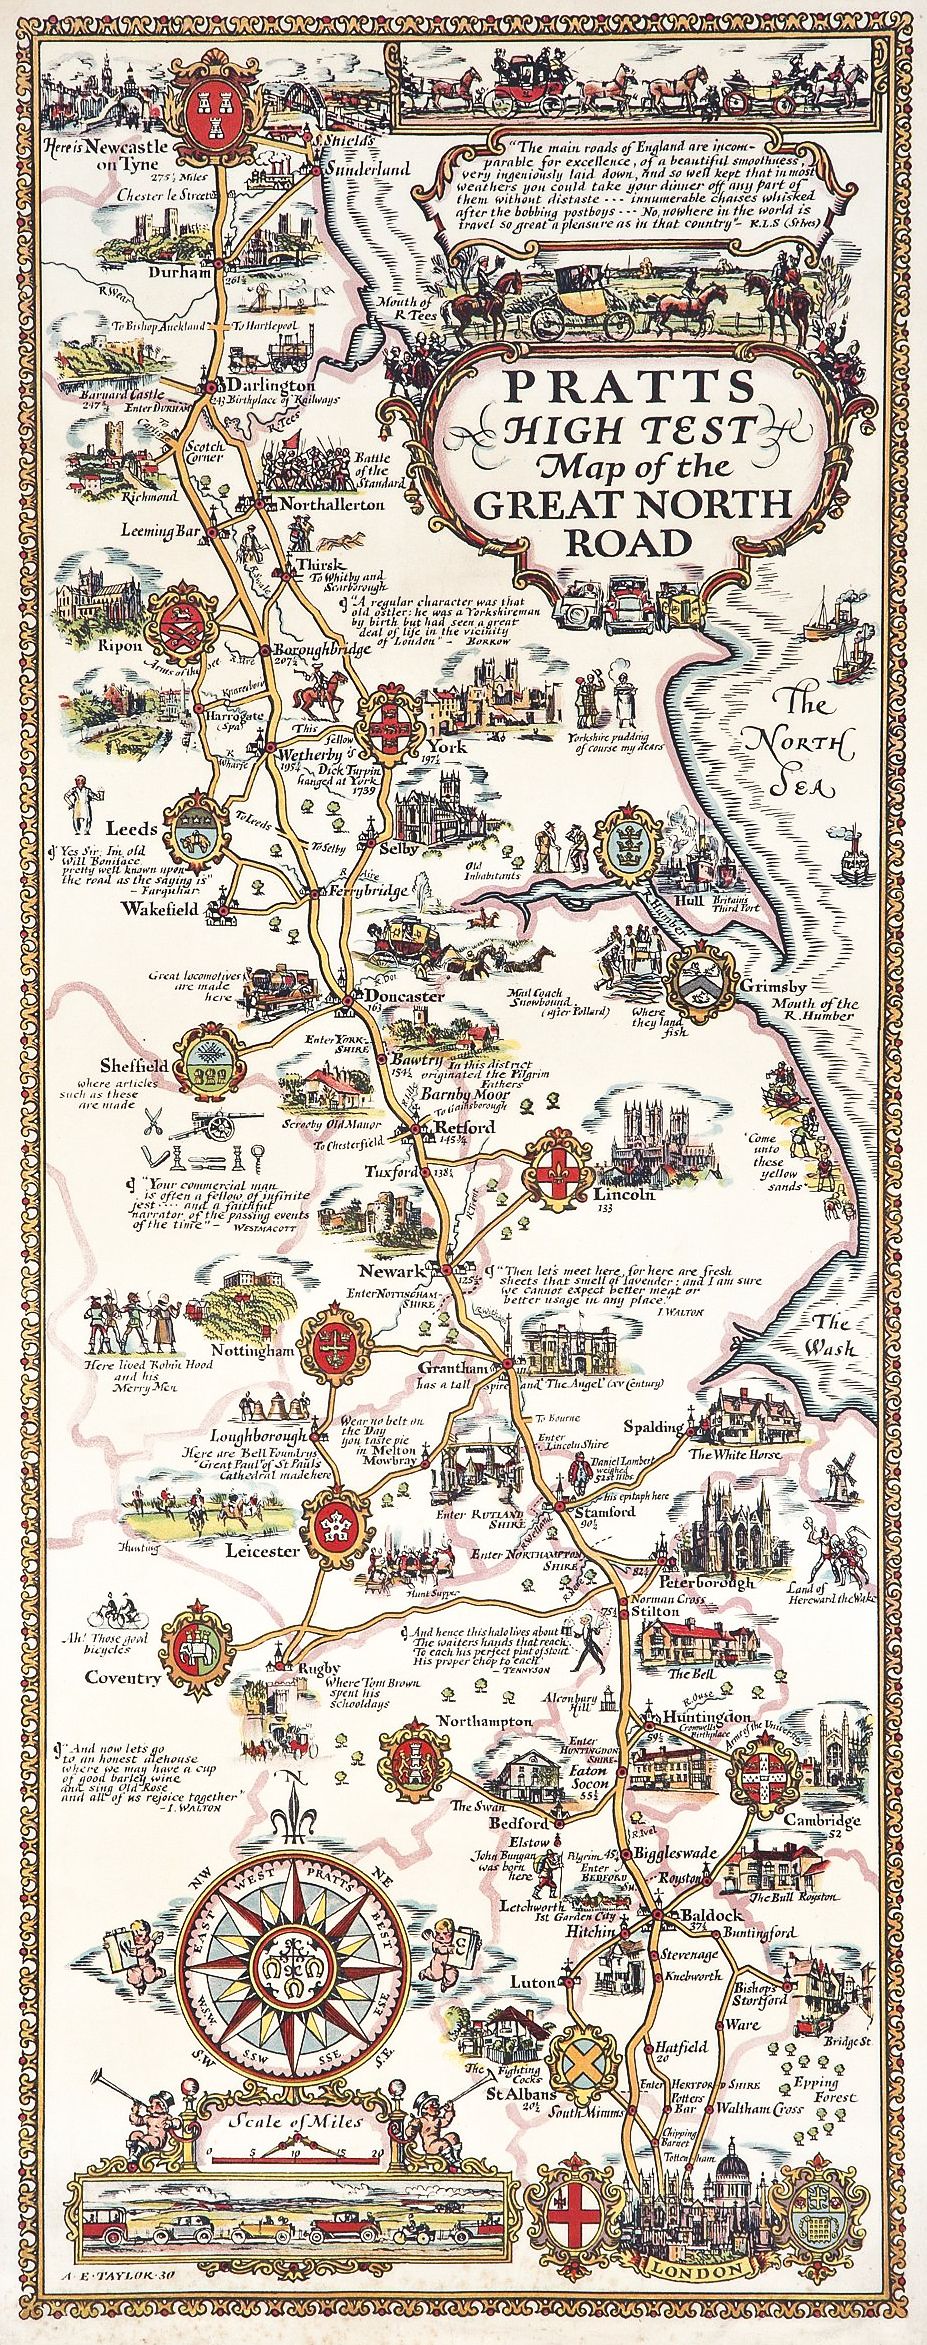
 Pratts High Test Map of the Great North Road. as a JPG image")
|
Title: Figure 102: Alfred Edward Taylor’s (1930) Pratts High Test Map of the Great North Road. Filename: DS_Fig-102.jpg (853 kB) |
JPG |
Info
Download |

|
Title: Figure 103: one of the surviving Leyland Motors Limited roadside clocks, now at Kendal Brewery Arts Centre. Filename: DS_Fig-103.jpg (2 MB) |
JPG |
Info
Download |
. as a JPG image")
|
Title: Figure 104: concrete base and steel lattice framework of the Leyland Motors clock at Healam Bridge (A1 scheme Field 63). Filename: DS_Fig-104.jpg (2 MB) |
JPG |
Info
Download |
World War II bunker, taken after 1939. as a JPG image")
|
Title: Figure 105: Scotch Corner ‘road circus’ with central (?)World War II bunker, taken after 1939. Filename: DS_Fig-105.jpg (142 kB) |
JPG |
Info
Download |

|
Title: Figure 106: excavation of the ‘diversion’ cutting and elevated roundabout at Scotch Corner, 1971. Filename: DS_Fig-106.jpg (192 kB) |
JPG |
Info
Download |

|
Title: Figure 107: Archaeological investigation at Agricola Bridge, Cataractonium, prior to construction of a retaining wall and road widening. Filename: DS_Fig-107.jpg (620 kB) |
JPG |
Info
Download |

|
Title: Back cover Filename: DS_cover_back.jpg (1 MB) |
JPG |
Info
Download |