Peterseat, Torry Battery and St Fittick's Church, Aberdeen

Aberdeen City Council Archaeological Unit, 2016. https://doi.org/10.5284/1037303. How to cite using this DOI

Digital Object Identifiers

Digital Object Identifiers (DOIs) are persistent identifiers which can be used to consistently and accurately reference digital objects and/or content. The DOIs provide a way for the ADS resources to be cited in a similar fashion to traditional scholarly materials. More information on DOIs at the ADS can be found on our help page.

Citing this DOI

The updated Crossref DOI Display guidelines recommend that DOIs should be displayed in the following format:

https://doi.org/10.5284/1037303
Sample Citation for this DOI

Aberdeen City Council Archaeological Unit (2016) Peterseat, Torry Battery and St Fittick's Church, Aberdeen [data-set]. York: Archaeology Data Service [distributor] https://doi.org/10.5284/1037303

Data copyright © Aberdeen City Council, Aberdeen Art Gallery and Museums unless otherwise stated

This work is licensed under the ADS Terms of Use and Access.
Creative Commons License


Aberdeen City Council, Aberdeen Art Gallery and Museums logo

Primary contact

Alison Cameron
Director
Cameron Archaeology
45 View Terrace
Aberdeen
AB25 2RS
Scotland

Send e-mail enquiry

Resource identifiers

Digital Object Identifiers

Digital Object Identifiers (DOIs) are persistent identifiers which can be used to consistently and accurately reference digital objects and/or content. The DOIs provide a way for the ADS resources to be cited in a similar fashion to traditional scholarly materials. More information on DOIs at the ADS can be found on our help page.

Citing this DOI

The updated Crossref DOI Display guidelines recommend that DOIs should be displayed in the following format:

https://doi.org/10.5284/1037303
Sample Citation for this DOI

Aberdeen City Council Archaeological Unit (2016) Peterseat, Torry Battery and St Fittick's Church, Aberdeen [data-set]. York: Archaeology Data Service [distributor] https://doi.org/10.5284/1037303

Historic Scotland logo

Downloads

Documentation
Image metadata CSV
Image metadata

[DOWNLOAD] right-click and save link
18 Kb
Report metadata CSV
Report metadata

[DOWNLOAD] right-click and save link
1 Kb
Report
Peterseat, Torry Battery and St Fittick's Church, Aberdeen Cameron, A., Croly, C., Stones, J. (2016) Peterseat, Torry Battery and St Fittick's Church, Aberdeen. Cameron Archaeology Ltd: Aberdeen. PDF 3 Mb
Images
Thumbnail of Illustration 01
Illustration 01
Illustration 01
[DOWNLOAD] (Full Resolution) right-click and save link
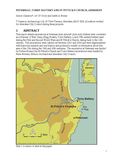
Illustration 01
Location of sites in this paper
JPG
Illustration 01
Illustration 01
[DOWNLOAD] (Full Resolution) right-click and save link
2.80 Mb
Thumbnail of Illustration 02
Illustration 02
Illustration 02
[DOWNLOAD] (Full Resolution) right-click and save link
Illustration 02
Location plan showing Cat and Baron's Cairns
JPG
Illustration 02
Illustration 02
[DOWNLOAD] (Full Resolution) right-click and save link
3.26 Mb
Thumbnail of Illustration 03
Illustration 03
Illustration 03
[DOWNLOAD] (Full Resolution) right-click and save link
Illustration 03
Plan showing WWII remains at Peterseat
JPG
Illustration 03
Illustration 03
[DOWNLOAD] (Full Resolution) right-click and save link
2.29 Mb
Thumbnail of Illustration 04
Illustration 04
Illustration 04
[DOWNLOAD] (Full Resolution) right-click and save link
Illustration 04
Plan showing command post AR/AQ
JPG
Illustration 04
Illustration 04
[DOWNLOAD] (Full Resolution) right-click and save link
1.69 Mb
Thumbnail of Illustration 05a
Illustration 05a
Illustration 05a
[DOWNLOAD] (Full Resolution) right-click and save link
Illustration 05a
Command post AR
JPG
Illustration 05a
Illustration 05a
[DOWNLOAD] (Full Resolution) right-click and save link
362 Kb
Thumbnail of Illustration 05b
Illustration 05b
Illustration 05b
[DOWNLOAD] (Full Resolution) right-click and save link
Illustration 05b
Command post AR showing construction techniques
JPG
Illustration 05b
Illustration 05b
[DOWNLOAD] (Full Resolution) right-click and save link
317 Kb
Thumbnail of Illustration 06a
Illustration 06a
Illustration 06a
[DOWNLOAD] (Full Resolution) right-click and save link
Illustration 06a
Foundation for gun emplacement AT plan
JPG
Illustration 06a
Illustration 06a
[DOWNLOAD] (Full Resolution) right-click and save link
710 Kb
Thumbnail of Illustration 06b
Illustration 06b
Illustration 06b
[DOWNLOAD] (Full Resolution) right-click and save link
Illustration 06b
Foundation for gun emplacement AT plan
JPG
Illustration 06b
Illustration 06b
[DOWNLOAD] (Full Resolution) right-click and save link
457 Kb
Thumbnail of Illustration 07
Illustration 07
Illustration 07
[DOWNLOAD] (Full Resolution) right-click and save link
Illustration 07
Plan showing structures F13, F14 and F15
JPG
Illustration 07
Illustration 07
[DOWNLOAD] (Full Resolution) right-click and save link
1.80 Mb
Thumbnail of Illustration 08
Illustration 08
Illustration 08
[DOWNLOAD] (Full Resolution) right-click and save link
Illustration 08
Tarmac road surface, AH, scored by later plough marks
JPG
Illustration 08
Illustration 08
[DOWNLOAD] (Full Resolution) right-click and save link
468 Kb
Thumbnail of Illustration 09
Illustration 09
Illustration 09
[DOWNLOAD] (Full Resolution) right-click and save link
Illustration 09
Section through F15 (top) and camp road BI (below)
JPG
Illustration 09
Illustration 09
[DOWNLOAD] (Full Resolution) right-click and save link
1.28 Mb
Thumbnail of Illustration 10
Illustration 10
Illustration 10
[DOWNLOAD] (Full Resolution) right-click and save link
Illustration 10
Surface AK
JPG
Illustration 10
Illustration 10
[DOWNLOAD] (Full Resolution) right-click and save link
525 Kb
Thumbnail of Illustration 11
Illustration 11
Illustration 11
[DOWNLOAD] (Full Resolution) right-click and save link
Illustration 11
Transport vehicle for taking PoWs to farms; Karl Roth is in the middle
JPG
Illustration 11
Illustration 11
[DOWNLOAD] (Full Resolution) right-click and save link
240 Kb
Thumbnail of Illustration 12
Illustration 12
Illustration 12
[DOWNLOAD] (Full Resolution) right-click and save link
Illustration 12
Letter sent by Karl Roth from Nigg camp and postmarked POW Camp No 75
JPG
Illustration 12
Illustration 12
[DOWNLOAD] (Full Resolution) right-click and save link
265 Kb
Thumbnail of Illustration 13
Illustration 13
Illustration 13
[DOWNLOAD] (Full Resolution) right-click and save link
Illustration 13
Canvas kit bag donated by Karl Roth to Aberdeen Art Gallery & Museums Collections (ABDMS 69921)
JPG
Illustration 13
Illustration 13
[DOWNLOAD] (Full Resolution) right-click and save link
221 Kb
Thumbnail of Illustration 14
Illustration 14
Illustration 14
[DOWNLOAD] (Full Resolution) right-click and save link
Illustration 14
Entrance into Torry Battery
JPG
Illustration 14
Illustration 14
[DOWNLOAD] (Full Resolution) right-click and save link
84 Kb
Thumbnail of Illustration 15
Illustration 15
Illustration 15
[DOWNLOAD] (Full Resolution) right-click and save link
Illustration 15
Location plan of trenches
JPG
Illustration 15
Illustration 15
[DOWNLOAD] (Full Resolution) right-click and save link
1.12 Mb
Thumbnail of Illustration 16
Illustration 16
Illustration 16
[DOWNLOAD] (Full Resolution) right-click and save link
Illustration 16
Plan of Trench 1 building
JPG
Illustration 16
Illustration 16
[DOWNLOAD] (Full Resolution) right-click and save link
2.26 Mb
Thumbnail of Illustration 17
Illustration 17
Illustration 17
[DOWNLOAD] (Full Resolution) right-click and save link
Illustration 17
Interpretation of fireplace AU and flue AT
JPG
Illustration 17
Illustration 17
[DOWNLOAD] (Full Resolution) right-click and save link
772 Kb
Thumbnail of Illustration 18
Illustration 18
Illustration 18
[DOWNLOAD] (Full Resolution) right-click and save link
Illustration 18
Section through utensil store (left) and bedding store (right)
JPG
Illustration 18
Illustration 18
[DOWNLOAD] (Full Resolution) right-click and save link
1.18 Mb
Thumbnail of Illustration 19
Illustration 19
Illustration 19
[DOWNLOAD] (Full Resolution) right-click and save link
Illustration 19
Section showing gutter AE
JPG
Illustration 19
Illustration 19
[DOWNLOAD] (Full Resolution) right-click and save link
537 Kb
Thumbnail of Illustration 20
Illustration 20
Illustration 20
[DOWNLOAD] (Full Resolution) right-click and save link
Illustration 20
Plan of Torry Battery 1906 showing coal, ashes, utensil and bedding stores
JPG
Illustration 20
Illustration 20
[DOWNLOAD] (Full Resolution) right-click and save link
321 Kb
Thumbnail of Illustration 21
Illustration 21
Illustration 21
[DOWNLOAD] (Full Resolution) right-click and save link
Illustration 21
Trench 2 showing stair base AA, tank base AB and lead pipe AW
JPG
Illustration 21
Illustration 21
[DOWNLOAD] (Full Resolution) right-click and save link
1.65 Mb
Thumbnail of Illustration 22
Illustration 22
Illustration 22
[DOWNLOAD] (Full Resolution) right-click and save link
Illustration 22
Plan of Battery in 1865
JPG
Illustration 22
Illustration 22
[DOWNLOAD] (Full Resolution) right-click and save link
79 Kb
Thumbnail of Illustration 23
Illustration 23
Illustration 23
[DOWNLOAD] (Full Resolution) right-click and save link
Illustration 23
Model of Torry Battery in late 19th century by Jan Dunbar
JPG
Illustration 23
Illustration 23
[DOWNLOAD] (Full Resolution) right-click and save link
57 Kb
Thumbnail of Illustration 24
Illustration 24
Illustration 24
[DOWNLOAD] (Full Resolution) right-click and save link
Illustration 24
St Fittick's Church and graveyard (facing west) showing excavation in the be to the west of the medieval one
JPG
Illustration 24
Illustration 24
[DOWNLOAD] (Full Resolution) right-click and save link
427 Kb
Thumbnail of Illustration 25
Illustration 25
Illustration 25
[DOWNLOAD] (Full Resolution) right-click and save link
Illustration 25
Trench plan showing main features
JPG
Illustration 25
Illustration 25
[DOWNLOAD] (Full Resolution) right-click and save link
1.02 Mb
Thumbnail of Illustration 26
Illustration 26
Illustration 26
[DOWNLOAD] (Full Resolution) right-click and save link
Illustration 26
Trench 1 features
JPG
Illustration 26
Illustration 26
[DOWNLOAD] (Full Resolution) right-click and save link
3.02 Mb
Thumbnail of Illustration 27a
Illustration 27a
Illustration 27a
[DOWNLOAD] (Full Resolution) right-click and save link
Illustration 27a
Terracing wall AK under the manse building
JPG
Illustration 27a
Illustration 27a
[DOWNLOAD] (Full Resolution) right-click and save link
336 Kb
Thumbnail of Illustration 27b
Illustration 27b
Illustration 27b
[DOWNLOAD] (Full Resolution) right-click and save link
Illustration 27b
Terracing wall AK under the manse building
JPG
Illustration 27b
Illustration 27b
[DOWNLOAD] (Full Resolution) right-click and save link
340 Kb
Thumbnail of Illustration 28
Illustration 28
Illustration 28
[DOWNLOAD] (Full Resolution) right-click and save link
Illustration 28
Diagram showing how terracing wall AK might have worked (N to right)
JPG
Illustration 28
Illustration 28
[DOWNLOAD] (Full Resolution) right-click and save link
654 Kb
Thumbnail of Illustration 29
Illustration 29
Illustration 29
[DOWNLOAD] (Full Resolution) right-click and save link
Illustration 29
Foundations of manse building (Building 2) foreground, driveway (with 2m scales) and garden (top); facing south
JPG
Illustration 29
Illustration 29
[DOWNLOAD] (Full Resolution) right-click and save link
370 Kb
Thumbnail of Illustration 30
Illustration 30
Illustration 30
[DOWNLOAD] (Full Resolution) right-click and save link
Illustration 30
Building 2, manse (foreground) showing Kirkhill Farm (background right) prior to the development of Balnagask
JPG
Illustration 30
Illustration 30
[DOWNLOAD] (Full Resolution) right-click and save link
88 Kb
Thumbnail of Illustration 31
Illustration 31
Illustration 31
[DOWNLOAD] (Full Resolution) right-click and save link
Illustration 31
Building 2, Concrete steps (AK) leading from driveway (top right) and garden (bottom left)
JPG
Illustration 31
Illustration 31
[DOWNLOAD] (Full Resolution) right-click and save link
379 Kb
Thumbnail of Illustration 32a
Illustration 32a
Illustration 32a
[DOWNLOAD] (Full Resolution) right-click and save link
Illustration 32a
Building 2, Looking south down steps AG
JPG
Illustration 32a
Illustration 32a
[DOWNLOAD] (Full Resolution) right-click and save link
396 Kb
Thumbnail of Illustration 32b
Illustration 32b
Illustration 32b
[DOWNLOAD] (Full Resolution) right-click and save link
Illustration 32b
Building 2, steps AG showing hole for railing AY
JPG
Illustration 32b
Illustration 32b
[DOWNLOAD] (Full Resolution) right-click and save link
415 Kb
Thumbnail of Illustration 33
Illustration 33
Illustration 33
[DOWNLOAD] (Full Resolution) right-click and save link
Illustration 33
Family photograph showing garden steps (AG), Building 2,foreground and garden wall AF (right)
JPG
Illustration 33
Illustration 33
[DOWNLOAD] (Full Resolution) right-click and save link
266 Kb
Thumbnail of Illustration 34
Illustration 34
Illustration 34
[DOWNLOAD] (Full Resolution) right-click and save link
Illustration 34
Building 3, upstanding wall, the east wall, BZ, of the agricultural building facing west
JPG
Illustration 34
Illustration 34
[DOWNLOAD] (Full Resolution) right-click and save link
885 Kb
Thumbnail of Illustration 35
Illustration 35
Illustration 35
[DOWNLOAD] (Full Resolution) right-click and save link
Illustration 35
Building 3, Upstanding wall, the east wall, BZ, with blocked doorway, BY, wall scar BX facing east
JPG
Illustration 35
Illustration 35
[DOWNLOAD] (Full Resolution) right-click and save link
755 Kb
Thumbnail of Illustration 36
Illustration 36
Illustration 36
[DOWNLOAD] (Full Resolution) right-click and save link
Illustration 36
Building 3, Trench 2: plan of all features
JPG
Illustration 36
Illustration 36
[DOWNLOAD] (Full Resolution) right-click and save link
3.31 Mb
Thumbnail of Illustration 37
Illustration 37
Illustration 37
[DOWNLOAD] (Full Resolution) right-click and save link
Illustration 37
Building 3: BA showing scar BX; facing east
JPG
Illustration 37
Illustration 37
[DOWNLOAD] (Full Resolution) right-click and save link
117 Kb
Thumbnail of Illustration 38
Illustration 38
Illustration 38
[DOWNLOAD] (Full Resolution) right-click and save link
Illustration 38
Building 3: Cobbled surface BF showing circular patterns made during laying
JPG
Illustration 38
Illustration 38
[DOWNLOAD] (Full Resolution) right-click and save link
450 Kb
Thumbnail of Illustration 39
Illustration 39
Illustration 39
[DOWNLOAD] (Full Resolution) right-click and save link
Illustration 39
Building 3: The agricultural building or 'Piggerie' showing wall BA (right), waterwashed pebble floor BF (left), wall BH (bottom) and exterior cobbles BN (top)
JPG
Illustration 39
Illustration 39
[DOWNLOAD] (Full Resolution) right-click and save link
427 Kb
Thumbnail of Illustration 40
Illustration 40
Illustration 40
[DOWNLOAD] (Full Resolution) right-click and save link
Illustration 40
Building 3: Early 20th century Piggery
JPG
Illustration 40
Illustration 40
[DOWNLOAD] (Full Resolution) right-click and save link
1.47 Mb
Thumbnail of Illustration 41
Illustration 41
Illustration 41
[DOWNLOAD] (Full Resolution) right-click and save link
Illustration 41
Artist's impression of the church, agricultural buildings and manse; the manse was constructed in 1759 by Claire Roberts
JPG
Illustration 41
Illustration 41
[DOWNLOAD] (Full Resolution) right-click and save link
605 Kb
Thumbnail of Illustration 42
Illustration 42
Illustration 42
[DOWNLOAD] (Full Resolution) right-click and save link
Illustration 42
The church and graveyard from the ESE
JPG
Illustration 42
Illustration 42
[DOWNLOAD] (Full Resolution) right-click and save link
427 Kb
Thumbnail of Illustration 43
Illustration 43
Illustration 43
[DOWNLOAD] (Full Resolution) right-click and save link
Illustration 43
Church plan showing location of doors and windows
JPG
Illustration 43
Illustration 43
[DOWNLOAD] (Full Resolution) right-click and save link
1.66 Mb
Thumbnail of Illustration 44
Illustration 44
Illustration 44
[DOWNLOAD] (Full Resolution) right-click and save link
Illustration 44
South wall elevations top: interior; bottom: exterior
JPG
Illustration 44
Illustration 44
[DOWNLOAD] (Full Resolution) right-click and save link
1.59 Mb
Thumbnail of Illustration 45a
Illustration 45a
Illustration 45a
[DOWNLOAD] (Full Resolution) right-click and save link
Illustration 45a
South wall: D1 interior
JPG
Illustration 45a
Illustration 45a
[DOWNLOAD] (Full Resolution) right-click and save link
1.26 Mb
Thumbnail of Illustration 45b
Illustration 45b
Illustration 45b
[DOWNLOAD] (Full Resolution) right-click and save link
Illustration 45b
South wall: D1 exterior
JPG
Illustration 45b
Illustration 45b
[DOWNLOAD] (Full Resolution) right-click and save link
1.51 Mb
Thumbnail of Illustration 46a
Illustration 46a
Illustration 46a
[DOWNLOAD] (Full Resolution) right-click and save link
Illustration 46a
South wall: Elevations of D1 interior
JPG
Illustration 46a
Illustration 46a
[DOWNLOAD] (Full Resolution) right-click and save link
1.42 Mb
Thumbnail of Illustration 46b
Illustration 46b
Illustration 46b
[DOWNLOAD] (Full Resolution) right-click and save link
Illustration 46b
South wall: Elevations of D1 exterior
JPG
Illustration 46b
Illustration 46b
[DOWNLOAD] (Full Resolution) right-click and save link
1.23 Mb
Thumbnail of Illustration 47a
Illustration 47a
Illustration 47a
[DOWNLOAD] (Full Resolution) right-click and save link
Illustration 47a
Illus 47 South wall exterior: Window 1 elevation
JPG
Illustration 47a
Illustration 47a
[DOWNLOAD] (Full Resolution) right-click and save link
631 Kb
Thumbnail of Illustration 47b
Illustration 47b
Illustration 47b
[DOWNLOAD] (Full Resolution) right-click and save link
Illustration 47b
South wall exterior: Window 1 exterior south facing showing chain for jougs in situ
JPG
Illustration 47b
Illustration 47b
[DOWNLOAD] (Full Resolution) right-click and save link
334 Kb
Thumbnail of Illustration 48
Illustration 48
Illustration 48
[DOWNLOAD] (Full Resolution) right-click and save link
Illustration 48
South wall interior: (l-r) W8, D5, W2
JPG
Illustration 48
Illustration 48
[DOWNLOAD] (Full Resolution) right-click and save link
1.20 Mb
Thumbnail of Illustration 49
Illustration 49
Illustration 49
[DOWNLOAD] (Full Resolution) right-click and save link
Illustration 49
South wall exterior: (l-r) Door 1, window 1, window 2, door 5
JPG
Illustration 49
Illustration 49
[DOWNLOAD] (Full Resolution) right-click and save link
1.20 Mb
Thumbnail of Illustration 50
Illustration 50
Illustration 50
[DOWNLOAD] (Full Resolution) right-click and save link
Illustration 50
North wall elevations top: exterior; bottom: interior
JPG
Illustration 50
Illustration 50
[DOWNLOAD] (Full Resolution) right-click and save link
1.30 Mb
Thumbnail of Illustration 51
Illustration 51
Illustration 51
[DOWNLOAD] (Full Resolution) right-click and save link
Illustration 51
North wall: W5 with D3 above
JPG
Illustration 51
Illustration 51
[DOWNLOAD] (Full Resolution) right-click and save link
1.11 Mb
Thumbnail of Illustration 52a
Illustration 52a
Illustration 52a
[DOWNLOAD] (Full Resolution) right-click and save link
Illustration 52a
North wall: Window 4 exterior elevation
JPG
Illustration 52a
Illustration 52a
[DOWNLOAD] (Full Resolution) right-click and save link
517 Kb
Thumbnail of Illustration 52b
Illustration 52b
Illustration 52b
[DOWNLOAD] (Full Resolution) right-click and save link
Illustration 52b
North wall: Window 4 exterior
JPG
Illustration 52b
Illustration 52b
[DOWNLOAD] (Full Resolution) right-click and save link
1.53 Mb
Thumbnail of Illustration 52c
Illustration 52c
Illustration 52c
[DOWNLOAD] (Full Resolution) right-click and save link
Illustration 52c
North wall: Window 4 interior
JPG
Illustration 52c
Illustration 52c
[DOWNLOAD] (Full Resolution) right-click and save link
854 Kb
Thumbnail of Illustration 53
Illustration 53
Illustration 53
[DOWNLOAD] (Full Resolution) right-click and save link
Illustration 53
North wall: W4 (centre) with scar of W6, left and infilled window W3, right
JPG
Illustration 53
Illustration 53
[DOWNLOAD] (Full Resolution) right-click and save link
1.28 Mb
Thumbnail of Illustration 54
Illustration 54
Illustration 54
[DOWNLOAD] (Full Resolution) right-click and save link
Illustration 54
Church phase plan; there would have been more openings in the earliest phases but all evidence of these early doors and windows has been obliterated by later building
JPG
Illustration 54
Illustration 54
[DOWNLOAD] (Full Resolution) right-click and save link
2.40 Mb
Thumbnail of Illustration 55a
Illustration 55a
Illustration 55a
[DOWNLOAD] (Full Resolution) right-click and save link
Illustration 55a
Stone basin/font now in University of Aberdeen Collections
JPG
Illustration 55a
Illustration 55a
[DOWNLOAD] (Full Resolution) right-click and save link
199 Kb
Thumbnail of Illustration 55b
Illustration 55b
Illustration 55b
[DOWNLOAD] (Full Resolution) right-click and save link
Illustration 55b
Stone basin/font in situ in church
JPG
Illustration 55b
Illustration 55b
[DOWNLOAD] (Full Resolution) right-click and save link
957 Kb
Thumbnail of Illustration 56
Illustration 56
Illustration 56
[DOWNLOAD] (Full Resolution) right-click and save link
Illustration 56
Church and gravestone plan
JPG
Illustration 56
Illustration 56
[DOWNLOAD] (Full Resolution) right-click and save link
3.23 Mb
Thumbnail of Illustration 57
Illustration 57
Illustration 57
[DOWNLOAD] (Full Resolution) right-click and save link
Illustration 57
Building 5 (Watcher's House) from the SW
JPG
Illustration 57
Illustration 57
[DOWNLOAD] (Full Resolution) right-click and save link
882 Kb
Thumbnail of Illustration 58
Illustration 58
Illustration 58
[DOWNLOAD] (Full Resolution) right-click and save link
Illustration 58
Aberdeen & NE Family History Society and Aberdeen Archaeological Unit staff and volunteers
JPG
Illustration 58
Illustration 58
[DOWNLOAD] (Full Resolution) right-click and save link
107 Kb
Thumbnail of Illustration 59a
Illustration 59a
Illustration 59a
[DOWNLOAD] (Full Resolution) right-click and save link
Illustration 59a
Stone 144, a typical example of lettering on the sheltered west faces of sandstone gravestones
JPG
Illustration 59a
Illustration 59a
[DOWNLOAD] (Full Resolution) right-click and save link
634 Kb
Thumbnail of Illustration 59b
Illustration 59b
Illustration 59b
[DOWNLOAD] (Full Resolution) right-click and save link
Illustration 59b
Stone 142 variable preservation on east-facing sandstone
JPG
Illustration 59b
Illustration 59b
[DOWNLOAD] (Full Resolution) right-click and save link
810 Kb
Thumbnail of Illustration 60
Illustration 60
Illustration 60
[DOWNLOAD] (Full Resolution) right-click and save link
Illustration 60
Gravestone 176 dated 1645
JPG
Illustration 60
Illustration 60
[DOWNLOAD] (Full Resolution) right-click and save link
502 Kb
Thumbnail of Illustration 61
Illustration 61
Illustration 61
[DOWNLOAD] (Full Resolution) right-click and save link
Illustration 61
Gravestone 165
JPG
Illustration 61
Illustration 61
[DOWNLOAD] (Full Resolution) right-click and save link
479 Kb
Thumbnail of Illustration 62
Illustration 62
Illustration 62
[DOWNLOAD] (Full Resolution) right-click and save link
Illustration 62
Gravestone 147
JPG
Illustration 62
Illustration 62
[DOWNLOAD] (Full Resolution) right-click and save link
1.17 Mb

ADS logo
Data Org logo
University of York logo