Case study: Inrap: archival preparation of the ArchéoDB field registration system
This case study was produced as a component of a two week work placement during April 2012 at the ADS funded by the Archaeology in Contemporary Europe (ACE) mobility bursary scheme.

ArchéoDB
Over the last 4 years, Inrap has been experimenting with the use of tablet PCs to record data directly from the field phase, with a relational database centralizing all the information gathered during the excavation and allowing the deposit of data collected by the team on a shared server (NAS) in the post-excavation phase[1]. Nicolas Holzem (Inrap Centre) developed an initial database, called DataDiag, which was tested on different evaluations from the summer of 2010. The database has evolved to a less oriented system with new tests on evaluations and its use in several excavations, including Lassay-sur-Croisne and Neuvy-Pailloux and then on the first two excavations of Étrechet “Croc au Loup” and “Le Four à Chaux”.
After a presentation of several Inrap database systems to the ADS team during the ACE placement, it was agreed to focus this case study on the ArchéoDB database. This allows us to approach various different aspects of archiving: backing up of a database and its associated documentation files (pictures, drawings, GIS files, inventories).
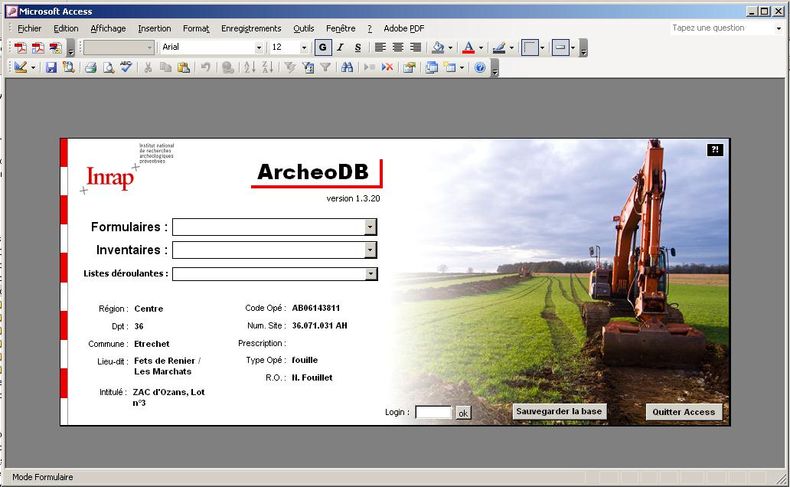
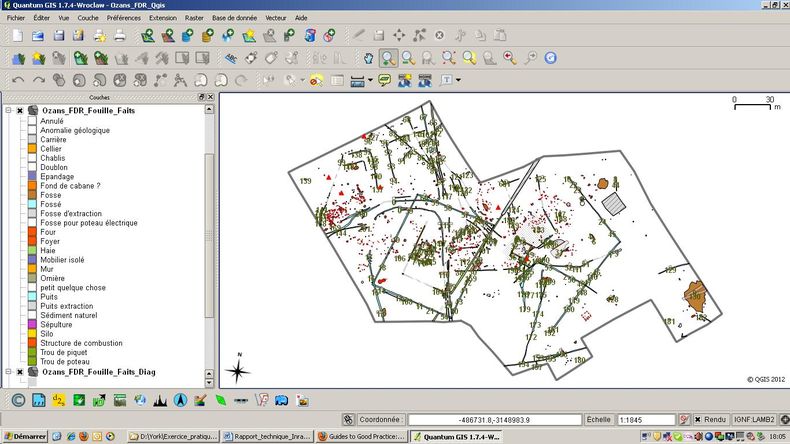
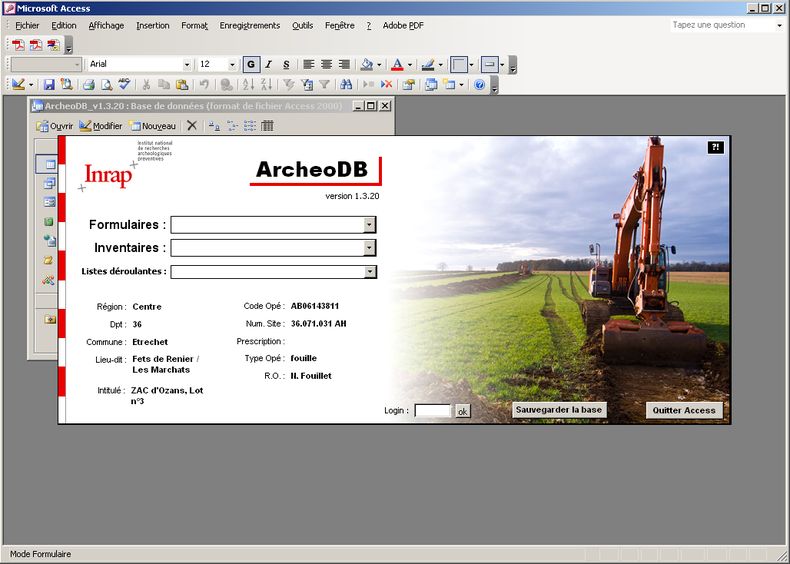
This is version 1.3.20 of the database, developed to be deployed on the third excavation of Étrechet “Fets de Renier”, which is discussed here. It contains the record of 1122 structures and their stratigraphic units as well as recording photographs and minutes field (displayed as thumbnails). The database will still be supplemented with other data (dates, results of specific studies). GIS exploitation is in its infancy and should also evolve (Fig. 2). So, this is an intermediate version of the database it was decided to archive here. In the frame of a real procedure, we can imagine that the depositor asks to deposit of a second accession with a more complete database, resulting in this case the conservation of a second archive (in the same collection).
Choices adopted in terms of preservation and dissemination
The selection of information to keep and formats to use was conducted in accordance with the recommendations of the online Guides to Good Practice available on the ADS website platform[2]. However, some characteristics of the database ArchéoDB have pushed us to save additional documentation: a copy of the main screen and entry forms in TIFF file format (to keep track of work done in ergonomics and organizing the data acquisition).
The inventories generated and formatted by the database (reports) were also retained for archiving and distribution in PDF/A-1b (they were not compatible for a save as PDF/A-1a), as when the formatting is consistent with current requirements of the regional archaeological service in the Centre region.
For the saving of the database, we opted for the conservation of the different tables in TXT file format, the most suitable for permanent conservation, with a delimitation of the text using the vertical bar (also called pipe) “|” .
Reference tables used to supply drop-down menus present in the entry forms (prefixed “lst_” in the database) and tables generated by queries have not been kept, as directed by ADS. The use of a reference table or a list of values for editing a field, however, has consistently been mentioned in the metadata file describing the database tables.
On raster images (photos and minutes field), originally created in JPEG file format, a conversion in TIFF file format was elected to avoid further damage during any re-registration. JPEG file formats have been retained for consultation and online dissemination.
One vector drawing (minute field template) is associated with the database. This, originally designed in Adobe Illustrator, has been saved in the SVG file format for conservation as well as for dissemination.
For GIS files, only the three types of files that composed a shapefile have been retained for archiving and distribution: SHP (shape format), SHX (shape index format) and DBF (attribute format in dBase). Following the recommendations of ADS, the project file from the application QGIS as well as LYR (layer symbology), PRJ (projection format), QML (style diapers), SBN and SBX (spatial index of the features) have not been retained for conservation.
Preparation of the files of the database[4]
Export of tables from the database at .txt format
The text format is valid both for the preservation and dissemination of data online. The generated files in this format, corresponding to the main database tables of ArchéoDB, will therefore be duplicated in the two sections of the corresponding archive folder (“preservation” and “dissemination”).
Below is detailed, step by step, the procedure to export tables in TXT file format:
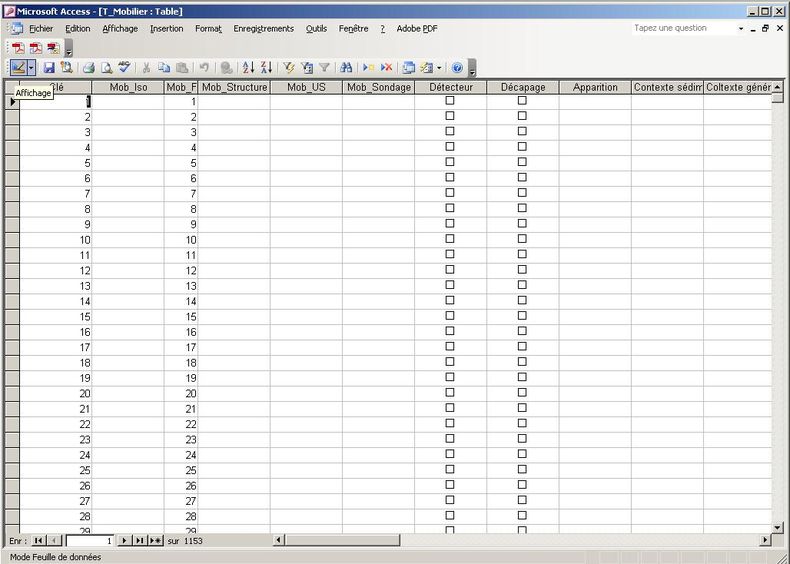
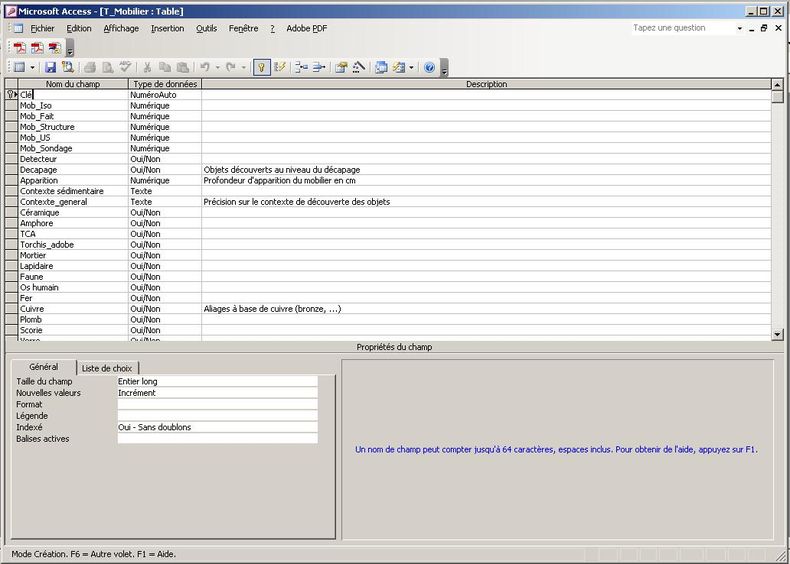
- Open the table to export (fig. 3);
- In “design view”, check that field names are clean by removing accents, special characters and spaces in field names and their captions (if it exists) available in the “General” box[5] (fig. 4);
- Select File > Export;
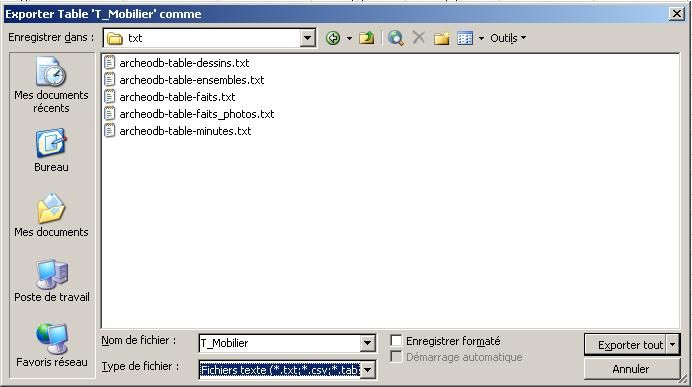
- Select the Text file format, name the file by “database name-table name” (without spaces, accents or special characters) and click on Export (fig. 5);
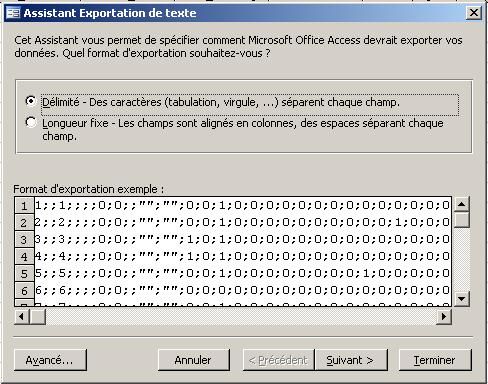
- Select the export format “Delimited” and click Next (fig. 6);
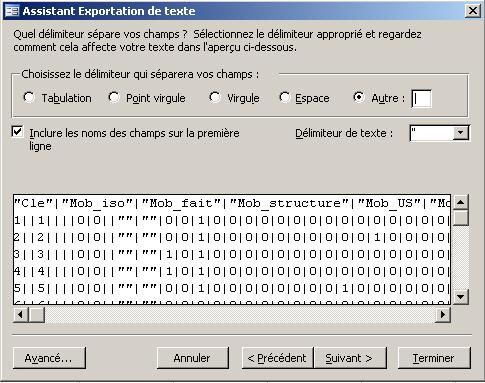
- Select “Other” type of delimiter and enter as a value the vertical bar (or pipe) “|” , check “Include Field Names on First Row” (Fig. 7);
- Click Next and then Finish.
Backing up of the relationships
It was decided to keep a copy of the relational schema in TIFF file format to document the database but also in JPEG file format to dissemination online.
Detailed below is the procedure to generate an image from the relational schema (not the ability to record directly into image format via Microsoft Access 2003):
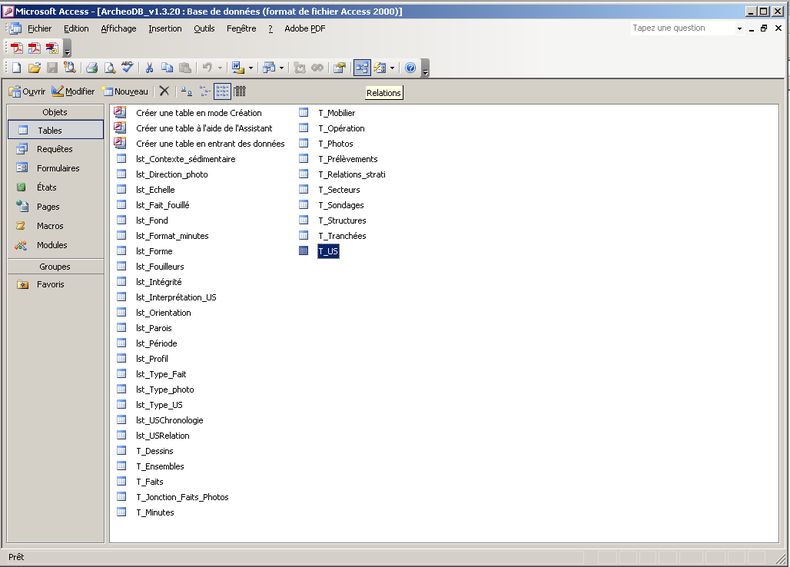
- Exit the main screen form and access the list of tables. Click on Relationships (fig. 8) ;
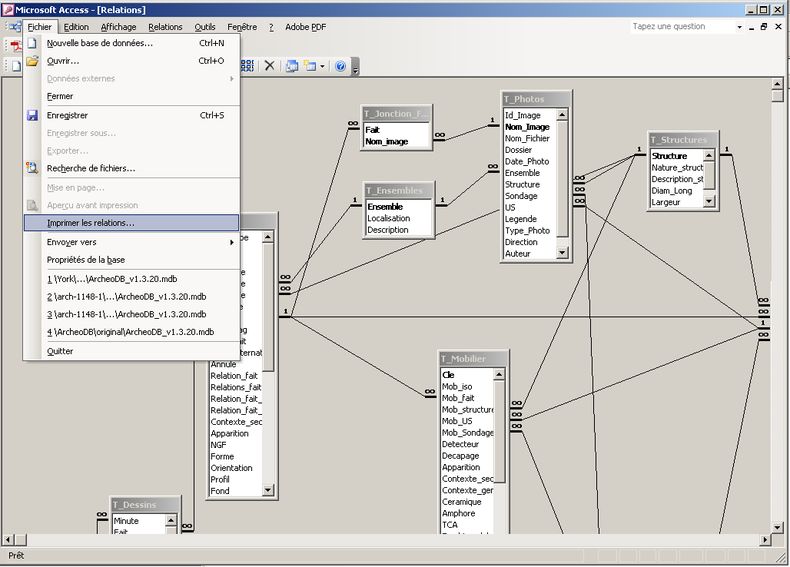
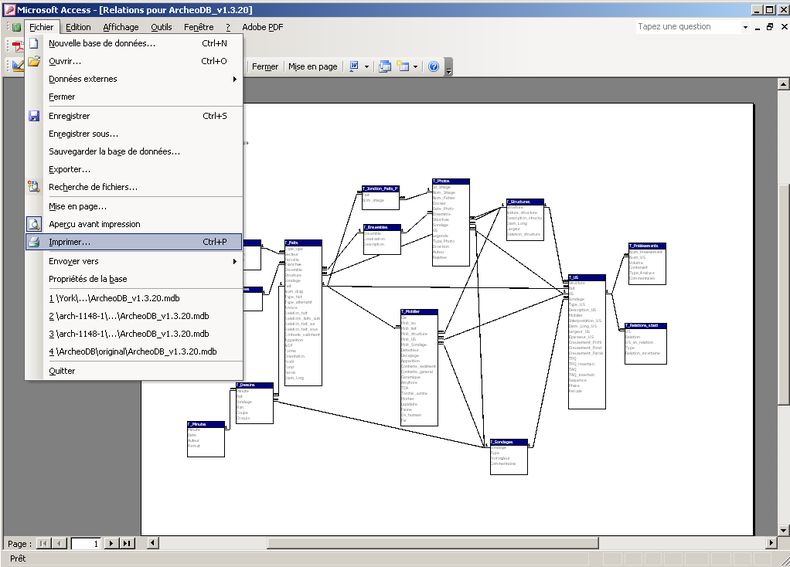
- Check that all of the tree relations are unfolded and visible on the screen and then select File > Print relations (Fig. 9);
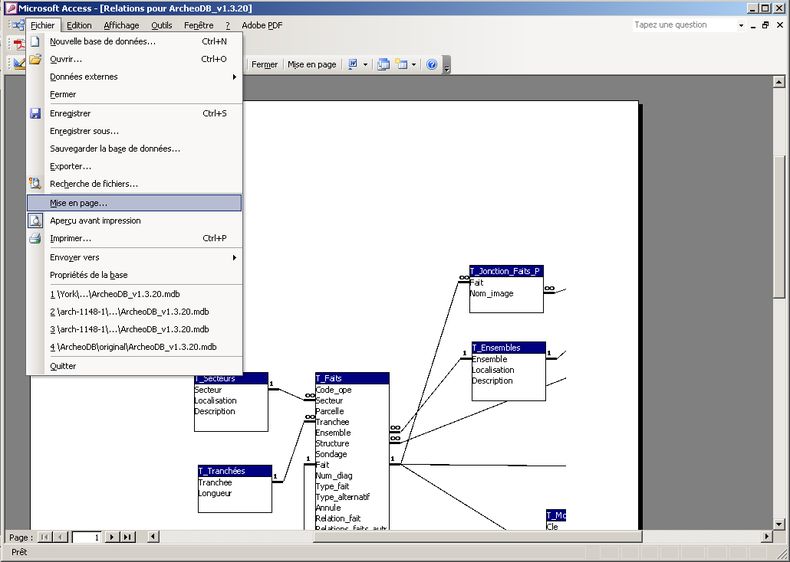
- Click on File > Page Setup (fig. 10) ;
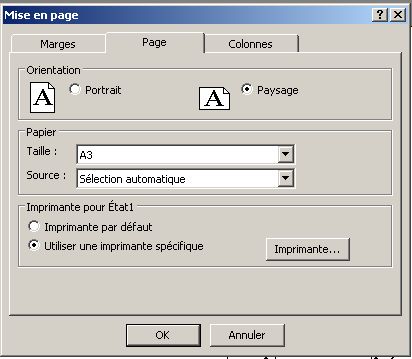
- Adapt the layout for all tables to have fields and links well visible (in the example we select an A3 landscape display format; select “Use Specific Printer” and click on the printer (fig. 11);
- Select File > Print (fig. 12);
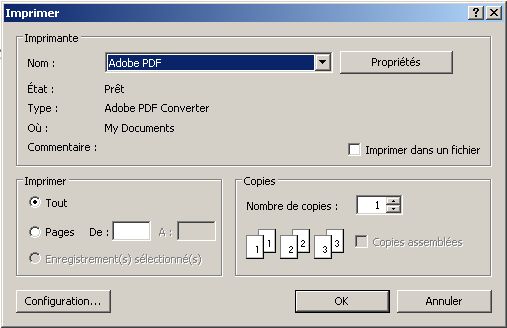
- Select printer as “Adobe PDF” (Fig. 13) ;
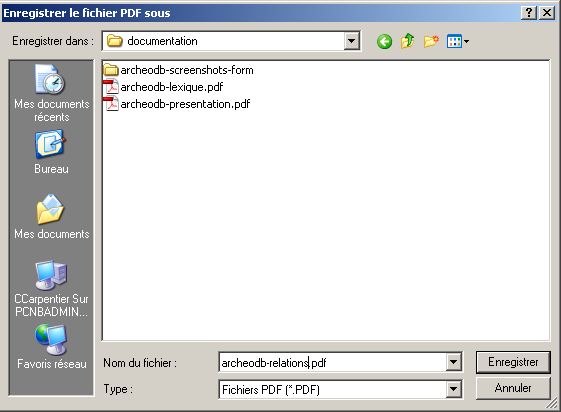
- Select Save (fig. 14);
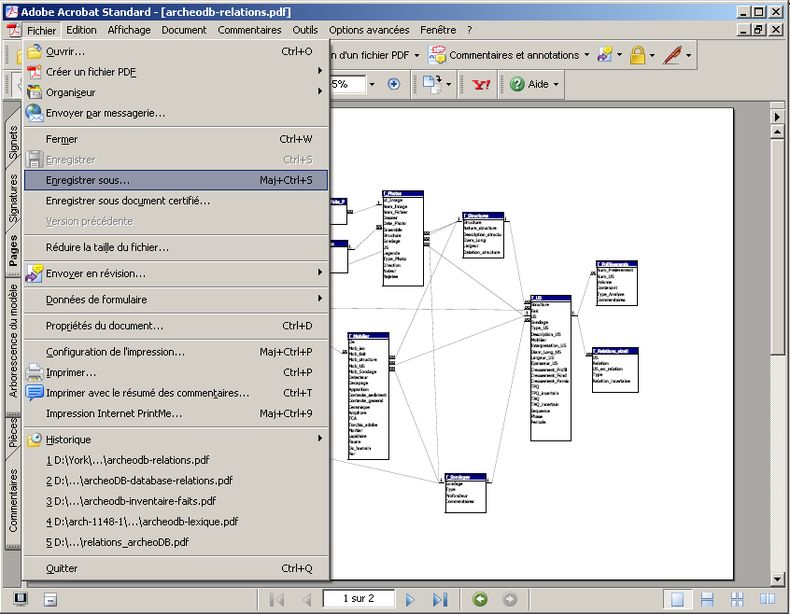
- From this PDF print has yet to be generated an archive in TIFF file format (only valid format for sustainable conservation)[6]. To do this you must open the generated PDF in Adobe Acrobat Pro and click File > Save As (Fig. 15);
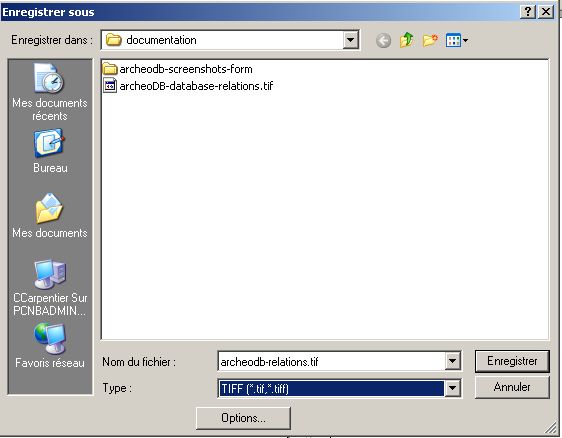
- Select the TIFF file format and name the file by “name database-relations” and click Save (fig. 16);
- Re-record the resulting image in JPEG file format to put it online.
Screenshots of entry forms
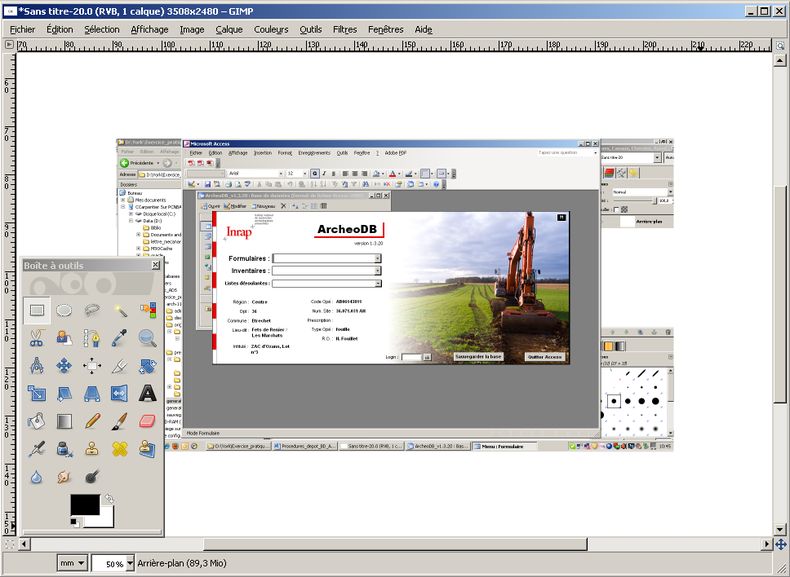
We chose to save screenshots of entry forms to document the database. This backup is performed in TIFF file format using the open source application GIMP, with the following procedure:
- Generation of screenshots with the Print Screen key of the keyboard (fig. 17);
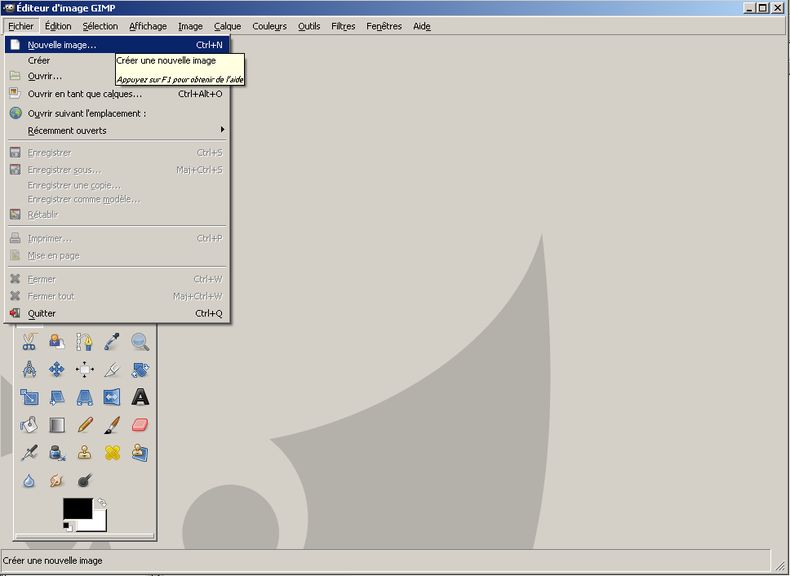
- Open the photo processing software and select File > New Image (New in Adobe Photoshop) (Fig. 18);
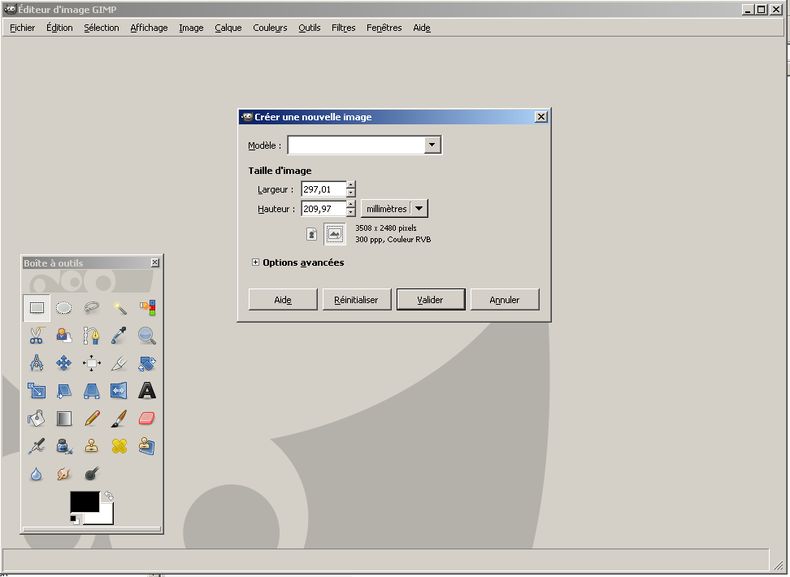
- Define the attributes of the file: name, width, height and resolution (Fig. 19);
- Paste the print screen (Fig. 20);
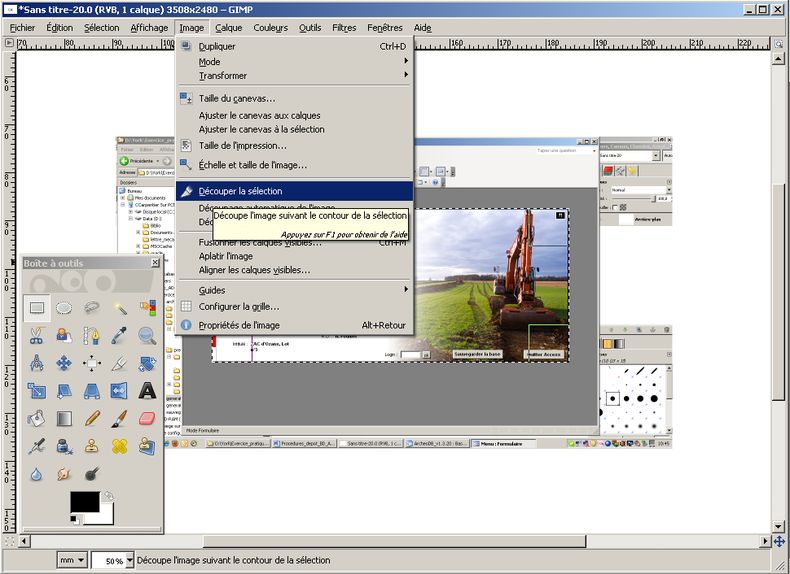
- Select the image area to conserve and reframe the selection with the Cut option (equivalent to the crop tool in Adobe Photoshop) (Fig. 21);
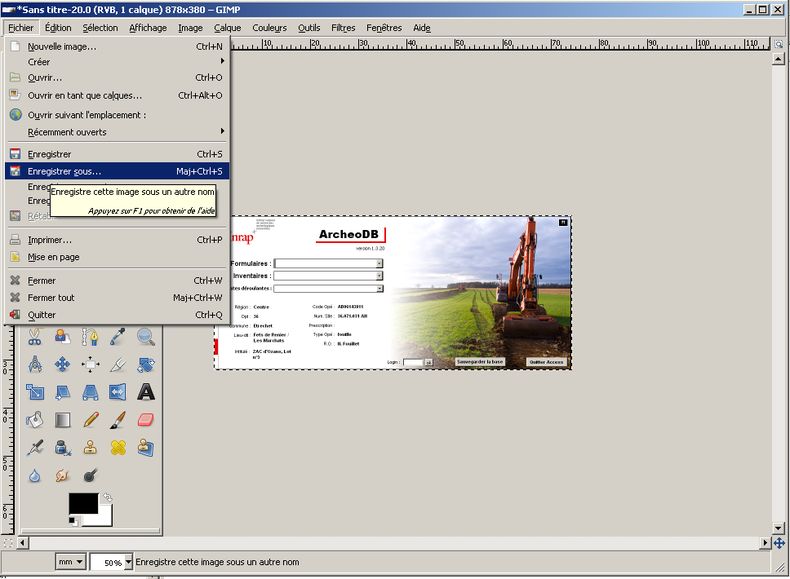
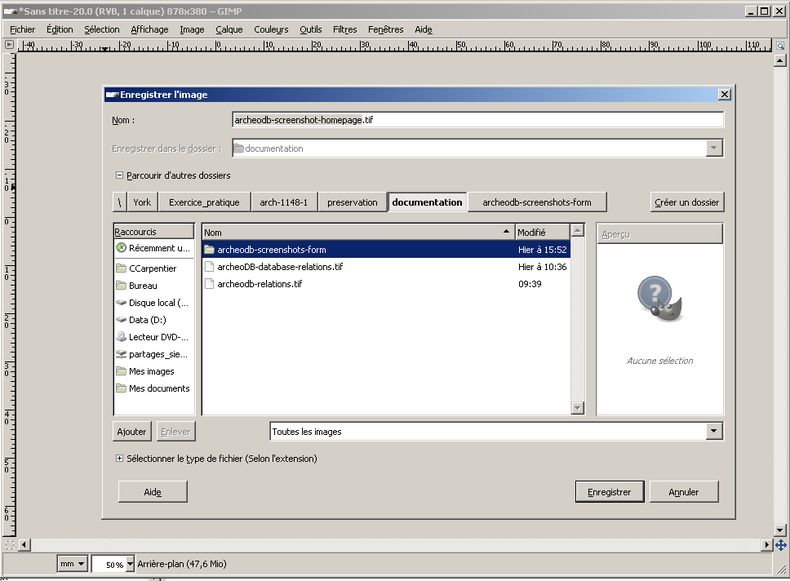
- Select File > Save As and save the file in TIFF format (Fig. 22 and 23).
Preparation of the files associated with the database
Treatment of photographs and minutes field (raster images)
Digital photographs and scanned minutes field, originally in JPEG file format, are stored in the same format in the dissemination section of the archive.
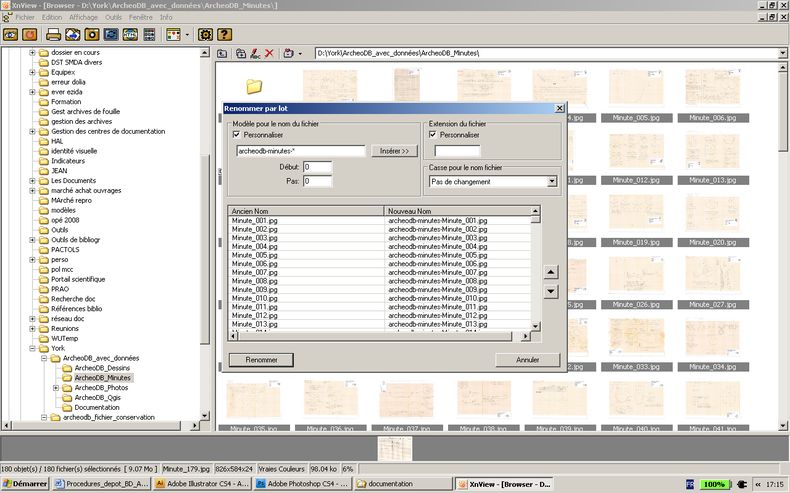
Before archiving, the original images must first be renamed by set using the application XnView. The name is composed as follows: “name of the database-name of the associated table in the database-name of the original image” (without spaces, accents or special characters).
The procedure is as follows:
- Select all the images and select Edit > Rename ;
- Add to file names prefix containing the name of the database and the name of the table to which are attached the images. Add a dash and a star (*) to the prefix so that the original name is automatically inserted. Do not add any extension to the file (Fig. 24).
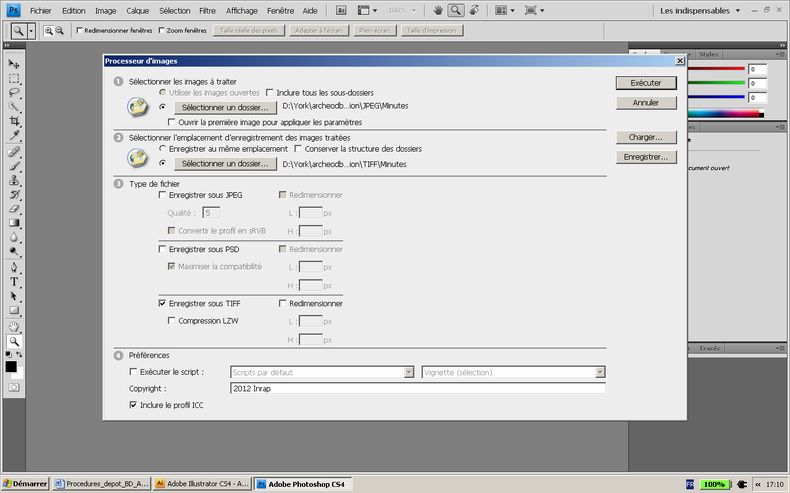
To allow permanent conservation, all of these images are then converted simultaneously in TIFF file format using Adobe Photoshop. Procedure is as follows:
- Open the application and click on File > Script > Image Processor;
- Select the folder containing the images to be modified, indicate where to save the processed images;
- After choosing the TIFF file format, run (Fig. 25).
Treatment of drawings (vector image)
Only one drawing, done in Adobe Illustator, is associated with the ArchéoDB database. This is a blank template intended to be used as the basis of field surveys. It is therefore not a single raster image file associated.
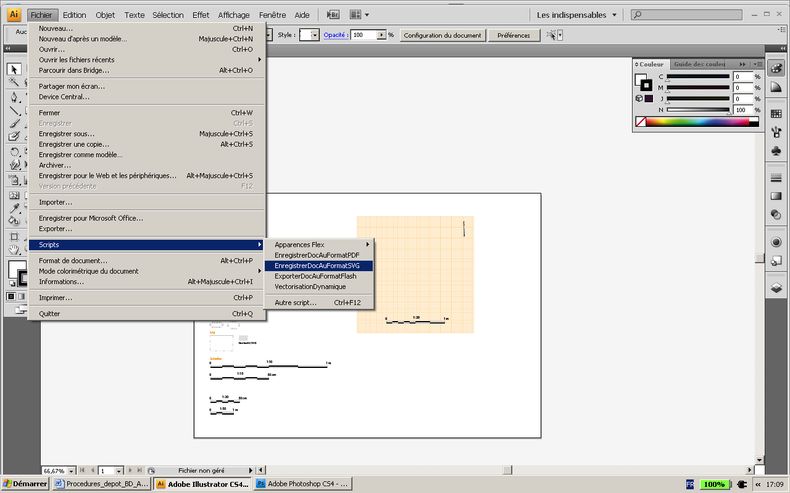
It was converted to SVG file format for its preservation and dissemination. The procedure is as follows:
- Use the function Save As or Scripts> SaveAsDocSVGFormat of Adobe Illustrator file menu (Fig. 26);
- Name the file as follows: “database name-name of associated table-original filename” (without spaces, accents or special characters)[7].
Treatment of inventories (formatted text)
Normally, textual documents are archived in TXT file format, unless you wish to conserve the format or layout aspects of it. In these cases, the use of PDF/A is recommended. PDF/A-1 specification was published by ISO (19005)[8] and is used by standards organizations around the world to ensure the safety and reliability of the dissemination and exchange of electronic documents.
There are two variants of PDF/A-1:
- PDF/A-1a representing the full form of ISO;
- PDF/A-1b which represents a simpler form of the ISO (this version preserves the document’s readability and good presentation for display and printing).
When the original file allows the conversion to PDF/A-1a, this format is preferred.
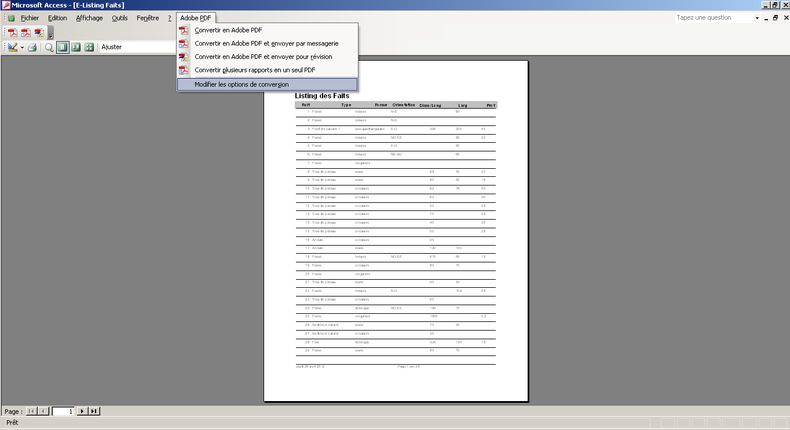
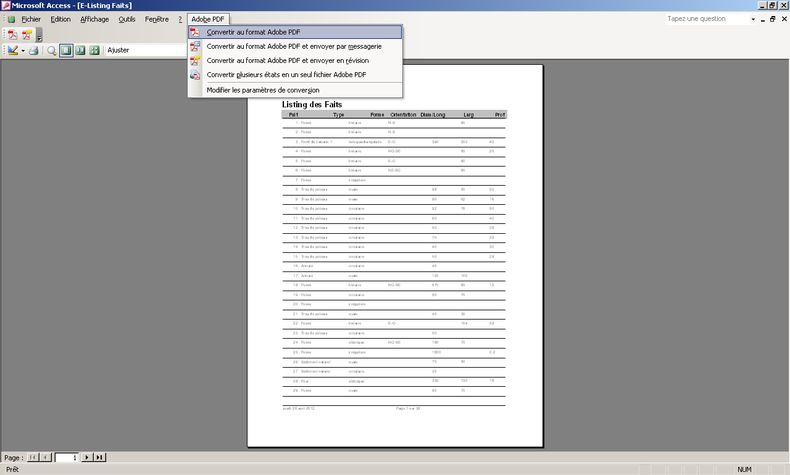
Detailed below is the procedure for the conversion of inventories directly from Microsoft Access[9]:
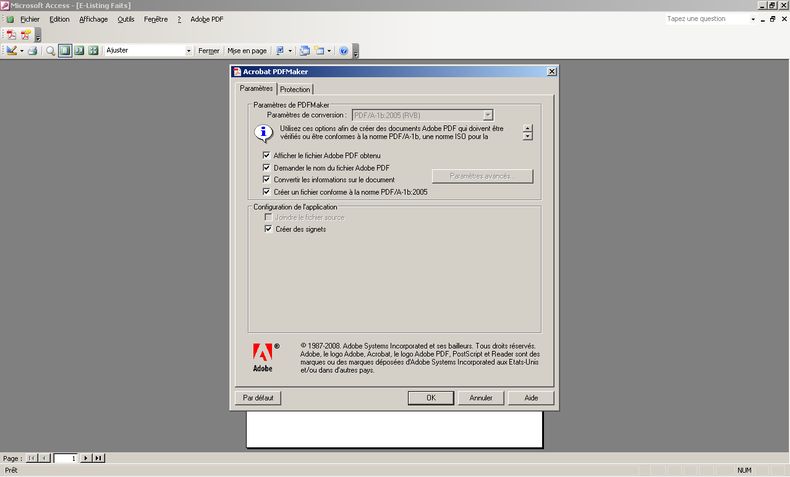
- Open the inventory that you want to convert in Acrobat Access and select Acrobat > Preferences (Fig. 27);
- Check the option Create PDF A compliant file, possibly A-1a format, otherwise the format A-1b [10] and click OK (fig. 28);
- Select Create PDF (fig. 29) ;
- Name the file by “database name-inventory-object of the inventory” and Save.
GIS processing of files
No treatment was necessary for the files from the GIS. The only job was to select among all available files constituting those shapefiles (SHP, SHX, DBF). For each layer represented in the original GIS project, we have checked that we had kept the triptych of corresponding files.
Project documentation: metadata files
Metadata associated with the project
The first metadata file to fill is the one on the project. We downloaded the corresponding model in the guidelines for depositors available on the website of ADS (“Collection-level Metadata Template”)[11]
We completed the various requested metadata: title, description, subject, location, author, date, etc. This file was named “archeodb-metadata-project” and saved as ODT file.
Metadata associated with the different files
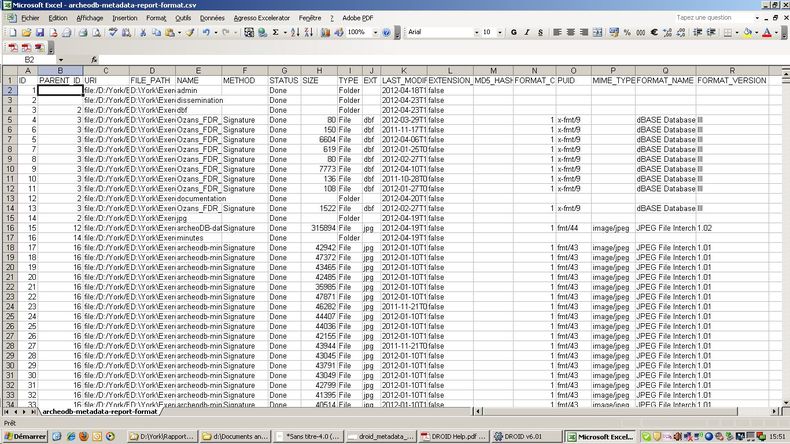
To fill this metadata we chose not to use the template downloadable from the online Guideline for Depositors and have preferred to use the free application DROID[12] that allows automatically generated the technical metadata requested. The result of the analysis performed with this tool has been saved in a file named “archeodb-metadata-files” in CSV file format.
The process of generating such metadata is described below:
- Launch the DROID application that will automatically create an unnamed “profile” and select Add;
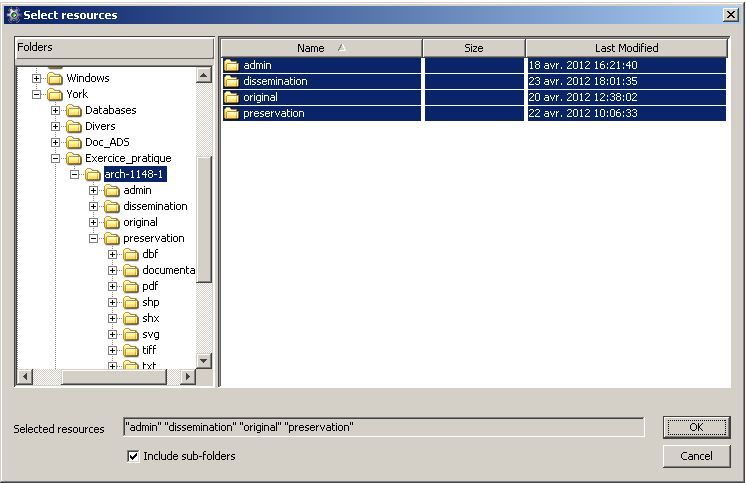
- Select all files in the archive and click OK (Fig. 30);
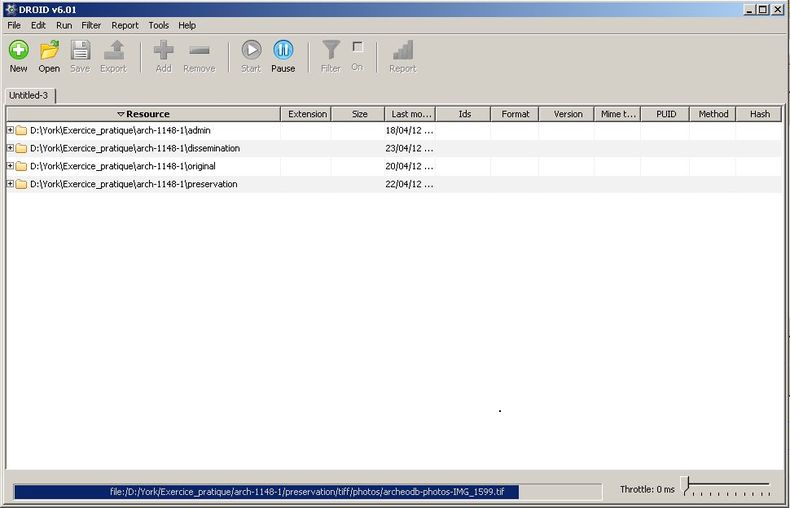
- Select Start to begin the identification of files and wait for the scan to complete (fig. 31);
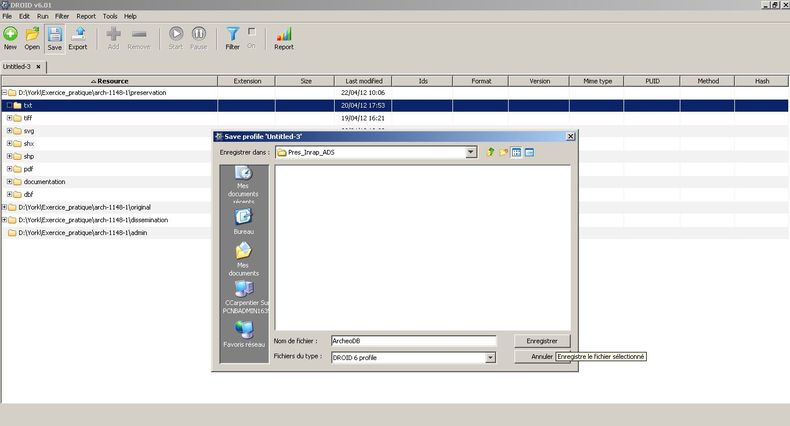
- Select Save to save the content profile and give it the name of the database (Fig. 32);
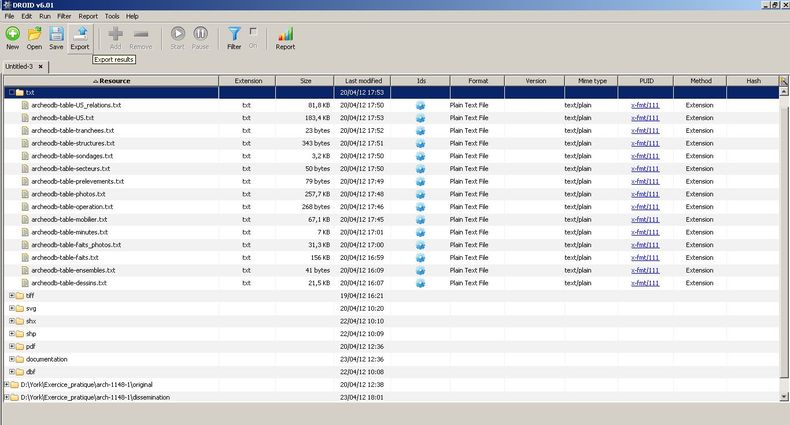
- Check that metadata are displayed and select Export (Fig. 33);
- Check the option “One size per row ID” and click on Export profiles;
- Name the file as follows “database name-metadata-files”, select the CSV file format and click “Save”.
To view the contents of the CSV file in a more readable spreadsheet format, simply apply the following procedure:
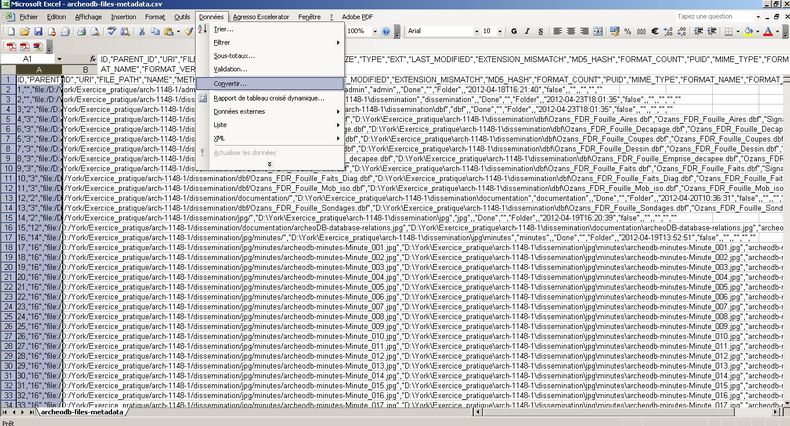
- Open the CSV file in Microsoft Excel, select the first column and select Convert (Fig. 34);
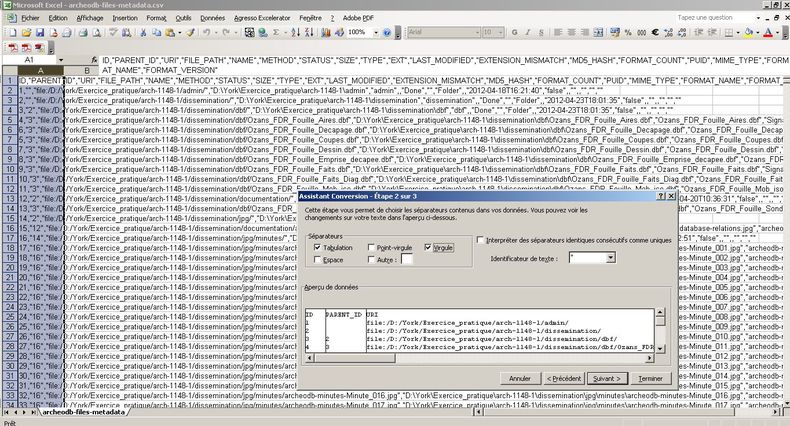
- Select the comma as delimiter and click Next (fig. 35);
- Maintain the default data format “standard column” and click Finish;
- The metadata are presented in a readable format (fig. 36)[13].
Metadata associated with the different documents
For metadata associated with the different types of documents, we used metadata fields described in the Guides to Good Practice[14] . The set of metadata files were saved in ODT file format.
Five metadata files, one for each type of documents, were generated: “archeodb-metadata-database”, “archeodb photo-metadata”, “archeodb-metadata-minutes”, “archeodb-metadata-drawings”et “archeodb-metadata-gis”.
Creation of the component tree files archive[15]
Creation of top-level folder
The file containing the entire archive must be named as follows: “Arch-Id collection-version number of the backup”. So, for our collection ArchéoDB, the folder name of the first level is “arch-1148-1”.
Creation of second-level folders
Folder « admin »
In the frame of our exercise this folder has been left blank. Usually, it includes:
- An export of metadata related to the collection created in the CMS, directed by ADS (DC_metadata.txt) ;
- The scan of the first page of the “license” deposit informed and co-signed by the depositor and ADS (licence.tif).
Folder « original »
This is the folder containing the original collection. This contains a subfolder named first by the “Accession number” generated by the CMS (here “2246”). Inside it, there is still another level of subfolders indicating the date of the deposit (eg “2012-04-18”). Inside the file version of our own repository, there is still a top level folder named by the name of the database (“archeodb”). This gives us the following path to access files: arch-1148-1\original\2446\2012-04-18\archeodb.
In our folder “archeodb”, the original files are organized as follows:
- drawings = model of field survey in Adobe Illustrator;
- sig = all files related to the GIS project;
- minutes = scans of the field minutes in their original format;
- documentation = documentation associated with the database by the author in PDF file format;
- photos = thumbnails of photographs taken on site in their original format[16] ;
- ArcheoDB_v1.3.20.mdb = ArchéoDB database in Microsoft Access format.
Folder « preservation »
This folder of second level consists of the files for conservation and archived on the server administered by ADS. It’s himself composed as many sub-folders that are file extensions. In addition, a dedicated subfolder dedicated for the documentation must accompany the archive. In our case, the 8 following subfolders were created:
- documentation = which can document the database (all the metadata files in ODT file format; relationship schema of the database, screenshots of forms and information given by the author of the database, all in TIFF file format[17]) ;
- dbf, shp et shx = 3 subfolders corresponding to three types of files that compose a shapefile (GIS associated with the database) ;
- pdf = backup of inventories (reports shaped and generated by the database, save to PDF/A 1b);
- svg = backup format for vector files (field survey template);
- tiff = backup format chosen for the preservation of images (photographs, scans of field minutes);
- txt = backup format for database’s tables.
Folder « dissemination »
This folder of second level consists of files archived for the dissemination on the ADS website. It’s himself composed as many sub-folders that are file extensions.
In our case, the 7 following subfolders were created:
- dbf, shp et shx = 3 subfolders corresponding to three types of files that compose a shapefile (GIS associated with the database);
- jpg = backup format chosen for the dissemination of images (photographs, scans of field minutes, relationship schema of the database);
- pdf = backup of inventories (reports shaped and generated by the database, save to PDF/A 1b);
- svg = backup format for vector files (field survey template);
- txt = backup format for database’s tables.
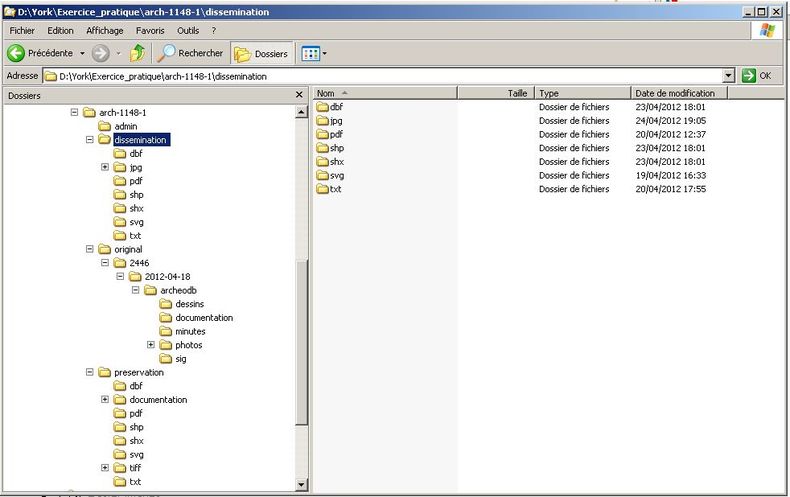
Figure 37: Tree of the collection archive
[1] The recording was originally done on the field using Excel files to the “facts” and “stratigraphic units”.
[3] The delimiter used preferentially by ADS is the comma. This colliding with decimal numbers present in the database (numeric fields are not distinguished as the text fields in quotation marks), it was decided to use that other delimiter also tolerated by ADS. Note that the problem of the use of the comma does not arise for English system because it is the point that acts as a separator in decimal numbers.
[4] The treatment of the original files here and in the next section (processing of associated files), satisfies the constraints of long-term archiving but also of dissemination online. The formats used are those recommended in the various sections of Guides of Good Practice, available online at the following address: Guides to good practice
[5] The captioned or named fields with special characters and accents are not taken into account when exporting to .txt format. About the “captions”, the simplest way is to remove them when they are given (useless information as part of export).
[6] This operation can be performed only by those with Adobe Acrobat Pro. If the applicant does not have this application, the structure ensuring that archiving will do it.
[7] If we had several drawings to treated, we could proceed like for the images, with a simultaneous renaming of files using the application XnView.
[8] http://www.iso.org/iso/fr/home.htm
[9] This method is usable only if Adobe Acrobat Pro (version 8 or higher) is installed on the computer. The conversion of an existing PDF to PDF/A can also be obtained from the application Adobe Acrobat but the procedure is more complicated and less effective. ADS preferably uses and recommends the application PDFTRON for the treatment PDF files: http://www.pdftron.com/.
[10] Adobe Acrobat Pro automatically detects here with what version of PDF / A supports the current file (1a and / or 1b).
[11] ADS Guidelines for Depositors : Instructions for depositors
[12] The application DROID is currently in use by ADS to check and possibly complete the metadata files received. It is freely downloadable at the following address: https://sourceforge.net/projects/droid/
[13] Metadata representing columns and archives files representing the lines (one line per file format).
[14] As part of this exercise we used the metadata described in the sections “Documents and Texts”, “Databases and Spreadsheets”, “Raster Images”, “Vector Images” and “GIS” (Guides to good practice).
[15] The archive of a collection must be organized in a very precise tree and particular attention should be paid on folders and files names that compose it.
[16] The author of the database did not sent us the photos in their original size for size problems, so we treated here the thumbnails (used to display the forms in the database) as if s’ were the original photos to archive.
[17] Documentation describing the database provided by the author in PDF format has been converted in TIFF file format because the original version of the file was not compatible for conversion to PDF/A.

