Planning for archiving
The following is a short discussion of the tasks required to archive a geophysical survey project. Most of the issues are covered in more detail in the previous chapters (see the references and links below) and only some information is repeated here. The particular tasks depend of course on various factors, like the choice of an Archiving Body, the size of the survey project, already existing practice for in-house archiving and many others. However, most of the time, they can be subdivided into four sections that will be used in the subsequent discussion.
- Planning for archiving
- Geophysical survey
- Creating the Archive
- Depositing to an Archiving Body
Planning for archiving
It is far easier to compile the majority of the Archive incrementally while data are being collected and created than trying to find time at the end for pulling everything together. It is hence recommended to think of folder structure, file naming conventions and databases for metadata even before the start of a survey project. In many organisations there will already be an established procedure for many of these issues but it may be worth reviewing them with a view to making archiving easier.
Resources
Most of the tasks involved in creating the Archive are part of a well planned workflow and necessary for creating data backups anyway. Nevertheless it needs to be recognised that archiving has resource implications, most notably in terms of staff time to compile all information, and charges levied by an Archiving Body. Planning for these resources from the outset is therefore essential and may involve applying for grant funding to cover archiving activities and charges, or including archiving in the costing for a commercial contract. In a competitive business environment the challenge is to convince a client that the benefits of archiving outweigh the additional costs. Ultimately, a regulatory requirement for data archiving will be the most persuasive argument. Already, in the U.S. the National Science Foundation requires all grant applications to include a section detailing a ‘data management plan’[1].
Folder Structure
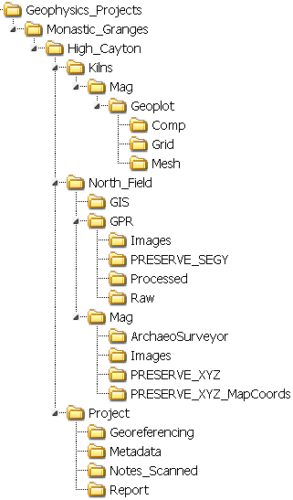
As explained in File description, a hierarchical folder structure is well suited to capture the relationship between different files from a project and reduces the required explanatory notes in the File Description Document. In particular the preservation files can easily be linked to the working files in such a structure. In File description it was suggested to use a template for the hierarchical structure similar to <Project>\<Site>\<Survey_Block>\<Technique>\<Format> (Figure 9). Wherever possible all files created during the project should immediately be stored in this folder structure rather than trying to copy them there at the very end. This also makes it easier to create backup copies while the project is in progress.

The working files used by the processing software are sometimes kept in folders outside of this hierarchical structure (e.g. C:\GEOPLOT\COMP\<sitename>) and a simple DOS batch file can be set up to copy these files into the project’s folder structure (see Code Snippet 1, below), avoiding pitfalls often encountered when copying files with Windows Explorer (e.g. cmd files may be set to be hidden and forgotten). Such a batch file also allows practitioners to populate the folder structure incrementally as the project progresses, thereby facilitating easy file backup from this storage location.
SET Sitename=MyProj (- or whatever is the sitename; it could also be %1)
MKDIR Geoplot
FOR %%d in (Comp, Grid, Mesh) DO MKDIR Geoplot\%%d
FOR %%d in (Comp, Grid, Mesh) DO MKDIR Geoplot\%%d\%Sitename%
FOR %%d in (Comp, Grid, Mesh) DO XCOPY C:\Geoplot\%%d\%Sitename%\*.* .\Geoplot\%%d\%Sitename% /S/Y > NUL
It is good practice to clearly label folders that hold preservation files, for example “Monastic_Granges\High_Cayton\North_Field\Mag\PRESERVE_XYZ”. This way the Archiving Body can easily identify files that need to be migrated.
File naming conventions
It can be difficult to figure out what a particular file ‘is’ just judging by its name. It is therefore most important to be consistent throughout a project and provide some explanation of the chosen naming conventions. For example a three-letter code can be chosen for a site and all relevant folders or even composites be prefixed with it. Alternatively, the folder structure may contain the site specific code and inside the folder the files can have generic names (e.g. mag, res, 1, 2, 3). Also when composites are saved with data improvement and processing applied they can be labelled with a letter indicating the processing (e.g. ‘L’ for low-pass filtering) or the processing steps can be numbered sequentially (e.g. ‘P01’).
It is a good idea to think about this at the start of the project, document it and make the information available to everyone who is working on the project to enhance consistency from the start.
Database
Most organisations already have a database in place to record details of the projects they are undertaking. It may be worth considering enhancing such a database with fields from the Comprehensive Documentation discussed in Comprehensive documentation. It is also conceivable to generate parts of a geophysical survey report directly from the database, either in a tabular form or as a text. Unfortunately, there is as yet no agreed exchange format to transfer the database directly to the Archiving Body’s own database and an export as flat spreadsheet is required for inclusion into the Archive.


