Selection and Retention of Files in Big Data Collections
The Example of the Pergamon Excavation of the DAI Istanbul
This case study was produced as a component of a two week work placement during June 2013 at the ADS funded by the IANUS and ARIADNE projects.
I. Background to Research and Documentation at Pergamon
Pergamon, as the capital of the Attalid dynasty, has been one of the most important and lavishly built cities in the Hellenistic Greek world. During the Roman Empire it was a prosperous city with an estimated population of about 200,000 inhabitants. It is located in the northwest of Turkey in the ancient region of Mysia, about 25km from the sea. Having its historical origin on the top of a 330m high promontory, it successively expanded downwards to the plain of the river Kaikos from the 3rd century BC onwards. Today, the modern city of Bergama at the foot of the hill overlies great parts of the Roman city.
The first modern excavations of the impressive and widespread ruins took place in the 1870s and began with the spectacular discovery of the Great Altar which had been reconstructed at the Pergamon Museum in Berlin. Since then the ancient site has been a place of continuous investigation and research and is nowadays one of the major, long running excavation projects of the German Archaeological Institute (DAI) and its department in Istanbul.
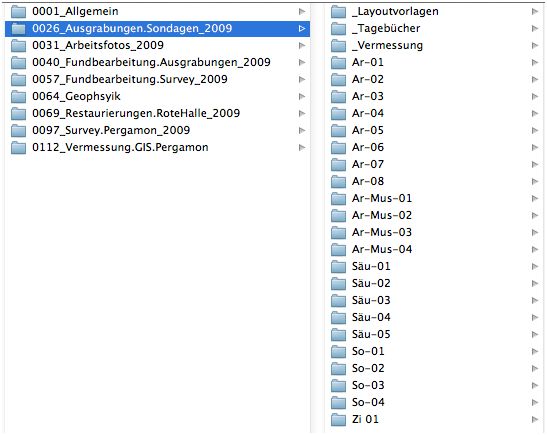
With the last change of the director of the excavations, Prof. Felix Pirson, in 2005 the digital era began at Pergamon. Under his guidance, for the first time at this site IT-related infrastructures and methods, as well as digital documentation and analysis, have been established. A new database for recording trenches, finds, surveys, boreholes, architectural studies, etc. has been developed; internal guidelines for data management, file naming strategies and formats have been established; and a local network with a server for centralised data storage and backup routines has been setup. Over the last eight years the total amount of data relating to Pergamon and its hinterland has totalled c.2 terabytes, distributed over c.150,000 single files. An example of the whole folder structure can be seen in Fig.1.
Although the question of how to archive this ‘virtual pile of information’ was never completely out of sight, only minor steps have been taken in this direction, e.g. systematically converting camera raw images to TIF or DNG format or omitting space characters in files and folder names. As the ADS has already undertaken research projects concerning ‘big data‘ in general, the aim of this case study will be slightly different, it should prove the feasibility of the recommendations in these Guides to a new project conducted by a German institution in a foreign country and whose data will be archived with IANUS, the future German equivalent of the ADS.
II. Focus of the Case Study
Often, one reason for a data collection to become a ‘big data collection’ is the involvement of longer, multi-phased and multi-disciplinary processes of generating, transforming and finalizing data. Not only can the files themselves be big in size, but also in many cases the applied methods require a multiple storing of files each presenting a different, presumably enhanced level of data. For instance, one 3D-data model as a final outcome could have been created from dozens of original source files.
For this case study, the graphic documentation of trenches and sondages at the Pergamon project are a good example because since 2005 they are done in a nearly digital-only, multi-phased way involving different persons, file formats, applications, and stages. The resulting folder structure for one exemplary sondage is shown in Fig.2. A detailed description follows in the next chapter.

When it comes to archiving these processes and files for the future, among others, two questions arise:
- Is it worth keeping all of them – from the earliest raw data to the very final product – and if not, what are the criteria to discard some?
- What are the best means to document the files and their interdependencies in order to make the whole process understandable for – and repeatable by – others?
The ADS gives some advice on these issues in these chapters:
- Guidance on the Selection of Material for Deposit and Archive
- Guide to good practice – Data Selection: Preservation Intervention Points
- Guide to good practice – Close-Range Photogrammetry: Section 2. Data Collection and Documentation
- Guide to good practice – Laser Scanning: Section 1. Introduction to the Laser Scanning Guide
They form the theoretical basis for the following discussion.
III. Trench Documentation Process
This chapter describes the workflow for how the drawings of trenches are produced and what type of files are generated at different stages:
Step 1. Once the plan or profile of a trench has been cleaned and prepared for documentation, several references points are distributed on the ground. Then photos are taken from an elevated point in order to get a view as vertical as possible. The resulting camera raw image is converted as soon as possible into DNG and for practical reasons also into JPG. They are stored in different folders. The next processing steps are based on the JPG-versions of the photos.
| Resulting file format: | DNG / JPG |
| File name: | PE09-So-02_M003.dng (the ‘M’ indicates that it is a ‘Messbild’ (measured image) in contrast to ‘normal’ pictures of the trench). |
| File size: | c.10-17 MB per DNG |
| c.2-5 MB per JPG | |
| Folder: | …/So-02/Fotos/Roh-Bilder/ |
| …/So-02/Fotos/JPEG-Gross/ |

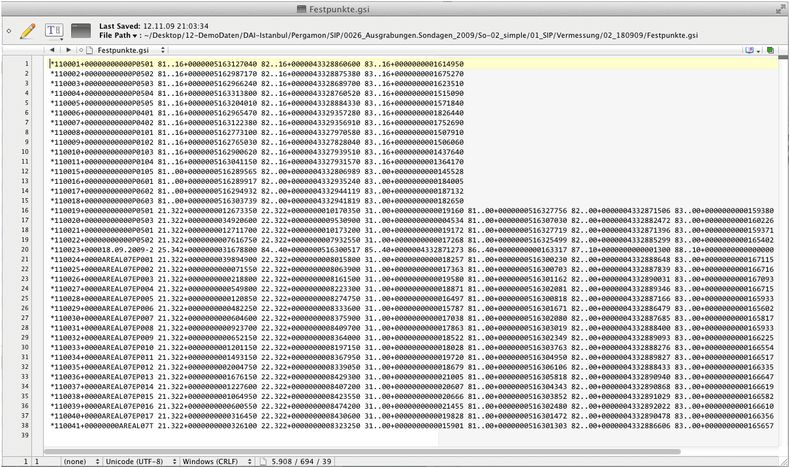
Step 2. The different reference points on the ground are surveyed with a total station or similar equipment.
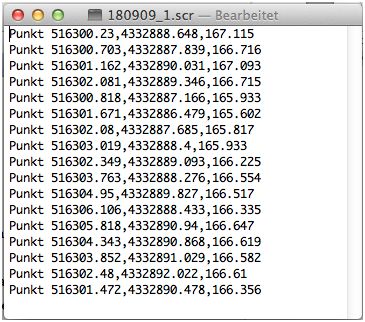
| Resulting file format: | CSV / SCR / ASC / GSI |
| File name: | Festpunkte.asc, Festpunkte.gsi (Coordinates of bench marks used for georeferencing the survey equipment and actual measurements of image reference points). |
| 180909_1.csv, 180909_1.scr (Reduced files only with the needed measurements as point coordinates, formatted in two similar ways). | |
| File size: | each 0.5-2 KB |
| Folder: | …/_Vermessung/So-02/GSI-Dateien/180909/ |
Step 3. With the help of the coordinates the photograph gets georeferenced and rectified using a specialised application (e.g. PhoToPlan add-on for AutoCAD)
| Resulting file format: | PPB / PRK / JPG |
| File name: | PE09-So-02_M003-E.jpg (the ‚-E’ indicates that the file is a ‘entzerrtes’ (rectified) picture) |
| PE09-So-02_M003-E_jpg.ppb, PE09-So-02_M003-E_jpg.prk (they both document the process of georeferencing (automated protocols) and are basically plain text files). | |
| File size: | c.2-5 MB per JPG |
| c.0.5-2 KB per PPB and PRK | |
| Folder: | …/So-02/Fotos/entzerrte Messbilder/ |
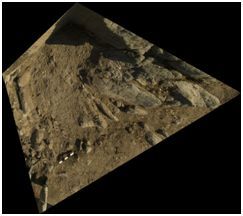


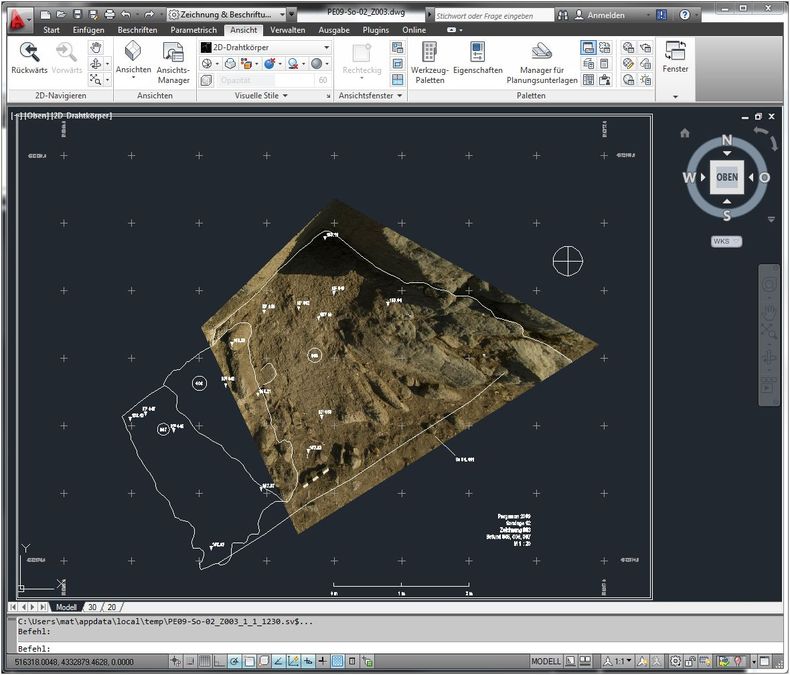
Step 4. One or several rectified, planar and orthogonal images get imported into AutoCAD to draw borders of stratigraphical units, to hatch and label features, to mark the spots of special finds, to add scales and north arrows and further information necessary to understand the final drawing. This usually is a longer process including checks with printouts on site. For the ease of working and consistent relative file references within AutoCAD the necessary JPGs are copied in the special drawing folder.
| Resulting file format: | DWG |
| File name: | PE09-So-02_Z002.dwg (according to the naming rules the ‘Z’ indicates that the file is a ’Zeichnung’ (drawing)). |
| File size: | c.0.5-2 KB per dwg |
| Folder: | …/So-02/Zeichnungen/umgezeichnete Messbilder/ |
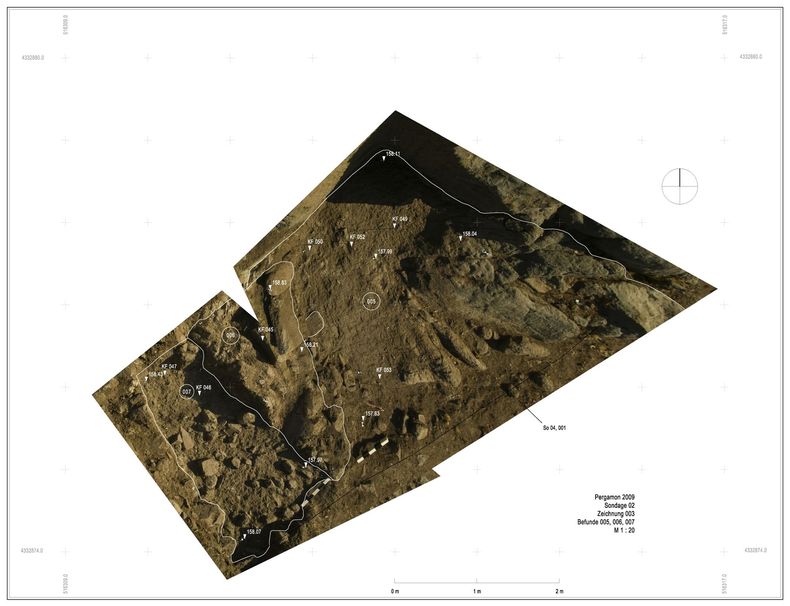
Step 5. The drawing is laid out in AutoCAD and then exported to PDF and JPG for easy viewing and reuse in publications, presentations, printouts, etc. By doing so the intended scale (often 1:20 or 1:50) of the drawing is also preserved.
| Resulting file format: | PDF / JPG |
| File name: | PE09-So-02_Z002.jpg |
| PE09-So-02_Z002.pdf (both files show identical content just in different file formats) | |
| File size: | c.2-5 MB per JPG |
| c.30-100 MB per PDF | |
| Folder: | …/So-02/Zeichnungen/umgezeichnete Messbilder/ |
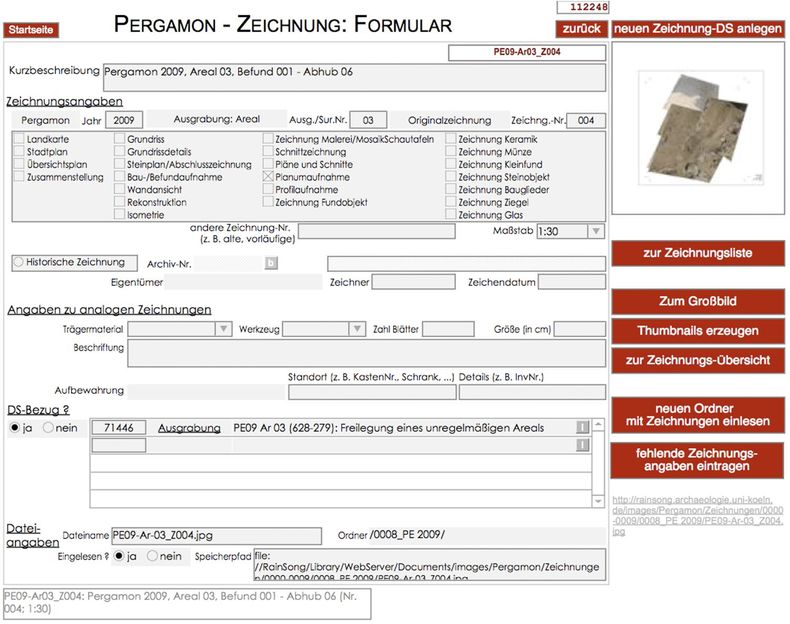
Step 6. At the end it should be mentioned that the drawing is documented in the database system used by the Pergamon project, where it is described with few attributes and related to the archaeological records.
IV. Issues of Selection and Retention
If we summarize the whole process in technical terms in the simplest case – i.e. one drawing is based on just one image – we realize that in total 13 files, including one duplication, are involved. In the example of the screenshot (Fig.12) they need about 60 MB of disk space which gives just a random, but not a representative estimate of size. The total number of file formats used is ten, of which six describe differently structured text files (PPB / PRK / SCR / CSV / ASC / GSI), two raster images (DNG / JPG), one vector graphics (DWG) and one portable and printable file (PDF). The folder structure could be as follows where the order of the different steps is integrated in the second-level folder names.
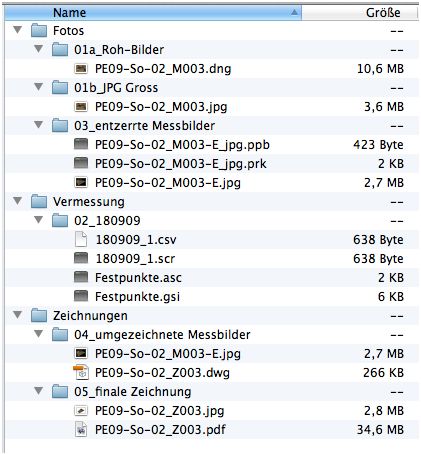
Regarding the file formats, these are not critical because all of them are either already – or can easily be migrated to – long-term preservation formats such as DNG, CSV, DXF and PDF/A. More challenging is the question of which of the files are worth keeping and curating and which can be deleted as they are not useful for an AIP and/or DIP. In the following table this is briefly discussed for each file type separately.
The main criteria are as follows:
- Has a file significantly been changed so that it documents a new ‘intellectual’ status?
- Is a file necessary to understand the next step within a larger process?
- Is a file necessary to reproduce the whole process in future?
- Is a file needed or suitable for practical issues, especially for dissemination and retrieving?
| Step in Process | Files | Keep for AIP | Keep for DIP | Comment |
| 1a | Original images in DNG | X (as DNG) | – | Keep it in the archive as they represent the original, unchanged raw photos; not suitable for dissemination purpose |
| 1b | Original images converted to JPG | – | X (as JPG) | As the images are part of the photographic documentation of a trench (regardless from their use to function as the visuals basis for a drawing) it makes sense to include them as the dissemination version of the original DNG |
| 2 | Measurements of reference points in CSV | – | X (as CSV) | The CSV files contain only the necessary information for the rectification of an image. In principal it can be deduced from the GSI files (documentation required) and is suitable as a dissemination version of these as they are easier to understand. |
| Measurements of reference points in SCR | – | – | The SCR files contain the same information as the CSV files with the difference of using other separators (spaces and commas). There is no need to curate them as all relevant information is deducible from the equivalent CSV files or from the preservation version of this data, i.e. the GSI files. | |
| Measurements of bench marks in ASC | – | – | The ASC files are a reduced version of the GSI files with different separators and less numbers (e.g. without leading zeros). There is no need to curate them as all relevant information is deducible from the equivalent GSI files. | |
| Measurements of bench marks in GSI | X (as TXT) | – | The GSI files contain both the coordinates for referencing the image as well as the coordinates used to position the total station on the ground. As it is the raw data produced by the surveying hardware (i.e. in this case a total station by Leica) and as the measured points are crucial for the transformation of the picture and only with them a re-rectification and re-georeferencing could be undertaken they should be archived and disseminated. For archiving the files should be converted to plain TXT-files. Important for understanding all the numbers of columns, a detailed documentation is necessary explaining how the file should be interpreted, what geodetic reference system was used, and how this can be reduced to the actual required information (e.g. for dissemination or for re-rectification of the image) | |
| 3 | Rectified image in JPG | X (as TIF) | X (as JPG) | The resulting image after a successful rectification process. The answer to the question whether to archive it or not is difficult. On the one hand one could argue that it can be re-created using the original image and the coordinates and thus it does not need archiving. On the other hand, the image manifests a considerable change to the original photo, its generation depends on unknown algorithms of commercial software and the result is essential for the next stage. Therefore the migration into a TIF and the archiving seems worth the effort and it should be kept, together with the protocol PRK (see below). |
| Transformation information in PRK | X (as TXT) | X (as TXT) | These are auto-generated protocols describing the rectification process of an image with the help of a number of measured points. Thus it forms part of the documentation and can be migrated into a plain TXT file. | |
| Transformation information in PPB | – | – | These provide also information about the rectification process but without a technical description of the file-structure which must be provided by the software company (in this case PhoToPlan) the file is of hardly any use. Thus its reuse potential is doubtful and it probably can be dismissed. | |
| 4 | AutoCAD working file in DWG | X (as DXF) | X (as DXF) | The desired plan of a trench combining photographic (raster) and drawing (vector) information. As it is the final product of the process, the file requires full curatorial efforts for archiving and dissemination. |
| Rectified image in JPG | – | – | For ease of use (especially to rely only on relative and not absolute file paths when including external resource in AutoCAD) a rectified JPG image gets copied to the same folder as the DWG. As it is a duplicate of step 3 it can be deleted but in the documentation its relevance for the drawing should clearly be stated. | |
| 5 | Final Drawing as PDF | X (as PDF) | X (as PDF) | The DWG is exported for the ease of presentation and use. As the DWG file itself gets archived and disseminated one could safely delete these files but as they show the targeted layout in a fixed scale they could also be useful for users in this format. Thus in this case it is decided to keep them. For the preservation version it might be necessary to convert the existing PDF into PDF/A files. |
| Final Drawing as JPG | – | – | As the JPGs are equivalent to the PDF-drawings they can be discarded. |
In the end we get the following number of files: six files are archived (DNG, TXT, TIF, DXF, PDF/A) and six are used for the dissemination (JPG, CSV, TXT, DXF, PDF). This still seems to be a high number just for one drawing but ensures that the whole creation process is traceable. All files are available for a later repetition and the future results can be checked against the original results. In order to be able to do this the documentation of the whole process is crucial.
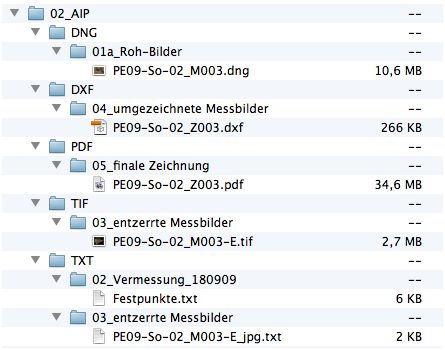
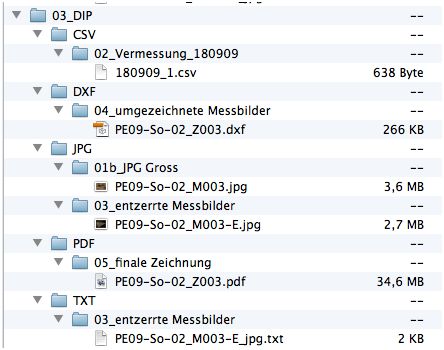
V. Documentation of processes
In the “Section 1. Introduction to the Laser Scanning Guide” of the Guide to good practice there is a comprehensive overview of which metadata and documentation is required for each individual file at each step of a process.
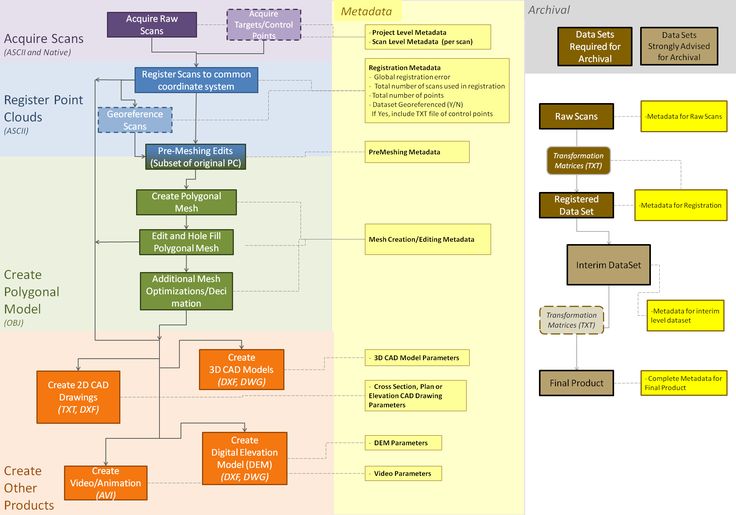
Although the example above refers to the process of laser scanning it can easily be adopted to the process described previously. For example, for the original image the standard attributes for photos (e.g. date, camera type, photographer, etc.) need to be recorded, equally the specifications of the coordinates and the output files of the total station require additional documentation and so on. Parallel to the separate documentation of the individual files and steps, a user also needs a description of the whole process which gives an overview of the general workflow, explains the interdependencies of the different file types, lists the implications for the management of folders and files, and gives information about the decision which files are archived and disseminated and which are not. Categories for a structured documentation should contain at least the following attributes for each single step:
- Sources i.e. input files, file types, folder location
- Output i.e. destination files, file types, folder location
- Further resources i.e. used files, file types, folder location
- Hardware and software
- Selected for AIP / DIP
- Relevant metadata and general description
A documentation of the process could look like this:
| Step in Process | 1 |
| Sources / Folder | no input files |
| Output / Folder | DNG files in …/Fotos/01a_Roh-Bilder; JPG files in …/Fotos/01b_JPG Gross |
| Further resources / Folder | None |
| Hardware | Camera equipment |
| Software | Software on camera to create DNG and JPG |
| Relevant for AIP | Yes, as DNG |
| Relevant for DIP | Yes, as JPG |
| Description | Photos are taken on site with measurement points, view as vertical as possible. |
| Relevant Metadata | List of photos with detailed information. |
| Step in Process | 2.1 |
| Sources / Folder | No input files |
| Output / Folder | GSI files in …/Vermessung/02_{date} |
| Further resources / Folder | None |
| Hardware | Survey equipment |
| Software | Software in Total Station; File Manager for transferring the files from the total station on a PC |
| Relevant for AIP | Yes, as TXT |
| Relevant for DIP | No |
| Description | Measurement points are taken with survey equipment. |
| Relevant Metadata | Detailed information about geodetic parameters in survey documentation folder. |
| Step in Process | 2.2 |
| Sources / Folder | GSI files |
| Output / Folder | ASC, SCR, CSV files in …/Vermessung/02_{date} |
| Further resources / Folder | None |
| Hardware | PC |
| Software | Leica Point Management, TextEditor |
| Relevant for AIP | No |
| Relevant for DIP | Yes, as CSV |
| Description | The Leica-output files GSI get transformed to easier understandable files; coordinates of fixed reference points are deleted, leading numbers extracted, decimals in coordinates marked with a “.”. |
| Relevant Metadata | Metadata for GSI files see step 2.1; for other files no further metadata required. |
| Step in Process | 3 |
| Sources / Folder | JPG files in …/Fotos/01b_JPG Gross |
| Output / Folder | PPB, PRK, JPG files in …/Fotos/03_entzerrte Messbilder |
| Further resources / Folder | CSV files in …/Vermessung/02_{date} |
| Hardware | PC |
| Software | AutoCAD 2007 and Add-On PhoToPlan |
| Relevant for AIP | Yes, as TIF and TXT |
| Relevant for DIP | Yes, as JPG and TXT |
| Description | The original photos are rectified with the help of the coordinates of the measurement points. |
| Relevant Metadata | The used Software PhoToPlan produces an automated protocol about the rectification process (= PRK files). |
| Step in Process | 4 |
| Sources / Folder | JPG files in …/Zeichnungen/ 04_umgezeichnete Messbilder |
| Output / Folder | DWG files in …/Zeichnungen/ 04_umgezeichnete Messbilder |
| Further resources / Folder | None |
| Hardware | PC |
| Software | AutoCAD 2007 |
| Relevant for AIP | Yes, as DXF |
| Relevant for DIP | Yes, as DXF |
| Description | The rectified image (the version in the folder 04_umgezeichnete Messbilder is an identical copy of the version in 03_entzerrte Messbilder) is imported into AutoCAD and functions as the visual basis for the vector-drawing. |
| Relevant Metadata | The structure of the DWG-drawings (styles, layers, layouts, etc.) is described in the drawing documentation folder. |
| Step in Process | 5 |
| Sources / Folder | DWG files in …/Zeichnungen/ 04_umgezeichnete Messbilder |
| Output / Folder | PDF files in JPG files …/Zeichnungen/ 05_finale Zeichnung |
| Further resources / Folder | None |
| Hardware | PC |
| Software | AutoCAD 2007 |
| Relevant for AIP | Yes, as PDF/A |
| Relevant for DIP | Yes, as PDF |
| Description | The final drawing is exported as PDF and JPG to preserve the proper scale and layout. |
| Relevant Metadata | Relevant metadata about the final drawing is recorded in the used database system. |

